I'm guessing the feathering is short enough that the veneer can be overlapped without appearing to not match. Being quite thick you could then sand down the overlap until it's also flush. This would be super hard with a thin veneer and not possible with a backed veneer. Author can chime in with specifics if I'm incorrect! :)
Heck of a turntable plinth. Ply/MDF laminated stack clad in top class wood veneer, beautifully finished. Looks like it's gonna house a 301, the owner chose well who to carry out the work. Looks superb, well done.
Brings back memories of making a 301 plinth in the late 1970’s and veneering it when I was a student. Used a Decca London arm and cartridge. Still got it today. I am proud of mine but yours is better. Like the curved corners. Do you do it commercially. I have a spare garrard 301 if you are interested. Unrestored.
It came out beautifully, but one question: Was that piece too large to put in your vacuum frame press? If you put it in with its large side resting on the table, I think the membrane would have surrounded it and exerted pressure all the way around the piece. In fact, you might even be able to _combine_ the techniques and use the caul you made in conjunction with the press to insure the application of even pressure.
Well I wondered who made those plinths for vintage Garrard 301 / 401 turntables : now I know. My own 401 would look good on one of those , the original rosewood veneered one's showing its age !
The only think I can think of, well with the plexiglass is, he will reuse it, and it last longer than plywood....but that's just me guessing on that.....and maybe he just likes epoxy over anything else. I know in a lot of cases I like it better.... I just want to know how he did his "seems"....
1 - Contact adhesive can dry out over time, plus as he said chocobolo is notoriously difficult to glue. 2 - a plywood version would / could also get stuck to the veneer; veneers can often weep adhesive where the are knots and other breaks - you can see a bit of weeping of the epoxy @ 3:36, there's a section around a knot close to the camera, and a vertical line further along. Yes you could put greaseproof paper in between, but if you get a wrinkle in the paper that can leave a wrinkle in the veneer if you use mass produced thin veneers that most people only have access to - his veneer at 1.8mm thick has probably been produced himself by resawing then putting through a drum sander machine, lastly plywood nowadays is pretty crap, and not uniformly flat overall a lot of the time, the plexiglass will be, because of how it's made. (yes I can see the seams, but the blend really is remarkable)
Excellent work. Questions and maybe hints for people thinking about similar work. People sometimes (almost invariably) don’t understand how much more work is involved when dealing with curves over straight pieces. I was told that a box (or whatever) with curves would take 10 times as long as a box with no curves. And, if you have compound curves, 10 times again. The point was to make sure you costed the work out correctly. I have had people asking how to cut the price of a piece and my first answer is to cut out a curve. Incidentally, have you tried bendy mdf instead of kerf cut plastic? I’ve had reasonable results although have to cover the mdf with cling film to avoid getting that stuck. 1.8mm is a good thickness for fancy veneers. If you try to work knife cut burr veneer of 0.5 or 0.6mm in the same way, you do get issues. If I’m unsure, I wet the veneer with a diluted mix of glycerine and water which softens it up a bit. Last point - use a sharp router bit and not one you have had for years. You can sharpen many router bits back to nearly as good as new state. Last question. Do you feather the second piece of veneer before applying it - totally or just halfway? Or do you apply and then plane to achieve the “scarf”. Using high gloss finish and the reflections from bright light is always going to lessen the view of joins.
all good points. yes, i feather the first part and then overlap the second piece and then feather it in, the feathering is fairly consisent with the curve to give a nice natural transition. i have a follow up to this in the pipeline showing how i futher blend the grain with earth pigment so watch out for that.
@@NewYorkshireWorkshop I look forward to the follow up. I blend using a mixture of wood dyes and waxes - all applies in streaks so that you don’t get abrupt colour changes. I’m sure you appreciate that my points were aimed at people who might be contemplating doing something similar - rather than teaching a grandmother to suck eggs (let’s see how our cousins deal with that saying)
Beautifully made, can you please explain what was the thickness of the veneer and the type of adhesive you have used to press it on the plywood.. Regards.
Great job. From an instructional standpoint you went from glue up to finished product with seamless joints. What happened in between to get those seamless joints!?
Před 4 lety+1
How the heck we cannot see any seams between the veneer sheets? Even if you pay close attention to the grain, that’s not an easy task.
With glue such as Boterm gta, there is no need for a press. The only conditions, then you can not use acrylic components! The sticking time for this radius with this glue would be 30 minutes
Thanks! the epoxy is West Systems, i used it because it works well at room temperature. the finish shown was just a polyurethane barrier coat which is the first stage before applying a high build polyester which is sanded flat then top coated with a high gloss acrylic.
that is just the first stage of the coating system, you can see the entire process in the circuit board table video here- czcams.com/video/TSSuigBqETM/video.html
@@newageoutlaw82 it is 10mm thick. i think it needs to be fairly thick to spread the load but if you used more ratchet straps you could probably go a little bit thinner. depends on the width i guess. btw if you turn on subtitles you will get some more description of what is going.
Clamping a piece of veneer around a corner is simple and easy. Please show how you joined the remaining veneer to the part you just glued on. Sorry, thumbs down for leaving that part out.
First spend hundreds on a piece of 10 mm polycarbonate!..then use your $1000 Festool and guide to cut the slots....but then yeah, sell the piece for a LOT of dough!
Thanks. mine was the 20 mil vinyl type so not the most robust. i have a rubber membrane press for flat and low profile stuff. main reason for this simple curve press was convenience as its really awkward to load into a bag. ill try a 30 mil polyurethane bag next time i need to do something with a deep prifile that the membrane press cant do.


I would love to see your process on invisible joins. I'm beyond baffled on how you do it. Would love a more in depth explination
I'm guessing the feathering is short enough that the veneer can be overlapped without appearing to not match. Being quite thick you could then sand down the overlap until it's also flush. This would be super hard with a thin veneer and not possible with a backed veneer.
Author can chime in with specifics if I'm incorrect! :)
Wow 😯 beautiful joins, amazing craftsmanship! I am in awe of your work!! ❤😊❤😊
Wonderful combination of the design of the project with the almost surreal grain of cocobolo!
That finished piece looks superb! As a novice woodworker myself, what I've learnt here is, clamp the thing up totally.
yes, since the veneer is thin and quite flexible. clamping pressure isnt so important, just that as much area is clamped as possible.
What's the next stage beyond simply clever? Your invisible joints had me bluffed. VERY nice work.
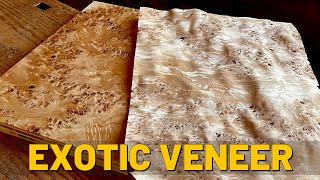
What an exquisite venner, the pattern of that wood is very exotic.
God made the wood.
Sheer genius. The veneer looks incredible and that shine is amazing. Brilliant video mate
Splendid the joints are perfect we do not see the assemblies ... Bravo, very good job ... !!
Proper quality, blown away by your talents
Heck of a turntable plinth. Ply/MDF laminated stack clad in top class wood veneer, beautifully finished. Looks like it's gonna house a 301, the owner chose well who to carry out the work. Looks superb, well done.
It looks like solid Beech and Birch ply, no mdf in there.
Absolutely gorgeous!
Brings back memories of making a 301 plinth in the late 1970’s and veneering it when I was a student. Used a Decca London arm and cartridge. Still got it today. I am proud of mine but yours is better. Like the curved corners. Do you do it commercially. I have a spare garrard 301 if you are interested. Unrestored.
Fantastic looking plinth, top workmanship
that's excellent work that is
respect from a norwegian furniture maker
one word.......... Stunning 😍
Nice finish well done 👍
This guy makes some awesome things
Absolutely beautiful! I cant see the seem!
No one can! :)
That is by far the best looking toilet seat I have ever seen…
Beautiful. Well done!
Lovely 301 plinth 👍
Love the floating Tonearm idea!
It came out beautifully, but one question: Was that piece too large to put in your vacuum frame press? If you put it in with its large side resting on the table, I think the membrane would have surrounded it and exerted pressure all the way around the piece. In fact, you might even be able to _combine_ the techniques and use the caul you made in conjunction with the press to insure the application of even pressure.
Stunning.
- Cathy (&, accidentally, Steve), Ottawa/Bytown
Great channel. Love your work!
Impressive work!
Well I wondered who made those plinths for vintage Garrard 301 / 401 turntables : now I know. My own 401 would look good on one of those , the original rosewood veneered one's showing its age !
yes its me, i make them all :)
Wow, very impressive.
just beautiful love it
That’s beautiful, however I have a couple questions. One, why use epoxy vs contact adhesive? 2. Why use plexiglass instead of a scrap plywood?
Scott Rogers
I had the very same questions. Hopefully, we will get an answer.
The only think I can think of, well with the plexiglass is, he will reuse it, and it last longer than plywood....but that's just me guessing on that.....and maybe he just likes epoxy over anything else. I know in a lot of cases I like it better....
I just want to know how he did his "seems"....
1 - Contact adhesive can dry out over time, plus as he said chocobolo is notoriously difficult to glue. 2 - a plywood version would / could also get stuck to the veneer; veneers can often weep adhesive where the are knots and other breaks - you can see a bit of weeping of the epoxy @ 3:36, there's a section around a knot close to the camera, and a vertical line further along. Yes you could put greaseproof paper in between, but if you get a wrinkle in the paper that can leave a wrinkle in the veneer if you use mass produced thin veneers that most people only have access to - his veneer at 1.8mm thick has probably been produced himself by resawing then putting through a drum sander machine, lastly plywood nowadays is pretty crap, and not uniformly flat overall a lot of the time, the plexiglass will be, because of how it's made. (yes I can see the seams, but the blend really is remarkable)
Excellent work. Questions and maybe hints for people thinking about similar work.
People sometimes (almost invariably) don’t understand how much more work is involved when dealing with curves over straight pieces. I was told that a box (or whatever) with curves would take 10 times as long as a box with no curves. And, if you have compound curves, 10 times again. The point was to make sure you costed the work out correctly. I have had people asking how to cut the price of a piece and my first answer is to cut out a curve.
Incidentally, have you tried bendy mdf instead of kerf cut plastic? I’ve had reasonable results although have to cover the mdf with cling film to avoid getting that stuck.
1.8mm is a good thickness for fancy veneers. If you try to work knife cut burr veneer of 0.5 or 0.6mm in the same way, you do get issues. If I’m unsure, I wet the veneer with a diluted mix of glycerine and water which softens it up a bit. Last point - use a sharp router bit and not one you have had for years. You can sharpen many router bits back to nearly as good as new state.
Last question. Do you feather the second piece of veneer before applying it - totally or just halfway? Or do you apply and then plane to achieve the “scarf”. Using high gloss finish and the reflections from bright light is always going to lessen the view of joins.
all good points. yes, i feather the first part and then overlap the second piece and then feather it in, the feathering is fairly consisent with the curve to give a nice natural transition.
i have a follow up to this in the pipeline showing how i futher blend the grain with earth pigment so watch out for that.
@@NewYorkshireWorkshop I look forward to the follow up. I blend using a mixture of wood dyes and waxes - all applies in streaks so that you don’t get abrupt colour changes. I’m sure you appreciate that my points were aimed at people who might be contemplating doing something similar - rather than teaching a grandmother to suck eggs (let’s see how our cousins deal with that saying)
How did you connect the other parts of the sidewall veneer, and without joints? Is this a vinyl record player?
this is very inspiring? where do you get your veneer materials from?
Which wood vaneer is that, absolutely gorgeous 😍
I actually preferred the non-veneered look!
Fantastic!
Beautifully made, can you please explain what was the thickness of the veneer and the type of adhesive you have used to press it on the plywood.. Regards.
1.8mm and Epoxy resin
Great job. From an instructional standpoint you went from glue up to finished product with seamless joints. What happened in between to get those seamless joints!?
How the heck we cannot see any seams between the veneer sheets?
Even if you pay close attention to the grain, that’s not an easy task.
What kind of veneer is that? Very beautiful!
Very cool
spectacular
Bravo.
wow, this is luxury job
Super job
With glue such as Boterm gta, there is no need for a press. The only conditions, then you can not use acrylic components! The sticking time for this radius with this glue would be 30 minutes
im a carpenter not a cobbler.
Beautiful project! What type epoxy was used? What is the finish on the piece?
Thanks! the epoxy is West Systems, i used it because it works well at room temperature. the finish shown was just a polyurethane barrier coat which is the first stage before applying a high build polyester which is sanded flat then top coated with a high gloss acrylic.
can this be done over top of old laminate countertops?
Garrard 301 Plinth
Was that a new plinth for a Garrard 301?
Missed out a whole load of stuff before the reveal
Good ol safety squint
Wow
Please tell me name of type pain?
Nice work.
What type of glue?
is West epoxy
Hi how did you achieve such a high gloss finish ?
that is just the first stage of the coating system, you can see the entire process in the circuit board table video here- czcams.com/video/TSSuigBqETM/video.html
great
Công việc tuyệt vời, tôi muốn mua từ Nhật Bản
That got 360ied without me getting how. :)
Very good!Turntable for Garrard 301 ?
correct!
COOL
Beautiful...
❤❤❤
Нет информации! Полное равно!
What glue are you using please?
it was west epoxy
e molto piu semplice con un compensato flessibile
Garrard plinth...
Is that acrylic sheet that you used?
hi. no it is polycarbonate. acrylic wouldnt work as it is too brittle, no matter how thin you cut the kerfs it would just break.
What’s the thickness that you use on the polycarbonate?
@@newageoutlaw82 it is 10mm thick. i think it needs to be fairly thick to spread the load but if you used more ratchet straps you could probably go a little bit thinner. depends on the width i guess.
btw if you turn on subtitles you will get some more description of what is going.
Круто! Даже стыка не видно! Приходи к нам работать , за тридцатку!:)
Two words: Vacuum Bag...
Красиво!
Супер!
Clamping a piece of veneer around a corner is simple and easy. Please show how you joined the remaining veneer to the part you just glued on. Sorry, thumbs down for leaving that part out.
First spend hundreds on a piece of 10 mm polycarbonate!..then use your $1000 Festool and guide to cut the slots....but then yeah, sell the piece for a LOT of dough!
and then make pizza!
@@NewYorkshireWorkshop good answer he sounded JEALOUS
dust cocobolo is toxic be careful :)
*****
use a 30 mil bag no worry bout poking holes then
Thanks. mine was the 20 mil vinyl type so not the most robust. i have a rubber membrane press for flat and low profile stuff. main reason for this simple curve press was convenience as its really awkward to load into a bag. ill try a 30 mil polyurethane bag next time i need to do something with a deep prifile that the membrane press cant do.
omg
I purchased some excellent plans from the Woodprix website.
Wow