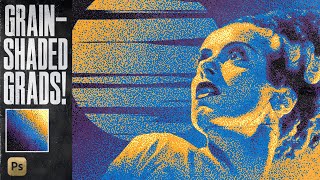
CREATE A SICK POSTER IN ILLUSTRATOR & PHOTOSHOP

Vložit
- čas přidán 6. 06. 2022
- In this tutorial, we will learn how to make a retro-futuristic poster design in illustrator and photoshop.
.........
ASSETS USED IN THIS TUTORIAL:
Astral Fruits Vector Pack:
kozmik.gumroad.com/l/fruits
Wire Figures Vector Pack:
kozmik.gumroad.com/l/wirefigures
Holyscans Texture Pack:
kozmik.gumroad.com/l/holyscans
.............
FOLLOW KOZMIK ON INSTAGRAM
/ kozmik.design


You weren't wrong , that IS SICK!!! Using the blur and threshold options with crystallize to create "ink bleed" is just chef's kiss. Thanks for sharing your techniques and inspiration. Great work, love it.
Thank you! Really Appreciate it 🙏🏼🙏🏼🙏🏼
ive been using that ink bleed effect as well, its amazing, TextureLabs has a video on it
@@Kozmikdesign I'm totally stealing your technique lmao, it's genius
This video is kind of hard for me to follow, could you put a timestamp or explain how the technique is done?
@@picklefortheknowingones They’ve used a blur filter along with another filter called threshold which can define the edges of a layer, because of the previously applied blur it causes the blurred edges to get sharper and creates an “ink bleed” effect and the crystallise filter then helps clear the noise up.
Super neat to see your creative process!! The poster turned out great! I loved all the wireframe art and crystallization
Just stumbled upon this video and it's an absolutely sick poster, love the way you designed it! Just bought a couple of your packs!
Thanks, that means a lot 🙏🏼🙏🏼
where can i buy it?
I'd love to see a tutorial on how to make wire frame people/bodies like you use here! I've wanted to make art like that for ages but I can't find any tutorials and don't really know where to start
I'll do a tutorial on it soon!
Yes Please !! Tutorial on how to make wireframe people !!
@@Kozmikdesign please, do it!
So excited for this one! Is it online already?
Hey I know this is old, but I've done a similar effect with blender by just taking a pretty high poly mesh and using the mesh shader!
this music is healing....and i love your work!
This looks TOO GOOD. Best thing I have laid my eye upon today.
Thank you 🙏🏼🙏🏼
Awesome stuff, looks like it could be an electronic or industrial album cover
Thank you🙏🏼🙏🏼, yeaah it could be ;))
I have just started at art school. I have had one Ai class. Then i watched this. Yeeah. Never gonna happen. But i surely will try!
This is awesome. Love it. ❤
this was actually really fun! felt like I didnt want to skip to the end because i wanted to make sure I did the whole thing with the tutorial. thank you for this
Great job!
Love everything about this poster man, I'm definitely adding that threshold/crystalize effect to my workflow. Tiny critique - would've been neat to see you change that iris color to orange
mad talent, i live for these videos. keep them coming i beg you
Thanks bro🙏🏼🙏🏼 getting back soon
This is awesome! Keep up the great work and thanks for sharing the process!
Thank you, I'll post more soon 🙏🏼🙏🏼
This is cool! I think this would be very useful for cover art
Dude man, diggin the retro vibes. Always been a fan of the grids, wire frames and retro styles. I'll give your tutorial a watch this weekend as I can't design for myself when I'm supposed to be designing for clients at work lol. I was looking into the links cause I'm lovin the beats you had playin in the background. Any chance you might clue me in who it was or post up the link????
i dont even do designing but i love your videos. so pleasant to the eye
So kind of you!! I hope you give it a try someday :)
Nice video and nice poster! You seriously have a lot of potential my friend! I wish you great amounts of happiness and success! :)
Love the fonts you use
love your style please keep the content coming
Definitely bro, thank you 🙏🏼🙏🏼
Awesome, I just started learning Illustrator and it's extremely intuitive compared to the other software I use like photoshop etc. I recreated some of your icons and learnt a lot after buying your astral icon pack and comparing them to mine lol.
Man, it's actually insane how much I learned from creating along, thanks so much.
Blur, Threshold, Crystalize.
That's handy. Thanks man.
That my fav technique to simulate type print effect, glad you found it useful
looks like a loathe album. love it.
I was confused as to why you were putting the blurs and thresholds onto everything until you finally put that texture on and I audibly went "oh fuck yes". Makes it look like it was printed onto felt or high cotton with the ink bleed, looks sick as hell!
I went and downloaded your Wire Figure Vector Pack, such good quality, Thanks mate!
Glad you like them!
thanks for posting these i love seeing the process. ran across your stuff on instagram
Thank you, enjoy the videos!
Wow thx for that free knowledge that will be useful❤
this is sick!! incredible work.
Thanks 🙏🏼🙏🏼🙏🏼
dude i love your vids
The text effect and font at 14:00 remind me so much of the Twenty One Pilots Trench Album cover text
Bro this looks amazing. Recon you could upload a quick tutorial on how to do the wire frame of either people or hands etc
cool video its really amazing!
Dammnnn, this is masterpiece
The attention to detail is so outstanding dude omfg
Thaaaaanks 🙏🏼🙏🏼
@@Kozmikdesign yurh 👍
This poster is actually SICK!! but in the process you were moving too fast for me but thank you for teaching us❤
Nice work bro, I will buy all your stuff to make my own artwork. Thank for inspiring me
Thanks bro!
That is so sick, thank you for your tutorial
Happy to help!
No experience in photoshop, no desire to use it, no idea how I even ended up here. But sick is an understatement. That looks dope asf.
Much appreciated :)
awesome video!! would it be possible to add the keyboard shortcuts in the video that you use through the designing process?
thank you very much for this guide!
you made it look easy xD i cant belive you did it in a hour or two...
it took me like 12 hours xDD
i would love to share my result with you! if its possible ofcourse..
anyways thank you!
I resonate with the choice of words ♻️ nice 123 btw
sick!
this is some real shit definitely got me working on my own poster rn for a class 💯
Happy to hear this 👍
You sir are phenomenal at Design.
Thank you 🙏🏼🙏🏼
Excellent work!
Many thanks!
masterful
bout damn time a learn something dope
Amazing. Thank you!
Glad you liked it!
i just watch until the end and i dont really know about what ur doing. but that's look soo freaking sickk
I am very confused on the way you use the grid
Just aim for asymmetrical compositions.
@@azammohammed9567how did he turn the grids into the green color
Yep, it seems kind of random
Not necessary to use it ...
@@Moodboard39lol it’s very necessary
Very dope
Thats sick i would love this on a tshirt
Thanks
i'm getting a serious David Cronenberg vibe from this!
GREAT!!
i recognise a barber beats album cover when i see it hahahah nice work!
Hey m8, been loving these tutorials. They're allowing me to create designs I've always wanted to make but couldn't figure out how. One thing that's confusing me is the threshold, for some reason it's turning my blacks grey whenever I use it. Any advice here? Thanks.
Make sure your project is set to RGB color palette instead of CMYK, fixed that issue for me right away
that was dope!!
Thank you :) :)
omg this is sick! im watching your video from argentina, i'd really love it
Awesome! Thank you!
soo cool, this is art
Thanks you :) :)
I really love the vibe and elements you put into your design.
may i get them for my designs?
Ofc you can!
thank you very much sir
So good!
Thanks 🙏
@kozmikdesign
What are you pressing to give a black background to the individual layers before you add the Gaussian Blur/Threshold/Crystallize? I know you can't add that to the individual layers unless there is a contrasted background, so I am wondering how you did it.
Thanks for the help! Awesome video!
nice work
This is not sick it asolutley ILL!!! this is epic!
Likee this one a lot
the hands in this clip, how are those made?
is there a way to make your own from a photo or is it made in some kind of 3d program?
anyways great poster, love the art style
this is so amazing bro
Thanks 🙏🏼🙏🏼
Indeed, nice
that's a great tutorial, did you design the assets yourself?
Sick!
Thank you 🙏🏼🙏🏼
omg, I want this desing in my tshirt
OMG THANKS !!!!!
what dimensions did you use to create your artboard in AI and PS ?
mad talent
Thank you 🙏🏼🙏🏼
dope
Can you explain why did you add 0.5 point blur at the end? Doesn't that make the small text blurry?
video informativo grazie
I don't know anything about photoshop and illustrator but this is so fucking awesome!!! This makes me wanna learn how to create art
Thanks 🙏🏼 I'm glad that you feel inspired to create 🔥🔥
I am curious, how did you manage to illustrate the hands wireframe? The poster is sick indeed.
Hey nice tutorial, what did you do at 11:25 to separate the layers?
Ive always loved this design genre. Wha is it called?
Loved this stuff! I wanted to learn how to work in this style for a time. Is the texture you use included in the pack you offer? I would buy it just for that lol
Thanks a lot! Yup all the textures come with Holyscans texture pack
This shit fire bro, I’m recreating this edit for my friend and putting my own spin to this
Looks like a MacroBlank/Monodrone album cover , very cool stuff
true this just HAS to be a barberbeats cover lmao
Thank you
hi bro, can you show how to make animated posters? It would be interesting to see)
How do you make the background black in multiple layers but the text on the layers below are still visible?
Honest title, poster is sick
How do you display those grid lines and what’s the standard size you use for your art board?
Make a rectangle the size of your artboard. Object > Path > Split Into Grid. If you have an artboard that is an even number, like 1200 x 1500, it's much easier to split the grid perfectly in multiples of 12 vertically and 15 horizontally in this case. The gutters can be up to your discretion but keep in mind it will push your grid outside the artboard so you will just have to resize. Hope this helps!
@@rileylevine7631 how did he make the grids colorful??
@@redwanhossain5181 view/guides/make guide (ctrl+5)
Great video how did you bring everything from illustrator and make it its own layer in Photoshop 🔥🔥🔥🔥stuff
Thanks 🙏🏼 Ctrl+a to select everything in illustrator then past in ps
thank so muck for your sharing, how can i look the grind you can share ?
Really cool design! I have one question: how do you change the colors at 12:12?
press X man
i enjoyed the video and being able to see the process, but the two left boxes for the images, was the bottom one supposed to be slightly slimmer on the left side my intention?
Hi, I appreciate your tutorials. Just had a question which stumped me as I was following. When you copy pasted your stuff in Illustrator to Photoshop, what exactly did you do? Because when I copy-paste it does the whole image instead of the paths. Also what did you do to invert the background to black in Photoshop and the lines to white? I'm still fairly new to both programs so any help would be appreciated. Thank you! I have purchased your stuff.
Hey, Lydia much thanks for watching and leaving a comment 🙏🏼 For copying from Ai just select all the elements you want to move and press Ctrl + c and then Ctrl+v in Photoshop, for inverting in Photoshop, select an image or any other element and press Ctrl + i . Hope this helps!
@@Kozmikdesign holy shit thank you so much I’ve been stuck on the Ctrl-I for so long and finally found this comment thank you for commenting this and making an amazing tutorial hahaha🙏🏽🙏🏽🙏🏽
Omg thank you ive been going back and forward like crazy trying to figure out what he did at that 12min mark turns out he pasted it to a different Program i thought i was going crazy love you man !
kozmik how did you design the wireframe hands? tutorial please :D
genius
Thaaaaanks! :)
🔥🔥🔥
Thanks 🔥🔥
Love the asset packs and the design tutorial, thanks for the vid. Curious if I purchase them through the gumroad page, can I use them commercially for game development projects?
Yes you can! Thanks :)
Sick design and technique! I would just suggest that you make it non-destructive by using layer masks instead of deleting parts of the image and converting to smart layers instead of rasterizing to apply filters and effects. But a really great job overall!
Thanks for the tip! Appreciate it :)
wow
Absolutely loved the work... But i wanted to ask a query regarding what is the purpose of these designs, they are fantastic to look but is there any concept used behind these... like usage of that small elements and dots and circles... ig that's a logical question 😅
Bro thanks! Sometimes there is no concept. Small elements are just for added visual interest.
Nice one bro! How did you know what type of grid sizes you wanted at the start of this?
First of all, incredible work, 10 out of 10, but I have a question, I have seen, that in your Instagram post, the image of the eye does not look like in the video, how can I achieve that effect?