Add 3d Objects to Photos with Blender!

Vložit
- čas přidán 25. 07. 2024
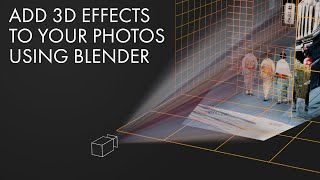
- In this tutorial I demonstrate a simple technique to integrate 3d models into any image! Among other things you'll learn how to extract the camera perspective from the photo and how to get realistic shadows.
Get my 3D-Models for Free: www.blenderkit.com/r/nik/?red...
Blender VFX course: gum.co/vfx-course
Image & HDRi: hdrihaven.com/hdri/?h=venetia...
fspy & add-on: fspy.io/
Character model: www.mixamo.com/#/
Blender Daily Patreon: / blenderdailytips
Blender Daily Gumroad: gumroad.com/blenderdaily
Free Resources: blenderdaily.xyz/free
Video Instructor: Nik Kottmann
Instagram: / nikkottmann
Blender Daily on Social Media
Instagram: / blender.daily
Twitter: / blenderdaily
Facebook: / blender.daily
Website: blenderdaily.xyz/


💥Get my new Blender VFX course on Gumroad and learn how to do the same thing, but with videos instead of images!💥
gum.co/vfx-course
Amazing. The whole progra, Blender, you guys especially that do tutorials. Would be lost. Blender Foundation tutorials ok, Docs, Not so OK. First month was painful. Almost broke my spirit.
You can upwrap the shadow catcher plane using "Project from View" option, and use the same image in the Bump to help natural jitterness in the shadow.
@Kaiser Nascitur 🤜🤛
You re so good 😊😊😊😊😊😊😊😊😊😊😊😊😅😝😅😅😝😝😅😝😅😝😅😅😝😝😅😝😅😅😝😝😅😝😅😅😝😝😅😝😅😅😝😝😅😝😅😅😝😝 to match the camera perspective and here you also need to download the blender atom so we can then import this into blender I already have FBI installed so let me just open this up and then just drag and drop the image we just downloaded in here so we can match the camera perspective and here we have two access that we can adjust the green one is the y-axis and the red one is the x-axis and we need to align this with with parallel lines in the image so let's first take the y-axis I bring this to this corner of the wall you can hold down shift to make precise adjustments and open up this magnifying glass just hold down shift thanks you can also turn off dim image see it a bit better than the other y-axis needs to be parallelized so I can take this one and I just want to play store so I'm going to go with this corner yes yes yes yes yes what is a call so let's change this to the set access now you can see the set access is pointing downwards so just switch this to the minus set up byeeeeeeeeeeeeee byeeeeeeeeeeeeee
What does really mean, updated video perhaps?
Before turning background to transparent you can rotate the HDRI to match the lighting as you have HDRI with backplate already.
great share. I like the shadow up the wall. that definitely sells the realism.
Incredible stuff... With 3D being discontinued from Photoshop, Blender is really drawing me in. Great tutorial - thanks and keep em coming!
Man, this tutorial was fantastic! I worked through the tutorial, using a little animation that I had hacked up. Painless! Nice touch showing us about the colour curve node as well!
Shadow catchers also provide bounce lighting so it helps to shade it the same color as the pic
Very well and clearly explained. Thank you!
Honestly the simplest way to do this and also by far the clearest tutorial on the internet! Thank you for doing this!
hey Matt, very happy to hear that!
Very nicely done and very helpful. Always learn something new from your videos!
unbelievable, awesome tutorial. Clear voice, excellent speed etc
Really useful as usual, thanks Nick !
The result is stunning and you teach very well. Thanks!
very happy to hear that!
Great tutorial. I was thinking of doing something like that and your video came just when I needed it!
great!
This fspy addon is a gem. Thank you for sharing the info with us.
yeah, I absolutely love it!
So good and simple!! Thank u
this video was sooo great!!
thank you for this step by step thorough tutorial - excellent work
Very nice! Thank you!
Great video from A to Z with min time spent. Thank you
You`re amazing, greate tutorial! Thanks
Thanks for the tutorial. I tried matching the FOV on a painting that I'm trying to replicate but it wasn't so easy :)
Thank you so much!!! GREAT VIDEO!!!👋👋👋
thank you for this fantastic tutorial
glad you like it!
one the best tutorial!
Thank you for the great video.
Great video, thanks
Geez I would love to master this so much
Thank you for this tutorial. Wonder if you teach us aplied at interior scene.
Subscribed, thank you!
excellent tutorial
Thank you so much good man!
I LIKE YOUR VIDEO MAN keep it up
Very well explained.
thanks!
чувак, это прекрасно! спасибо тебе большое!!!
Really good tu tutorial
Harika süper 👍 gerçekten çok güzel anlatım tam anlamıyla muhteşem. Teşekkürler
wow thank you really beneficial
Thanks bro !! :)
this was a valuable content.
Thank`s my bro!
bedankt!
amazing tuto ! Can we change the softness of the shadow ? Cause in your tuto your shadow is really sharp and not as dark as the other shadows in the scene.
Thank you very much !!^^
thanks a lot!
great!
oh yes this is gonna be good
Thank you for this, really helpful :)
May I please ask you...will this work if using TEXT?
I want to learn how to add TEXT to a photo and cast shadows etc, so it looks like part of the original photo?
NIce! Thank you.
you’re welcome Aguinaldo!
Thanks for your helpful video. Could you please let me know how to align the image and 3D point cloud? for example, I have an image building facade and 3D point cloud. I do not know how to align them together?
Thank you
Very nice my friend
Nice tutorial
thank you!
Great! Thank you. It would be also useful to show how to use different additional filters to make it more realistic (color match, brightness match, blur), by the way, I figure it out myself :)
Hi, great tutorial but i would like to know if it is possible to get a reflection on the plane instead of a shadow, still transparent from an object with an emission material above the plane.
Yes the new shadow catcher in 3.0 do reflections.
Hey, Blender Daily, a great tutorial, but since the update from HDRI Haven to Polyhaven i'm struggling to find an option to download the JPG file of a selected HDR. Since this is a crucial step of your tutorial - could you comment something about that ? I can only find the HDR, EXR options :(
You can import the HDR file in the environment texture instead of JPG. HDR is better here.
excelent
Super interesting thanks.
I have a question: if there was an element of the photo that you wanted to look like it was in front of the model (for example a cat in the street that you want to appear as if it was in front of the model), is it possible to place an Blender object in front of the model that you can then hide to show only the photo?
Hope you understand what I mean.
Possible, in several ways, but most may seem overly complex if you're a beginner. I think it normally involves modeling the blocked part to be brought forward, the "cat," for instance, in at least 2d plane form, (if a still image is your output), and then figuring out how to use the model as a perfectly-matched "mask" over the other obscuring model -- the robot model, in this case. Turning off the mask's object's camera rays, or otherwise making it "alpha," or invisible somehow in compositing. A few other issues might have to be solved, but this should be a start.
Masking out a second photo (of the cat) placed in front, to match in Blender, Photoshop or manually "rotoscoping" in video editing software, is another less efficient, time-consuming way if it's a video.
I think this is sometimes done in videos to morph a person into a "werecat," for instance, and they usually start with a matching model of the actor, (as well as the ending werecat) to be morphed... (If this workflow is way off, please someone correct me...)
Great tutorial, thank you for the many contributions.
However, I have a question, the shadows projected by HDRI are very clear compared to the shadows of the background photo. Is it possible to make them softer? I thank you in advance. Good work
Woho 🤗 en schwizer CZcams blenderer 👍🏼
haha jaa:))
How do you update the version to the latest? I am using blender 2.93 and it wont let me post the URL from any of the sites you mentioned.
nice tutorial ! thank you.... it would be interesting in a future tutorial to make the camera moving (camera projection) as well in the space to crate a small movie clip
that's exactly what I demonstrate in my course on gumroad:) gum.co/vfx-course
nice
wow
Amazing work, really well done. I also do 3D, if you have some time let me know what you think!
Is it possible to make the character's shadow darker and more blended around the edges to better match the other shadows in the scene? Thanks for this tutorial!
You must render only shadow before compositing to adjust contrast with nodes. To render shadow, unactivate character render at "collections panel" (camera icon next to eye icon). At the end you have to have 2 render passes (Shadow and Character) before final compositing.
agreed
to get the shadows fading out correctly, adjust the whole scene to real world scale
Thanks, great one very clear.
But I should say that sometimes in fspy it is dangerous to put the axis on the ground of the image because there is ALWAYS a slope on the exterior grounds (gravity for water) that could drive you mad in Blender for precise modelisation.
So it is better to take horizontals lines on the buildings.
good tip, thanks!
Is there a way to render shadows and model in seperate render passes so we can fine-tune later.
hello, how do you zoom in scene without changing the camera position at 4:12? Thanks
Schwizer, sehr guet, sehr guet
Does anyone know hwo to change the shadow opacity, turns out that my shadow is way darker then the environment shadow?
also how do i add extra lights when i do they affect nothing
Can you make background video with 3d animation
how can I make an object be a light catcher like you did as a shadow catcher?
👏
got it to show but it still wont hsow in the imag preview still comeso ut transparent
how to let mirror the object in the ground?
Hey, ich habe irgendwie das Gefühl, dass ihr deutsch versteht, also schreibe ich auf deutsch :D zuerst einmal großes Lob für dieses tolle Video! Aber wie kann man aus dem HDRI einen unverzerrten Teil rausschneiden? :)
How do you get the flattened image? When I import the HDRI into Fspy, it looks nothing like the image you are working with.
you don’t import the hdri into fspy. There are backplate images on hdrihaven that I used, not the actual hdri.
@@BlenderDaily Thank you so much! Awesome tutorial, cheers!
Hey!! Does anyone know why my shadow is not moving with mapping node? Is it necessary for the image to be a HDR? Because I am using a jpeg. Please help!
Is there a way making it without this perspective matching software?
Yes, there is. There is no add-on required. It uses only existing Blender built-in Camera Tracking tool. But is a bit more involved and requires two photos of the same scene taken from slightly different perspectives.
Visit here for more details
czcams.com/video/aknsCszvMdA/video.html
What if I don't have an HDR file? Can I re create something like it with geometry nodes or something?
Nice but one thing is missing for it to really look realistic...which is the blurriness of the shadow...the shadow in the photo is semi soft and yours is sharp, I'd change the shadow to be similarly soft and then it would be actually perfect but it is still cool.
Hi I noticed that when working on my own project and I don't know how to fix it, can you tell me how?
@@JA-nw1ge Well, play with the size of your lighting setting (sun for example has a size setting which when set to big I think it's making the shadows softer).
@@21EC what if i'm using an hdri?
@@JA-nw1ge Well, then the HDRI's lighting and sun size in the HDRI image itself is dictating how sharp or soft the shadows would look..then if your HDRI gives sharp shadows then you have to change the HDRI to a one that features soft shadows (or you could try to perhaps edit the sun size in the given HDRI to be bigger using a brightness & contrast filter on the sun only (with a selection portion on it) to make it brighter and thus bigger which should give softer shadows but I'm not sure how well that would work.
Can someone help me? when I make the plain a shadow cather it just turns grey
can you align the 3d or it's just fixed?
hello, is your denoiser active? i activate the denoiser but it removes the shadow. do you have a solution? thankyou
it doesnt work for me with the projection :/ when i add a plane it is like 45 degrees turned and dont really aling the axis
What if you want to use your own photo, where you don't have a 360 Sky-HDRI-Photo from? I appreciate your video, but i miss how i have to use the lightning to let it look realistic as possible without a HDRI-Photo.
I would recommend you to still use hdrihaven.com and just search for a similar hdri, go for a sun lamp or use the new nishita sky texture that was implemented in Blender 2.9. I hope this helps✌🏻
@@BlenderDaily Thank you :)
If you have a 3d character in blender, is it possible to add it to a chair so that character sits in the chair (like photoshop)?
i added it to blender but it would not open file , it says no camera set up
--I dont have "Shadow Catcher" option. There is only "Mask - Holdout" for me. Blender 3.4.1. Maybe i dont have some options enabled, idk, please help :D--
I found it, but it just made my pane black :D
omf why does this always happen?
people make a video and then when i try the first steps my computer always doesnt work
this fspy stuff isnt showing up when i install it and i wish this open source stuff would be typed up a little better cause its so confusing to find download links and how to install
wow, i don't have this Mask section in the Visibility menu, so i can't just click on shadow catcher , how can i add it?
oh, it's cycles. not evee, i see, nwm =)
i want the same button for Evee =(
yeah, it’s cycles only
Hey there. Awesome tutorial, but the addon doesn't seem to work. I tried a bunch of different blender versions but nope. Thanks anyways.
Looks like Polyhaven no longer provides the images separately. I can only see the hdri, not the invividual frame you use for the camera background? Is there some clever way to do this without?
you sure can, they can be found on the same site as the hdri, right side of screen and when mouse hover over you can see download options ;)
how did you even import the 3d object into blender? looks like he just checks a collection called charterer and it just shows up. How did you even get the model into blender and to show up with just one click? My biggest issue so far seems to be getting a 3d object to even show up on the plane, seems like every tutorial glosses over this, is it that easy?
Hey, I cover it in this tutorial: czcams.com/video/2QtFbgkYJms/video.html I hope this helps:) Sorry for skipping this step.
it is removing all backgrpund even for fspy
A video idea I would appreciate: How to do the opposite? Add a person into a rendered scene.
Photoshop
theshadow catcher is just grey and not transparent help
Can't you just render 3d object as 2d and place it in a photo using compositing software?
what about just a random jpeg pic can i use it or i need to have hdr?
you can use any picture you want:)