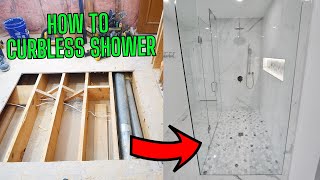
Cutting Down Floor Joists for Curbless Entry Shower in Upstairs Bathroom

Vložit
- čas přidán 16. 08. 2021
- To make a curbless entry shower, the floor in the shower area needs to be recessed to allow for the height of the drain and the proper slope on the shower pan. In order to do this on a raised foundation or second story, the floor joists will need to be cut down in order to accommodate the recessed area needed. There are engineering rules that need to be followed to maintain the structural integrity of the floor joists. As a general rule, no notching of joist can take place in the middle 1/3 of the span of the joist. On the outside 1/3 of the span, notches may be cut into the joists. There are also limitations to the size of the notch you can cut. Only 1/6 of the height of the joist may be removed. That means for a 2x12 joist, only 2" may be removed from the joist. For a 2x10, only 1-5/8" may be removed. For a 2x8, only 1-3/8" may be removed.
I hope this video helps you to make informed decisions based on your joist situation. Always consult with a structural engineer before making any modifications to structural members in a building.
For the video on setting the kerdi-line drain in the floor: • HUGE Double Line Drain...
If you need help with your project, we offer individualized coaching plans to help. Please visit www.tilecoach.com/plans-pricing to sign up so we can help you get your project done correctly.
If you would like to support our channel, please consider purchasing merchandise to help with costs to make these videos. To see what we have to offer, go to: www.tilecoach.com/shop - Věda a technologie


There area numerous variables involved when notching structural framing members! You should always have a structural engineer sign off on that type of work!
I don't know your span on your floor system and notching those four or five joist probably will not effect anything. Did your 1/3 rule take into consideration the load of the roof above that is sitting 6 feet away from the bearing point below.
Your plywood is installed incorrectly for strength!
You also compromised the insulation on the exterior wall with the nitche!
Good points. I always recommend consulting with a structural engineer before cutting structural framing members. Yes, the wall was considered as part of the load on the floor.
As far as the niche, we will add another 1/2” foam backing along with the 1” foam that is already there in the stucco. We will end up with about 5 R value there, but we have very mild winters here. The customer was given the option and wanted the niche more than the insulation.
For the plywood I see your point, but since the entire perimeter is blocked, the direction doesn't matter.
Again, thank you for your input it makes our channel so much better!
@@TileCoach such a classy response 👏🏾
As long as what you are doing falls within the parameters of the IRC, absolutely NO need to pay $500 for an engineer to come sign off on a notch. That's absurd. Data/specs in the IRC were specified BY engineers and as long as your "variables" don't take you outside the scenarios of variables that are accounted for in those specs, there is no need to call an engineer. Instead of throwing money away, my suggestion is to get an IRC and learn to use it. That's what it's FOR. It's when you get outSIDE the scope of the IRC that you need an engineer. Many permits I pull for structural builds and/or modifications do NOT require an engineer's stamp because everything I've specified in those particular jobs falls within the IRC scope and the IRC, in those instances, IS the engineer's stamp and that book is only $130 or there abouts.
@@SomeDumUsrName agreed
@@SomeDumUsrName I don't Have the IRC parameters in my possession! The gentleman has a roof load falling on those floor joist and according to what we have been told in the video there is not a bearing wall directly below the upper wall of the structure. Which I find hard to believe the IRC is going to calculate the exact stress on those floor joist in this situation.
Man I love you! You have done it all, thanks! This is exact the situation for my current project!
2:20 rewatching this and not sure if said this before….. BUT
LOVE that everything is neat, clean, and tidy.
All the cutting, tapering work that was done has been cleaned up (vacuumed assuming) and just have a great area to work on w/o getting crap everywhere and into materials👍🏻👍🏻
The attention to details like this, can make a great difference on a lot of projects, not just shower pan install, etc…
Very nice guys✌🏻
I’m excited to see this whole shower come together. Keep us updated
Wow I can't wait to see how this turns out. This looks awesome 👏
I love your videos bro. I'm going to a class in South Carolina in Sept. I'm really excited about learning this stuff. I'm a plumber for 10 yrs but I want to learn how to do tile and correctly. I've must of watched like 30 of your videos the past two weeks. thank you for your experience
Thanks for the great info, I'm getting ready to lower my floor. I'm using the Schluter pan, kerdi and ditra. This is a first time project. I was fortunate to attend a Schluter workshop on the process. Your videos are excellent. Going to go buy one of your shirts.
Excited to see this job. Like “different” and this job is definitely different😉
Cool, or warm, to have that floor heat in the shower, and can’t wait to see what material they picked out for floor and walls.
God bless Isaac and team✌🏻
Thanks Aepek!
That's what i like about our job.The fact that every job is done by the same steps but in the same time every job is unique by itself :)
Heads up to anybody else wanting to do this: I wanted to do this detail in a shower I'm working on. I just called Schluter to run it by them, and they said they wouldn't recommend, endorse, or warranty using ditra-heat over a plywood in a shower. You have to use either a mud base, or their foam pan.
Hi Isaac, it would have been nice if you show how did you shave the beams, tools etc. thanks
I was just watching some of ur videos on my way home from work with my dad.
Thanks bro, long time viewer. I’ll be in SD on sept. 30th. Hit me up on Instagram maybe we can meet.
Tile Coach protects mother Earth.
Thank you for the 2 great tips now i learned how to my job a little bit better
May God bless your crew. 😉 I do tile and come by my friends trailer. He helped a guy get some work but I noticed lippage and uneven wall from just walking up on the shower. He noticed nothing but don’t know what to look for. I asked what was used for water management and/ or water proofing? He said all he bought was durarock. No linnet, unsealed bench and walls. I hate to break it to him but it all needs redone at this point. Unless u know any tricks. But I don’t bandaid jobs and don’t feel comfortable just doing the
Floor ass he asked. Thanks for your time brother. I love u guys.
Like 10 years ago I did a shower job for a carpenter where he planed and pitched the subfloor towards the wall. Then I jus applied fabric and liquid waterproofing over it. And I got a lot of haters on why I didn't do a proper mud pack before tiling. Now, with all the new materials with foam and all that, people are looking at tile substrate in a whole new light. I think the wood pitch is ingenious. Just like how in the 70s and 80s they thought it so smart to frame up, or down, to accommodate shower receptors. That's architecture, not just pasting down tiles.
Nice work Isaac. Love the detailed information.
Much appreciated!
Can you show how you did the taper on the beams?
That's crazy. California engineering. Next level. Good job.
Great video!!! Appreciate the insight and expertise!
I love you too bro. You’re awesome. Thank you.
Great explanation 👌
I thought this was about the last job. Seemed confusing until you made it clear how it started. Please, do not forget to upload the footage of the last shower being finished. This one, too.
First comment! 🏆🥇😁
That's some tricky cutting. Looking forward to the project, especially the Ditra heat.
great video
Super helpful.
Great video as always! I noticed in this video that you are using a slot drain that only relies on the Kerdi Membrane that is factory attached. You have another video I recently watched that shows this membrane delimited from the metal and caused a serious water damage. I'm assuming this is because you are working with limited space due to the curb less situation. What are your thoughts on using a double system that has the membrane AND also the threaded traditional interface? Is that an over kill? I found that Infinity Drain makes one that has both and was wondering if you have an opinion on that.
You can only notch in the first 1/3 of floor joists on either end, however, the max notch size is limited to 1/6 in depth and 1/3 in width of the height of the floor joist. Any notch larger than this limit will need some structural reinforcement, such as metal strip, or double joists.
Nicely done and explained!
Schluter has a tutorial on how to make a curbless shower and NOT cut the joists. I suggest that people do more research, we all have a world of knowledge in our very own pockets!
Well look like you have no clue about construction let pro do the job
Do you have another video where you install the heated floor system and the water proofing? Did you install the water proof membrane directly over the wood subfloor or is there Kurti under the membrane like installed over the rest of the floor? Would love to see the full job, start to finish. Love your videos and the quality and love you apply to every job. Fantastic work.
good job
Insulation looks a little rough coach, spend the 50 for a bag of r12. No vapour barrier required for Northern Cali?
Do the wall as have to level to tile them floor to ceiling? I know it’ll look bad with the curve to it so how can I make hardie backer level? Can I mix the front of it to bring it level in the small/few spots that it is not?
Can you put a niche on an exterior wall?? What about the insulation?? Also is it ok for the floor heating system to run under the glass?
Could you show how you actually cut the floor down.
I’m working on one of these at my house. I had 4x6 material to work with, and I was on the outer 1/3rd as Isaac described. what I did was calculate the depth needed from zero to the lowest point. Let’s say it was 3/4” fall over 3’. I marked the 4x6 top surface with a sharpie in measurements to remove with my skillsaw. So that I had something such as 3/4, 5/8, 1/2, 3/8, 1/4, 1/8” marked along the surface. I probably had them marked in 1/4” only. So, At the 3/4 mark, I set the saw depth to 3/4. I made a few slices perpendicular accross the top of the joist at this point. Then bumped my depth a little short on the next few cuts. Repeat every couple of cuts. When I would get close to my next mark, say 1/2”, then I would set my saw to exactly 1/2” depth. Then keep repeating until I got to the next mark and so on. Eventually I was at zero. Then, I found a chisel and hammer and knocked them out. Clean up with a chisel or belt sander and they are near perfect. Honestly, it was easy and anyone with tools could do it. The key is the sharpie measuring every 6-12” increments and sticking to the desired depth. If you’re laying ply over the top as Isaac did, it may not matter how precise the surface is but I inset my plywood between joists to lessen the cut depth. I sanded them to near perfect but then covered with thin set and deck mud so probably a waste of time. Good luck!
@TileCoach Hey Isaac, happy new year. I'm wondering if you have any vids for curbless methods in lowering floor using engineered I-Joists? I can't seem to find any. I'm a DIYer and I'd like to replace my 36x48 using Schluder pan. If you don't have anything, can you recommend any other youtuber affiliates who might? Thank you!
I have to do this to an existing bathroom floor. I'm searching for HOW to do this and not finding anything worth watching. I don't have a lot of room to work in - it's a manufactured home with a 2f-foot crawlspace underneath the floor. Any recommendations you may have are greatly appreciated! The cuts have to be precise for leveling, depth (1/2 inch) etc...
Very cool
TY. Excellent information.
But am I seeing pex supply on an exterior wall?
Yes.
I've thought about doing a curdles in my bathroom. I have 16" floor trusses. All the members of the truss are laid so that the members are on edge. In other words, the trusses are 1 1/2" thick. I have 2 layers of 5/8" plywood on them for 1 1'4" total thickness. If I went curbless, I would put blocking nailed to the sides of the trusses set below the top of the truss the thickness of the plywood. So the most I can get is 1 1/4" of fall to the drain,, I would use a central drain. Shower would be 32"x72". I have Ditraheat on my floors so that gives me another 3/8"
Cool story
That's some shady looking insulation work you uncovered there
Are you saying that you aren't just supposed to ball it up and shove it in?
At least we shook the rat poop out of it first 😖
What you can't see can't hurt you
I'm running a Schluter pan (1-1/8" thick). I recessed my curbless area 3/4". Then Im running Ditra Heat on the rest of the bathroom subfloor (not including my shower), which leaves me with an 1/8 difference between the pan and subfloor. How would you make up for that difference?
You can always put a girder under mid span of those joists to support them
I have a truss system 22’x 16” in a triangle pattern with a rectangle in the center. My trust are built out of two by fours. My subfloor is inch and an eighth. I forgot to ask the truss company to build in the trust to have the shower curb list. If I use blocking is there a Standard on cutting into truss!!???
Isaac are you in my home ? All joking aside. I have the same layout in my tub and shower combo at the 2:55 time mark in the video. with the same style cabinet doors and drawers. I spoke to you back in November 2018 about my home, but never sent you the photos as I was hospitalized at the local Veterans hospital and had to put that project off. I am in the beginning phase to replace that built in tub and shower and go full ADA with a zero clearance to help with my disabilities. From Central California keep the videos coming and keep on doing that awesome art you and your crew do with tile. Perhaps I should send you those photos even if it is years since we spoke. Take Care Isaac aka Coach
I'm also located in the central valley and would be glad to help if you're in need. Thank you for your service
Structural concern…Did you get approved?
We try to avoid putting a niche on an outside wall not only for the loss of insulation but the chances that new siding gets installed with nails that might hit the tiled niche .
Why not slope it from the back wall to the front to make it curbless without having to modify the floor joists?
I would like to know/see how the joists were actually cut down.
Tricky!!👌
Thanks for sharing! How did you deal with the gravity venting for the linear drain?
And you’re supposed to have a vent within 5’ from the drain so this may not flow so well.
The vent is coming up through the pony wall.
Great! Thanks.
Do all drains require a vent or just linear drains? If I were to switch from a regular round drain to a linear drain, would I need to add a vent?
I am trying to find the other videos for the next step?
I want to do a curbless wetroom bath on a upstairs but on a engineered floor truss. Think I'm gonna have build up since I'm 2ft on center trusses.
Nice
One of my unusual circumstance is that I have a very small shower with a curb, and a closet directly next to the shower. I want to expand the shower while keeping a small portion of the shower. I want to do a curbless shower, but I'm remodeling by myself, I'm not sure if I can do it. I'm scared as woman doing htis job.
Don't forget with your joists you are dealing with a nominal figure (2x12's in today's world can be from 11 1/4 to 11 1/2") which would skew your load figures. It is always the little things that bite you. Because you are dealing in a pretty heavy load bearing area it would not hurt to sister in a bit of additional stiffening and or blocking in the middle of your expanse.
I can imagine what a mess the demolition was with all that tile.
Cool.
Why not just run your linear drain pan from right to left or from back to front . This way your high slope start side runs against the back wall and your zero degree side with linear drain butts against your field tile. They will both be the same height at that point . Then your your glass with a bottom seal gasket on that perimeter
You stole that idea from another CZcams channel on curbless with linear drains lol
No vent for the drain?
Wasnt the niche wall a gable?
What if you were to double up the joist in the section you notch extended towards the center like 2'?
Was thinking the same thing. If you sister in some joist the same size as your cut, than you basically double the original capacity.
Wouldnt really be doubling unless the sistered joist is also on the supporting wall below but if you can span the weak point it should be ok im thinking. It would be interesting if isaac get get more info on the code there should be a work around but im no engineer lol
@@bsmbB Better safe than sorry. The more wood, the more support, the better.
But how did you cut down th joists?
So the tile niche on the exterior wall doesn’t need to be insulated?
Good question! I typically don’t and live in the north east. Was thinking maybe some foam board insulation behind the cement board. just hate making the niche shelf any shallower unless you build the wall out.
It probably does need to it, not sure what he is going to use. There are some high r values materials to consider like aerogel if you have limited depth. It looks like 2x4 construction for that exterior wall so there is no room to get up to R10+ otherwise.
Guessing the niche will be one of those prefab foam ones (kerdiboard) so will have some R value. And this is more than likely in California not North Dakota.
What if you ripped up the entire floor and sistered up the joists?
That wouldn't really help imo, as the problem becomes as the closer you get to the middle of the house, the more the joists are cut down in the middle of the house, the more it causes the entire household structure on top of the house to basically bow and have more deflection, so even if the bathroom floor never has an issue the rest of the house could have structural problems from the middle section of joists being compromised.
Sistering wouldn't necessarily make anything stronger in that scenario, even if the bathroom floor is stronger in that section, as the sistering isn't going to extend all the way to end of all the joists.
Why not use a custom curb-less shower pan from Encompass, they make custom solid shower bases with linear drain That you can install without having to notch the joists.
Code must be different on that side of the country. Here in Ohio, we can't just put the supply lines and mechanicals on an exterior wall like in this video. Obviously it's much colder. So what we would have had to do is build another walk In front of where his were and put the mechanicals there.
Hey Issac, that standard diameter shower drain pipe you ran to the toilet, I thought with even minimum slope the longest you could go is 6' before you siphon out your P trap..
The distance from the p-trap to the vent (in the pony wall) is about 4’, and the distance from the vent to the 3” line is about 8’. I don’t see how it could siphon with the vent in between the trap and the 3”. It would grab air out of the vent before it would pull water out of the trap. I could be wrong, and maybe a plumber could chime in.
Saw that also. Looks like a cheater vent in the pony wall
It is a 1-1/2" vent pipe going into the crawl space then out the roof.
i usually run the plywood opposite direction.
Yes, but since it is blocked on all edges in this instance it doesn't matter.
Must be nice to had wood to work with, the last 3 houses I’ve. Worked on have been on concrete slabs🤨
Don't forget that the water proofing should extend 1 foot into the room past the high point in the shower floor!
Yes! Great point! Per TCNA
3" toilet line?
A 2 X 12 is only 11 1/4" so you can't take out 2 inches. And your 2nd piece of plywood is installed in the wrong orientation with the floor joists.
Came here to say the same thing about the plywood being oriented in the wrong direction.
I agree but since the plywood is blocked on the entire perimeter it doesn't matter.
why didnt you just take of some more subfloor and sister the floor joist ?
That is a good option as well, we could have done that. Thank you.
What’s curbless? Sorry for the cuestión.
Nothing to step over going into the shower.
Why not use blocking and run your plywood in-between the joists instead of on top?
Can’t bond ditra on framing is my guess
@@shettlock shulter actually demonstrates In laying the plywood between the joists
Would like to know why also. I just did a recessed subfloor with kerdi pan on top. I had engineered I-joists but I would have done the same with dimensional joists. Why create a slope with your joists when the pans are already correctly sloped? Not criticizing, just honestly curious as I learn more about this stuff.
@Born Behind Bars -- But not with Ditra. Only foam pans.
@ B Connelly Exactly!!!
Why Not slope the opposite end and have the shower run high. Have the drain at the entrance Saw another shower that had the drain at the entrance and it looked good. Then you just need to add height not cut anything out. Have to see the layout again
Stupide idea plus look amateur work
I probably still would have sistered up some rips of plywood to the joists.
Not a fan of putting the drain on the shower head wall side. The reason being because of that sliver you had to cut because you have a sloped bathroom floor. If you put the drain on one side it looks a lot better. I’ve never had a customer complain of standing on a slightly sloped floor. But the finish looks better because you have the same reveal across the whole floor. And you don’t have a giant transition by the door to the hardwood.
@ 6:29 you point out that you're going to put down Ditra heat AND Kerdi over that? Just curious 🤔
Yes
Hopefully you consulted a structural engineer. Given the smaller than normal joist spacing that looks to be around 12" there were some load issues to begin with given the construction style.
The second piece of plywood is oriented incorrectly. This is not a trivial thing either.
You are correct, but in this instance it does not matter because there is edge blocking on the entire perimeter.
That's not how deflection works.
If you had found engineered “I-beam” joists, you couldn’t have done that type of install?
No, we would have needed to fill the webbing of the outside TJI joists, sister them with LVL or 2x10, then head the area off with double 2x and then hang shorter joists from that in the recessed area.
@@TileCoach understood, thanks!
Heads-up: in seismic areas, you'd also have to consider shear forces on the floor diaphragm: you'd have to extend the headers with blocking and strapping to several parallel joists either side of the new opening. Especially in commodity construction where safety factors are minimized for cost efficiency.
Blanket Rule- never railroad your decking.
and you did not mention a vent but I assume you have one.
Also, appears to be 12" OC, you could have easily taken 2" across, and you could always double your joists with a 2X10.
Yes we have a vent coming up the pony wall. I will make the change on the plywood. Thank you!!!
what u mean railroad decking
NEVER CUT YOUR JOISTS !!! Use a 1 inch Schluter shower pan.
Blablabla sometime you have to do it
It’s called a jack stud🤔
Or trimmer stud. Same thing.
second place!!lol
plywood weak grain
Tell the owner of this house to just get a regular shower man . The curbless entry shower isn’t that much better looking than normal shower. Duh 🙄
dude,. every showetr does NOT need to be curbless.....
Its all about$$ look men shower floor like that coast 2500$$ n way more can you do it
Great videos, but, super f#@King weird when he says "I love you"
You get used to it. He’s a motivational person. Welcome to the tile coach family!
Haha, yes you will get used to it. I was never told I love you as a child...and it took me a long time to get used to people saying it to me as well. I really appreciate you watching the entire video to the end as well.
Great little drawing man but, the rules are not "general." They are very specific. And based on both your drawing AND what you've said in this video; your recollection of these rules is both wrong and incomplete. Hence this video advises people that they can do what they in FACT are NOT supposed to do. And we're not talking about some insignificant troweling error here: We're talking STRUCTURE. Bad moves in structure can be very costly to not only the wallet but also life and limb.
Based on what you've said in this video, it's obvious you've made full-depth-allowed notches in floor joists before at a width that will accommodate dropping an entire pan without supplementing the joists in the thinking that there is no max width to your notch. If you haven't been faced with problems from having done this, then consider yourself lucky. Get yourself an IRC and go back over this stuff. I'm sure you'll find that publication to be valuable to you in many OTHER ways too....... Span tables for one.
Regarding max WIDTH of a notch in a floor joist, you canNOT notch out the entire outer 1/3 of the length of your joist as appears in your drawing. And I'm assuming your blacked out section of the outer third of the joist represents that material having been removed because you DON'T have on your drawing the other parts of the rule. The maximum WIDTH of your notch is 1/3 of the DEPTH of the joist. So, you canNOT take away 2" of height of that joist for the entire outer 1/3 of it's length . You can't take ANY height off the joist over a length of the joist that is longer than 1/3 of it's height. AND, at the END (bearing points,) you cannot notch more than 1/4 of the depth.
So..... not only is there a max DEPTH to your allowed notch but, there is also a max width. Notch depth max is 1/6 of joist height (for notches inSIDE the bearing endpoints) and max WIDTH of notch is 1/3 of joist height. And technically, you cannot take 2" out of the height of a 2x12. 2x12s are not 12" high; they are 11 1/4". 1 7/8" is your max.
From the span tables in the IRC, you should be able to derive what you need to do to double up (sister) to get back to the initial strength of that original joist height; like for when you want to take out a notch wide enough to accommodate recessing an entire shower floor. I'm gonna check n I'll get back.
No, the floor-joist span tables do not specify what's necessary for doubling or tripling. I believe I'm thinkin' about tables for headers and/or beams n girders.
I edited this comment
There are king studs, disregard my blindness.
Also, you're using the IBC/IRC for what's allowable to those joists, which is no more than 25% of width, and 2x8's aren't 8". They're not universal, so kids watching at home, check with local code enforcement first.
Other than that, good luck.
Yes, the trimmer (jack) studs are against the king studs. Not sure what you are talking about. Please clarify.
@@TileCoach I see that now, I suppose I mistook the kings difference in color for kraftpaper. I'll edit the original comment to reflect this.
Minor question, Is that fiberboard sheathing? If so, how do you suppose to waterproof it for the niche?
Thank you so much for your clarification. I will try to make a video for you on how we do the niche against the exterior wall vapor barrier. Its tricky!
7:27 that guy needs to come back and fix that, that pipe is at way to tight of an angle and going to leak with time...
What’s curbless? Sorry for the cuestión.
It means there is no step going into the shower. It goes straight from the bathroom floor and slopes into the drain.
I thought that‘s a wall in shower.