DIY - How to Apply Clear Epoxy Resin - “Liquid Glass”

Vložit
- čas přidán 5. 07. 2024
- An Adventures At Home, LLC video! Do you want that ultra-glossy bar top look on your wood projects? Then look no further than this step by step video. We’ll walk you through every step to make sure your projects turn out perfect the first time. Even if you have worked with two-part clear coat epoxy before and got mediocre results, our tips and tricks may change your mind on working with this finishing product again.
Here is a link to the epoxy that we used in this video:
amzn.to/33l0e9M
***Reminder to everyone - Submit a photo of one of your projects you have made (hopefully using one of our videos for inspiration) and you'll have a chance to be featured on our Maker's Spotlight page! Thank everyone for watching!***
Like this video?
Make sure to give us a thumbs up and subscribe if you want to see more videos like this. Your support means a lot. Thank you!
***Video Notes and Gear Used***:
1. Main Camera: Sony A7II Full Frame Mirrorless
amzn.to/2QPEPCV
2. Main Camera Lens: Sony FE 70-300mm F4.5-5.6 Full Frame E-Mount
amzn.to/37GzFPu
3. Microphone - Fifine Wireless Microphone System
amzn.to/2XYhMHL
4. Lighting Kit - Neewer
amzn.to/2OoxwAg
5. Main Camera Tripod
amzn.to/37B9jOR
6. Aux. Camera: GoPro Hero 5 Black
amzn.to/2OlDtxT
7. GoPro Tripod
amzn.to/2rtDgjc
This video was edited by Adobe Premiere Elements 2019:
amzn.to/33igDM9
DISCLAIMER: This page contains affiliate links. As an Amazon Associate I earn from qualifying purchases. This helps support this website and allows us to continue to produce content like this. Thank you for the support!
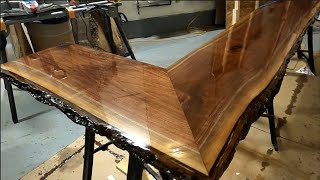
About this video: In this video we show you how to use two-part clear coat epoxy to get an ultra-durable, ultra-glossy finish on your projects. You can get the fantastic “bar-top” look with a little bit of effort and some patience. This product is perfect if you need something that is more durable and UV-resistant the standard polyurethane. We will walk you through every step of the way including: Prepping your project, applying an initial thin coat, getting your mix perfect, applying the flood coat, getting rid of any bubbles and how to keep dust off of your project while the epoxy cures. The process may seem tedious, but the finished product is well worth the effort! - Jak na to + styl


Like so many before me have alteady said, "Thanks man!" Excellent on many levels. God bless you and your family brother.
I love that you were conscious of how much epoxy you were using. It makes it less expensive and easier on the environment.
Thank you for the easily understanding, and explaining video!! 👍👍🙏
You're welcome! And thanks for watching!
Great information! You are a exceptional teacher! Thanks.
Thank you for the compliment! And thanks for watching!
Great video! Very informative.
Great explanation for all us beginners. I like how you clarify all the little problems that may be encountered and the calculations were great knowledge to pass on.
Thank you! And thanks for watching!
Maaan, that resin/epoxy conversion formula you used is a great money saver! This is best DIY I have come across. Thanks Man!
For sure! Takes a little more upfront work, but we feel we dial the amounts in way better that way. Thanks for watching!
Great video Kyle. Keep up the good work and keep us DIY ers informed.
Thank you! And thank you for watching!
Awesome job! I'm going to try this for a bathroom vanity top / vessel sink. Thanks for this!!
Awesome. Let us know how it turns out! Thanks for watching!
I want to thank you for an excellent explanation. With all the tutorials out there on how to apply resin to a coffee table, yours is the best. From applying the first seal coat to pouring the final finish to how to calculate the amount of resin is spotted on. Saved me so much headache.
Just a couple thoughts. When doing this on the flood coat use extra epoxy a little thicker will give you a much more even coat . Edges wet them with a thin coat of epoxy before allowing it to run over the edge as it will be a much more uniform coverage. The torch does not work a s well as a heat gun set on a low setting.
That was a very instructive video. I actually appreciate the fact that you were able to do the work in your dusty shop. I always imagined that I would need a “Clean Room” lab type environment. The fact that you could write your podcast name in the dust on the furnace and have a wood shop in the background helps me have confidence that it can be done in “real life” conditions. Thank you!
As long as you keep the dust from blowing around you will be fine. Thanks for watching! Let us know how it turns out.
I connect more with this man than some of these pretentious wood working channels. He uses plain english. Good job. I wanna do something like this combining colander painting with an epoxy coating for our aging bathroom vanity top. Thanks for the video.
Good luck and let us know how it turns out! Thanks for watching
I Just Finished a Bathroom Vanity Using this Video. It turned out Awesome. Thank You "Adventures at Home" for helping Me Finish this Project. Cheers! 👍
crazy good result, just fantastic!!
Most instructive and precise tutorial on epoxy resin! thanks!!!
Thank you! And thanks for watching!
Great job. It looks beautiful. Thanks.
Thank you! And thanks for watching.
Extremely helpful! Thank you
Great info getting ready to build first table.
This is by far the best video I have come across, I now feel confident in doing this myself, I am going to do a practice run on an off-cut of Oak kitchen worktop to practice and then gonna try and do the whole kitchen which is approximately 6m2 in total - wish me luck! Thanks so much dude!
We're glad you found it helpful! Let us know how the finished product turns out. Thanks for watching!
I have sat through so many videos that talk about EVERYTHING else but the epoxy application. This one got to the point and answered many questions. Thank you
Thank you! And thanks for watching!
I just did my first epoxy project, I wish I had watched this video beforehand ... your comments about not overworking the epoxy are spot on...
Hopefully you aren't discouraged enough to try again. Thanks for watching!
@@AdventuresAtHomeLLC p]p!
Appreciate the cleanliness, procedure, time constraints, and your strict adherence to them. It was worth it when you see the final result.
Appreciate the kind words, and thanks for watching!
By far the best epoxy tutorial we’ve seen! Thank you!
Thank you for the kind words. And thanks for watching!
Awesome video. That table turned out great. Keep up the good work.
Thank you for the compliment, and thanks for watching!
You sir just made an incredible video! In enjoyed watching the entire video. I will use this to make my own DIY 3 inch oak table with my own made aluminum square framed. Thank you for posting, keep it up!
Let us know how it turns out! And thanks for watching!
I'm going to do a project following the instructions you give on this video. Thank you for sharing.
Let us know how it turns out, and thanks for watching!
thanks a million sir, very helpful, direct and easy to follow.
Thank you, and thanks for watching!
Great instructive vid, really helped me. Thank you
Happy to help. Thanks for watching!
Thank you for the video. This is exactly what I'm looking to do.
Thanks for watching! Let us know how your project turns out.
Thanks for the vid! Learned a couple things that I'll try out on my next display.
Awesome! Let us know how it goes, and thanks for watching!
Nice work and detailed video, thanks!
Thanks for the detailed video. Have a little craft project that I can't wait to do.
Let us know how it turns out. And thanks for watching!
Your explanation is great and I really thanks for this teaching videos god bless you
Thank you, and thank you for watching!
thank you just did my table top . watched several tutorials . this was by far the best . I just might try another project like this . thank you . I am still waiting for my final few hours .. I am very inpatient . waiting is the worse .. I did it and thank you for tutorial . you are awesome
Thank you Karen, and thanks for watching!
Learned a few things,thank you Kyle 🙃 Perth Western Australia
Thanx boo very informative you did great explaining
excellent teacher
Thanks so much for sharing this. It was very helpful. ☺️👩🏻🍳
You're welcome. Thanks for watching!
I love the pool table light behind you!!
I love the "Adventures At Home LLC" finger-written into the dusty wood into the background 😂 cute! Great video - thank you for this helpful tutorial 🙏🏾
Thank you, and thanks for watching!
Wow that is gorgeous
Thank you for explaining this so well. Too many people spend too much time talking about every tiny detail and personally, for me, I just want the basics!
I find your videos to be easy and “just the facts!” Great job!
Thank you for the kind words. And thanks for watching!
Oh and can you use a heat fun rather than a torch?
Yes - it takes long though, and you risk blowing dust deep into the epoxy.
@@AdventuresAtHomeLLC thank you for your advice and quick response!
@@AdventuresAtHomeLLC quick question do u think I can use resin on a wood cross for a grave site ? Im also wondering if it’ll be ok in any weather
Excellent place to start! Thanks Kyle
Thank you! And thanks for watching!
Really helpful, thank you very much! I don't know why some people disliked this...
That was am awesome DIY, now i feel confident doing my custom made tulip wood kitchen island counter top
Thank you, Derek. Let us know how it turns out. Thanks for watching!
Awesome video. Thanks for sharing
Thank you! And thanks for watching!
Thanks for the tip on measuring by weight. Since not all liquids weigh the same per volume, it's good to know we don't have to worry about that with epoxy.
Thank so much for your great details video
You're welcome. Thanks for watching!
Thanks great info
I learned a lot, thank you for the video :)
Good video thanks for the tips. I'm new to epoxy helped me a lot.thank you.
That's great! Thanks for watching!
Thanks for the tips.
And thank you for watching!
Good video very explanatory. Planning on doing my kitchen island the same way
Let us know how it turns out. Thanks for watching!
Very nice job. Thank you
Thank you! And thanks for watching!
Well done have learned a lot going to give it a go Thanks
Fantastic. Let us know how it turns out. Thanks for watching!
Great job!!!
Thank you! And thanks for watching!
Great video starting my project
Let us know how it turns out! Thanks for watching!
Thanks for this!
Thanks for watching!
Nice job. Love it. 😛
Great job and thanks for keeping us focused on the project instead of other junk. Now I'm gonna make something. I'll send you the video and give you credit in the video for teaching me too.
Nice job!
Thank you...straight,simple and useful 👍🏻
You're welcome! And thank you for watching.
Thank you for your time and knowledge!!!!
You're welcome - And thank you for watching!
@@AdventuresAtHomeLLC making home made arcade sticks that take a lot of abuse... this looks like the perfect solution.
Just need to practice!!
@@AdventuresAtHomeLLC also, I see the video is tagged in Wisconsin. I'm from the Green Bay area!
@@0thers1d3 we're just a bit south of you in the Waukesha area. Let us know how your project turns out. We'd love to feature a fellow Wisconsinite on our "Maker's Spotlight" page!
@@AdventuresAtHomeLLC Yes sir, I will do that!! Man, am I motivated, and this video helped!
Thanks for a very informative vid. Now I know why I got lotsa bubbles on my benchtop timber slab, after following all of resin manufacturers instructions to the absolute letter with 2 coats of their 'sealer' prior to flood coat pour. I don't think their recommended sealer was suitable, hence bubbles. I like your method of thin epoxy coat prior to final coat. You made it look relatively simple. I am tempted to have another go at it. Thank you
You're welcome. Let us know how it turns out! Thanks for watching!
Great information. Thanks,
You're welcome! Thanks for watching!
Great Video !
Explained dverything very well
You would make a great teacher
Thank you! And thanks for watching!
Great video! Greetings from Sweden
Great Job !!!!!
Thank you, and thanks for watching!
Thank you very much sir .
And thank you for watching!
This is solid n excellent...
Thank you, and thanks for watching!
Awesome video! Thx man... I can't believe people would give a thumbs down... Alot of info 👍
Thank you very much and thanks for watching!
the reason is the pros pour coat is poured on only they pour it on an then no touchy. everyone's a pro on everything on youtube don'tchano. he still got very nice results imo. i'll try to do the pour like the pros, but far as i'm concerned this is a fine trick to have up my sleeve just in case. nice job mate
Probably because of things like, preparing the tabletop and cleaning it with thinners, then slapping his hands all over it, and then using it as a bench to prepare the epoxy, then using a tack cloth, and then dumping a dusty spirit level on it :-) Still a good video though. Pretty informative.
Bet its more to do with no gloves...
Great edit. We almost didn't notice you didn't use enough the first time
@15:28 Raiden Wins! over-exposed lighting melds the dude's head with lampshade :-)
Thanks for the tips - watched this video after many others on epoxy resin "liquid glass"ing, and there were several points much better made here.
I'm part way through my first attempt, fingers crossed.
Hahahaha. Yes we were quite new at video making in this video. Good luck, let us know how it turns out. Thanks for watching!
Good info....good vid....thank you.
Thank you! And thank you for watching!
Beautiful job.
Thank you, and thanks for watching!
I’m just learning. I appreciate every bit of inspiration and tips I can get.
@@dwaynecain5608 A little bit of practice and you'll be the expert! Let us know how it goes!
i was about to start my epoxy today ….ima prep just a little bit more then start tomorrw thanks to ur video.
great tutorial.
/Bklyn👑
Thanks for watching!
Pass the torch over the entire surface in a sweeping motion. There are usually many micro bubbles that cover the whole surface and will not pop without CO2/heat from the torch.
Thankyou!!
Thank You
Good job I like that
Thanks for watching!
Thank you. Alot of work but I've learned alot from your video and I'm nervous 😳 but ready to take on my dinning room table. 🤓
Good luck, and let us know how it turns out. Thanks for watching!
@@AdventuresAtHomeLLC 💙 I'm addicted 🤦😀
Hope you find lots of inspiration for your own adventures!
Nice video bro thank you
Thank you, and thanks for watching!
THANK YOU, it was great to see the shine of the table change as you continued working. You're a *very* good teacher, & I appreciate all your work here. I do wish we could have seen the table with an over-head shot, so we could see the change from your perspective!
Question:
I have a table w/ a decorative edge. It was a woodworker's project that he just left sitting in a woodworking- friend's basement for a decade. That friend just gave it to me. I'd like to use this type of epoxy b/c *durability* has to be the theme of my life; four kids are hard on everything. However, will this type of finish look weird on a table that *doesn't* have the straight-down-ege like your coffee table?
Thanks for all you do!
Very informative
Thank you! And thanks for watching!
Just did two 3'x6' tables in the garage. I probably over worked the thing, but the bubbles kept coming. I used a redwood with lot's of knots. (I wanted knots) to build the tables. I did them a gallon at a time. I did not weigh the product like you did, (lesson 1). I tried to get every bubble out, not just the larger ones, (lesson 2). Finally, I did not apply a thin coat, (lesson 3). Thanks for the video. I think it will help the next time around.
Thank you
Well done
Thanks! And thanks for watching!
FANTASTIC video! This is EXACTLY the tutorial I have been hunting for. Thank you very much. Maybe I'll send pics of the project one it is complete.
We'd love to see completed pictures! Thanks for watching!
Kyle, one question, how do you clean up the dried drips off the bottom of the edges? sanding? that easy?
Sanding is the safest method, and the one that I prefer. In a time crunch I have used a razor to speed it up, but you risk removing too much.
Looking for a DIY vid to help a customer clear coat the lower half of small very well made side table I cut a piece of glass for on top, too intricate for glass work on the lower half. As a craftsman of 45 years (born in 63) I find your vid most informative and actually surprisingly entertaining. It's very refreshing to see a craftsman work under less than ideal conditions. Hitting your head repeatedly on the triple light fixture but continuing/soldiering on professionally just soothes my soul for my less than perfect shop. When you started talking formula, 10:30 my mind started to drift. I noticed maybe a kid or yourself fingered "Adventures at Home" onto the duct work and how your wife utilized shelving and then the band saw way in the back. I can only imagine the wonderful projects constructed from that side of the basement. Just wanted to say you're inspirational. Keep up the good work!
Thank you very much and thank you for watching. I'm almost sad to say that we are in the process of updating our workspace. A lot of unforgettable projects (and memories) we're made in that small basement workspace..
Good vid
Inlove epoxy
Keep fingers crossed for me, I am petrified to do it but I will try, almost ready for it.
Will do - Good luck, and let us know how it turns out! Thanks for watching!
Great video, and so informative! Currently, I am working on an outside mosaic tabletop of a potting table. Will this work as a coating over the mosaic? I am mostly concerned about yellowing, over time, that might dull my tile colors. ( The potting table won't be in the sun, and it doesn't freeze here in my part of So California). Thanks so much!!!
Unfortunately, this product will not do well outdoors. And it probably won't hold up well to the rigors of being a potting table. Thanks for watching!
Excellent video. For dining tables or a bar, what cleaning products would you suggest for cleaning up after a meal on a surface like this?
Thank you! We use a lightly damp rag to clean - with mild dish soap if we really need it. Thanks for watching!
👍
Hey thanks for the video, very useful! How would you use the epoxy to coat a box? Would you follow these steps and do one side at a time? Cheers!
He said more ultras than killer instinct… ULTRAAA COMBO
what brand of epoxy did you end up using? Love that it gives you thirty mins to work with and looks amazing!
Check out the product link in the video description. Thanks for watching!
Love the video I appreciate the knowledge! I have 1 question, is the smell strong when applying and drying?
Strong, but not unbearable. Thanks for watching!
The smell is not strong but the chemicals are this should definitely be done with a mask and if possible outside
Hey not sure if this was asked in previous comments, about what percentage of the mix did you use for this first coat? A guestimate is fine. I’m doing a 15 sq ft table and will need a little over 2 quarts per the instructions. Just wondering how you decided how much to use for the first coat?
Both my epoxy/resin product and my propane torch emphasize VENTILATION. I coated a panel door to transform to dining table. Was afraid of the flood coats, so did several thinner ones. Next time, I'll be more bold.
How did the result end up being?
@@tobiashede I admit that I still have one final layer. Will be bold & pour a lot of product so it floats evenly. Love the shiny glass effect.