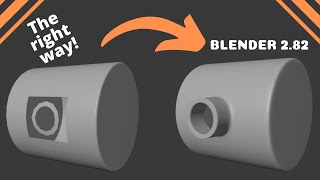
The INSET FACES Tool - Blender Modeling Tool Tutorial

Vložit
- čas přidán 30. 07. 2024
- In today’s video, we’re going to talk about how to use the Blender inset tool to inset faces. This can be especially helpful for creating recesses and other details in your Blender models!
MORE BLENDER TOOL TUTORIALS
• Getting Started with t...
The simplest thing you’d use the inset tool for is insetting a single flat face on an object. This can be very helpful for creating recesses and nooks in your faces in Blender.
To start off, go inside of edit mode. Jump into face model, then select a single face and tap the “I” key. Notice this is more effective if you start with your cursor outside of this object.
What this does is takes all the connected faces and insets them in order to create a new face that’s smaller than the face you had before. Once you click, this pops up a little menu where there are some things you can adjust.
A lot of these can be set by keyboard shortcuts with the tool active as well.
Thickness is going to control the thickness of your inset. Depth is going to control if your inset goes up or down in addition to in. You can either control this with the depth slider, or with the mouse by holding the control key while the tool is active.
I want to talk for a minute about the individual check box. This box makes it possible for you to inset multiple different faces at once. The way it works is that you select several faces, tap the “I” key to activate the tool, then tap the “I” key again to place it in individual face mode.
Works on shapes other than rectangular shapes (like a cylinder).
Note that this tool is often coupled with either the extrude tool or the scale tool
For some shapes, the offset tool doesn’t offset even, so there’s a box to lock this to even (SciFi Box)


Hi everyone! Let me know if you have any questions about the inset tool in the comments below! :)
I am a beginner and your videos are incredibly helpful. You are a wonderful teacher. Thank you for your videos.
This was exactly what I was looking for, thank you! Inset here we go!
Thank you so much for this tips... This is really important to improve our performance to achive more complex shapes!
Thank you for your videos. They have been great!
i like how this is so concise
great tutorial video. Thanks
Bro plzz mention shortcut keys also on display then only beginners can understand.
Fantastic teaching thank you
what if i wanted to inset, then keep that void i made to save as an stl so i can merge them later and print in two colors. so i can print the boarder of a logo in one color and the inset in another?
thanks for tuts
I can not change the way Insert face works. The menu to change the function how insert face works ,does not come up. I hope you can help me. thanks in advance..
Wish there's an Inset modifier; big fan of non-destructive workflow.
Press two Time "I" key to individually insert
this is a good tutorial but one thing is your only showing perfect faces (squares) what happens when the cube is longer than the hight and you inset and then the ends of the inset are thicker than the long sides?
How do you get equal spacing of the inset faces?
LOL, same exact question as I'm doing this to a rectangle
APPLY TRANSFORM FIRST (CTRL+A)
@@sekhej4309 thank you so much!
I have a rectangle with no face on one side. How do I create a face where none exists?
Is it possible toInset from selected edges only? Example on a square plane can you select 3 edges and not the 4th to inset on 3 sides?
It's possible.
First click I for inset, then B for boundary. Video I found: czcams.com/video/02IURllsj7M/video.html
For all the newbies not sure what to search for like myself!
if use that parameter thickness on cube it mean diagonal length or length form edge?
Not sure on this one
First cube dimensions are 0.295 m. And inset faces thickness is 0.5 at 1:46. How is possible? I just want to inset faces 2 milimeters from edges on my cube. How can I do it? Dimensions works really strange in blender. I didn't like it..
For whatever reason the inset does not evenly offset the face from the original edge. It’s like there’s not a center point it is off setting from. It does it on certain faces but not all
hey justin is there a way to reduce the sensitivity of orbit ?
I think you can change orbit sensitivity in the navigation preferences
How about insert face, not faces? For example insert 20x32cm face 2cm from the selected edge, how do I do that?
What do you mean? Just select the one face and use the inset tool...
ok I'm making a skull to work on my skills and my problem I've been told is better described this way I have a disk I want to make into a donut I was sent to this video, which doesn't help me. I'm actually trying to make the Zygomatic arch but I've been told including all the details just confuses people.
Sorry, to do that, uncheck boundry. Thanks again.
5:30 press O, nothing happens. Inset menu appears only when you already did something, so click Outset there did nothing too.
great vid, thank you so much!!
I'm already the 3rd person asking about the THICKNESS: the value goes from 0 to 1.
Here's my problem:
-the flat roof of my skyscraper is 10 by 10 meters
-I need an accurate 2-meter-shelf (where the players can stand on) and need to extrude the middle part for another 3 meters in the air
-> how can I achieve this accurate 2-meter-shelf? (as mentioned before: the thickness gives me only a value from 0 to 1)
probably a number of ways you could do this.
one way - which doesn't use the inset tool - is to add an edge loop exactly half way up the skyscraper
then use the move tool to move that edge loop nearer to the top of the skyscraper; use the operator panel to move the edge loop a precise distance (which is going to depend, obviously, on the height of the skyscraper and where you want it in relation to the top)
now repeat, adding another edge loop exactly half way up the skyscraper; move it to nearer the top; if you moved the first one 12 metres, move this second one 10 metres
you now have two edge loops near the top of the skyscraper, exactly two metres apart; they form a face loop; select the four faces in that face loop and use the extrude (along normals) to pull out your shelf, using the operator panel to get exactly 3m of extrusion
does that do what you want?
if you're not sure about any of those steps just ask again in this thread
Is there a way to offset the face rather than centering? Thanks
Select the faces you want to move after insetting, then move them (default hotkey “g”) along the axis you want to (by pressing x y or z)
Great i thought i can't inset multiple faces individually, thanks
Glad I could help!
+++++
you look like that one hard paintroller soaked in paint that no one uses (sorry)
If you're sorry, why'd you say it to begin with?
@@TheCGEssentials i do not know actually.