Easy To Remove Supports In Creality Print

Vložit
- čas přidán 1. 06. 2024
- This video is sponsored by PCBWay www.pcbway.com/ Visit their website for all your prototyping needs.
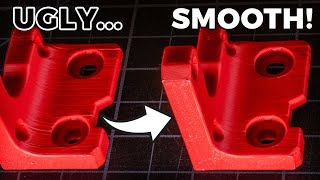
What can you say about supports? Nobody likes having to use them. They add to the print time, they add more material, they're hard to get off of the model. Unfortunately, they are a necessary evil when it comes to 3D printing. They've come a long way over the years and the Creality Print slicer settings give us some control over how we use and manage supports. I'm going to show you a few of the settings I use to make supports more manageable and easier to remove! @Creality3D @crealitycloud9494@crealitycloud9494 @OFFICIALCREALITY3D - Věda a technologie


Dude you need way more subscribers for the quality/help you are providing for us a Creality users. Thank you 🙏
This comment made my day! I was happy to hit 5,000 subscribers just yesterday, but your comment confirmed what I was thinking, I need more! None of the "large" channels are showing any love towards Creality Print. I even bought an Ender 3 V3 SE right before Christmas for the sole purpose of supporting new users getting that printer for Christmas. Either way, I'm going to continue to do my best to continue supporting Creality users as well as Cura & Orca users. Thanks again for the kind words. They've inspired me and motivated me!!! And of course, thanks for watching!
Thank you, You are the most useful 3D printing person I have ever seen (and I have watched and skipped loads) Easy to follow what you are doing and saying. You are now my go to channel for Creality Print and anything else you do. Keep at it thanks.
Well if that doesn't make my ego swell, then nothing will! Thank you so much for those very kind words. There are some big things going on with Creality Print right now. They released an update just a few days ago and currently have a whole new version in Beta testing. I was looking enough to get picked for their testing team and I'm really liking what they are doing. I can't wait to put some video out on it! Thanks again for those kind words and thanks for watching!!
I’ve been 3-D printing for three years I think more and this channel helped me out a lot. Awesome awesome work buddy.
That's very humbling! Thanks for those kind words and I thank you for watching!!! Comments like this make it all worth while!
CZcams algorithm send me here.
I use snug supports in Prusa slicer for my models. I mean figurines.
My 1st attempt was with Creality Print. Something I have to use with my Ender 3 S1 laser engraver.
And it was awful.
Then yree supports slim then strong.
Awful.
So your video pointing out how to tune Creality Print is a good one.
1st time buyers won't know about other slicers by default. So informing them on how to use the provided slicer is a great idea.
I was a little different.
When I bought my 1st 3D printer I was researching the model and relevant information.
That is how I got to 3DPN, uncle Jesse and CNC Kitchen and last year Aurora Tech Channel.
Every channel has something to offer the community. And this video sure did.
Thank you, I appreciate those kind words.!
VERY VERY useful thank you so much, my supports were crazy difficult to remove
Thank you for taking the time o explain this. Looking forward to seeing the stringing video when you figure it out 😀
Thanks for sharing! I really enjoy your in-depth explanation and step-by-step approach, works for me!
Thank you, thank you, thank you....and thanks for watching!
Great explanation of supports. I think next step should be how to smoothly print the bottom surface of the model touching the supports, to prevent strings and etc.
Agreed! I'm still trying to work that out. Thanks for watching!
Thank you, supports are much easier to remove now. I'm using a Creality K1 max and so far am happy with Creality Print.
The K1 Max is a great printer! Creality Print is a decent slicer. It wasn't always the case, but Creality put a lot of work into it! Thanks for the kind words and thanks for watching.
Great tutorial Bill, thanks for putting the time into this for all of us new to creality print. I've used Cura for the past 8 years but since I recently moved into the 21st century lol with the purchase of a new KE, I'm willing to learn about crealities own slicer. I got to say I like it so far. I don't understand why there's so many comments From people that say they absolutely hate creality print on CZcams, guess we get pretty narrow-minded don't we, even for an old guy I'm willing to try something new I like it,
it's got everything I need to push plastic thanks for your tutorials Bill they're excellent.
And like another guy said here you need more subscribers! so count me in,
your content is excellent my man from one old guy to another old guy, ha ha😊
Thanks for the kind words! There was a time, years ago where Creality Slicer was a stripped down version of Cura. But that was a long time ago. Creality stepped up their game in the slicer world and have some new things coming soon!!!
Thank you sir! The same settings are found in Cura.
Yes they are! and many other slicers as well!
I am new to the world of 3D and everything involved. I have only just purchased a Creality Sermoon V1 printer. I have the slicer, and use Tinkercad to design at this stage. I cannot for the life of me find how to flip an object in the Creality slicer, which would be so much simpler. When I use Flash Forge (?) at the library you can remove some of the supports manually, which makes it easier to clean up after the print.
In creality print you are either looking for rotate, on the tool bar or the Mirro command, also on the toolbar.
Thank you, Sir, this video is godsent for sure. I've just bought my first 3d printer and was struggling removing tree supports connected to my prints, changing the XY/Z distance really helped me. Printing with one-click is the reason to use this slicer and my simple testing prints are fine. Im going to try this on smth complex. Thank you!
Awesome! I'm glad this helped!!! I support Creality Print, Cura and Orca slicer in my videos. Look for more Creality Print videos in the future!!! Thanks for the kind words and thanks for watching!
Now i know why you said stay tuned!! Haha thank you Bill, Seriously your videos have been super helpful!
I have tuned it better than standard settings but hopefully this helps. Do these settings work for the tree supports too?
@@JayEm16 Yes! There are a lot of other settings I haven't touched on too. IF you get one of those days when you want to print something but have no idea what to print, download a simple piece and experiment with different settings. The piece I used prints in about 20--30 minutes. I'm still looking to make cleaner surfaces where the support touches the print. Good luck and thanks again for watching!!
@@pushingplastic7445 of course, yea some explanations on settings are clear others are super bland and practically just repeat the name of the setting haha. I do test with other settings all the time. But i will thank you again!
YOU ARE THE MAN!!!!!! I CAN'T THANK YOU ENOUGH!!!!! 👍😎
Thanks! I hope this helps!!! Thanks for watching!
thank you for making learning easyer
Thank you for watching! I hope it helped!!!
Thank you so much, i will be subscribe! congratulations
Thank you for watching! It's very much appreciated!
Thank you for you time help me to much.
Thanks for those kind words! I'm glad it helped and thanks for watching!!
Cool video
On that print you should turn off support roof , you dont need it for that shape and the support will come straight off without changing any other settings. Id keep the support at 15% if your removing the roof and print grid
I could have, but this piece was just an example. There are more cases where I would want the support roof and I wanted to demonstrate all of the settings I typical change and why I change them. Thanks for the comment and thanks so much for watching!!
@@pushingplastic7445 👍👍 Keep up the good work
Thank you 🙂👍
What I learned from my testing to get support material to stick less (mostly applicable for spanning horizontal surfaces like shown in the video)
Short version:
1) Reduce extrusion width specifically for layers that have supported bridges. (Or only for the bridges, but I doubt that any slicer can do that)
2) Drastically reduce temperature - but only specifically for layers that have bridges over support material.
3) Make the topmost support layers (that touch the part) less dense. Less lines touching the part = less hassle removing.
long version:
1) If you use high extrusion width to save on print time and to increase stability: reduce extrusion width only on the specific layers that have bridges over the support material. Reduce extrusion width to the nozzle diameter (0,4) or below. That results in finer and more bridge lines - with the benefit that the molten filament gets "pressed" less onto the support material. Imagine having to do a line with 1mm width there. The printer would press the material right in between the small support layer crevices because it needs more pressure to make the broader line with the same speed.
Playing around with reducing bridge flow ratio has the same effect of "less pressure", but you bridge lines will be further apart. Haven't tested it's efficacy compared to changing extrusion width yet, but it will definitely be less work in the slicer compared to setting extrusion with for multiple layers individually.
(With this you probably also will not need such high vertical distance to the support material any more.)
If this alone doesn't do it, using 1) in combination with 2) will.
2) Use custom gcode for the layers where the part is getting pressed onto the support to reduce temperature where needed (e.g. "M104 S190" = set temp to 190°C). There is also M109 but use with caution since the printhead stands still until it reaches the desired temperature and can create small blobs. I only use that for high flow printing where the next layer immediately needs to print super fast & hot again. Check if your slicer sets the next layer back to the original temperature automatically!
3) I usually reduce "interface material" density quite a bit (double or tripple the usual line distance). Worked nicely for me so far.
My number 1 tipp to reduce print time: Increase extrusion width to around 0.8 for a 0.4mm nozzle (and increase layer height of course).
As a side-benefit your parts get stronger and you can now use only 1 perimeter (outer wall) instead of 2 or 3. Same for bottom and top infill.
A lot fewer lines at slower or the same speed... this cuts down on printing time dramatically.
I recommend watching CNC Kitchen's video about "Extrusion Width".
You soon then will realize that not "mm/s speed" is the true bottleneck of your printing time but max. volumetric speed is!
(Of course up to a point of diminishing returns, starting at 25 mm/s³ and capping pretty much at 40mm/s³).
This is why I upgraded to a high flow nozzle + silicone sock and can print my models in roughly half the time now.
I'd give it a try if you haven't already.
Small note: increasing inner infill width to such huge numbers can be detrimental for stability in some cases.
For me it was for small areas with low infill percentage (between two nearby walls).
Since the lines would be thicker, you get less lines for the same amount of infill %. Less lines can result in too sparse placed "stabilizing beams", even thought the beams themselves might be thicker.
I will give that a try 😊
A while ago I eas investigating why Prusa slicer gave a better finish on figurines than CURA slicer. And I noticed that the extrusion width was 0.42. CURA was 0.4. so I went down the rabbit hole. Vase mode I print at 250% of nozzle width . But this is for functional parts only. The outside gets a bit ruff. Easier to just get a 0.8mm nozzle and do a normal setting for faster print times.
Layer height remains the same.
I have a model I have to mass print.
I have 2 printers with 0.4mm nozzles and 1 with a 0.6mm nozzle.
Same layer height. 0.6 is 25% faster. 2 walls instead of 3. Same thickness.
@@MrGerhardGroblerYeah, good tipp. I will definitely get a 0.6mm nozzle since I refuse to print useless figurines, Benchies, etc... only functional parts.
Also I saw in a video from Made with Layers that one should still be able to print finer details with Arachne as "perimeter generator".
So far I'm only annoyed by it though, since it isn't very skillful at adjusting extrusion width to fill gaps :D.
@@MrGerhardGrobler I made prints now in vaas 0.4 nozzle 0.3 high 0.6 width for a start and this works, so I keep pushing 😃
@@SebasTian-od7oz The figurines are for a client, not myself. So I had to experiment till I got the best finish for the best time. We had loadshedding every 5 hours, so I had to fit each print inside that time frame. So what works for me, doesn't work for everybody. So you do you, I do me
I copied all these settings and WONDERED why I was having some issues. It's because I manually added Automatic supports. If you just let the slicer do it.. You get great results..
You also get supports in A LOT of areas where you don't need them. It wastes material and time. Thanks for watching!
This video help me too❤
Awesome! I'm glad it helped! Thanks for watching!
❤❤
Follow up on print speed: I found a video that tells you *every* possible and some uncommon slicing options you can tweak (according to your printer's physical capabilities) to speed up your prints while maintaining decent quality.
This is the peak.
It's too much to handle for your average Joe - but you can learn a lot here if you pause the video and investigate what each option does further.
czcams.com/video/mklQ-sNAud8/video.html
If the link doesn't work search for:
"How to SLICE and PRINT a Decent 7m30s SPEEDBOAT 3DBenchy - Speed Up Your 3D Printing!"
from the channel 247printing.
where is support density? This latest version seems to have disappeared..🤕
In the Support section, you need to enable supports and turn on Advance settings. But I'm only seeing first layer support density.
Why would anyone want to use Creality print in the first place?
People are free to use whatever slicer they want.
@@pushingplastic7445 Creality Print is a dumbed down version of Cura, right? So I dont understand why someone would use it over cura or other slicers. Pretty fair question that wasn't rude, nor did I imply that people aren't allowed to use it. Why are you so upset by my comment?
@@user-lx9jm1wo3h Nope, it isn't. Creality Slicer was, Creality Print isn't. A lot of people buy their printer and want to use the slicer that came with it. There isn't anybody out there giving support for those makers. If you look at the videos on my channel you'll see that I have videos for Creality Print, Cura and Orca Slicer. I support everybody!
@@pushingplastic7445 Why wouldn't you just respond with that in the first place? That was a much better response than your first one. I wont be checking out what other videos you have though, so I'll just take your word for it.
@@user-lx9jm1wo3h Why wouldn't you ask your original question the way you did in the previous response. It goes two ways. Sorry you won't be checking out other videos but again, thanks for driving the algorithm.
Great video. A comment for the algorithm!!!!!!!!
I like those kind of comments too! Thanks and thanks for watching!!!
You got yourself a new subscriber! Thank you so much for this!
Awesome! Thanks for watching and thanks for subscribing! It keeps the channel going!!!!
Gonna try this tomorrow