EXTENDING Campervan Bed | Fiat Ducato | UK Self-Build Campervan Conversion

Vložit
- čas přidán 13. 06. 2024
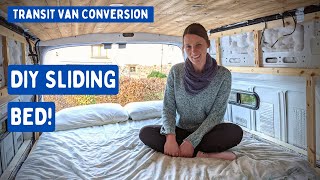
- With our van being an L2 (medium wheelbase) model we had to get creative with our living area. We decided to build an extending widthways bed so that it took up less space during the day but could easily pull out and become a full size double bed at night. Planning was hard work, and we re-thought our design as we went, but we got there in the end! We're really pleased with how it turned out and we have plenty of space to stretch out thanks to the cut outs we incorporated. These will be shared in an upcoming video. Hope you enjoy it!
Mark & Neil
===========================
Products Used
Silent Night Double Mattress: amzn.to/3ztqIpj
Fabric Scissors (for carpet): amzn.to/3lI8yLK
Evolution Mitre Saw: amzn.to/3nRGcBs
Bosch Jigsaw: amzn.to/3zjNMqx
Evolution Circular Saw: amzn.to/39zuTFX
Makita Plunge Saw: amzn.to/3AkimSl
Makita Combi Drill & Impact Driver: amzn.to/3wwzJ0B
Timings
00:00 Intro
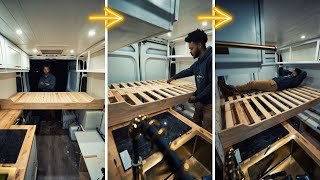
07:00 Building the cutout base
08:37 Re-thinking the bed design
11:35 Planning the bed slats
14:45 First ever carpeting
16:01 Cutting and shaping the mattress
17:24 Adding a bed front
===========================
WHO ARE WE?
We're Mark and Neil and this is Our Van Plan. We've always wanted a camper van and took the plunge in 2020 by ordering a brand new medium wheelbase (L2H2) Fiat Ducato. We are converting it ourselves into the van of our dreams with little previous experience. We're glad to have you along for the ride!
===========================
FOLLOW US
You can follow our build in real time over on Instagram....
/ ourvanplan
===========================
#ukvanconversion #vanlife #campervan #ducatocampervan


This has gone onto my shortlist of design ideas. I like a fixed bed but it uses space so a compromise that converts really quickly is a winner
Yeah that was our thinking too. It’s so quick to get out and put away it’s never become a chore
I’ve looked at many pull out bed videos and this is the best I have seen and a simple design. Good to see the way you had to adapt the design. Great and thank you.
Thank you glad you like it and found it helpful. It was quite complicated to think about but it worked out really well.
Great design. There is a guy in the US who I follow and he has used that aluminium extrusions for all of his interior! Keep up the content, I love the way you carefull think things through and your attention to detail is excellent considering its your first conversion. Well done.
Thank you, really appreciate it 😊
That playdoh idea is absolute genius! I’m havin that!lol 👍🏼 top work
I love your attention to detail, creative ideas and explanations of how and what you want to achieve. I can't wait to see the finished product. I might just poach an idea or two!! Keep up the good work, you'll have a cracking van build.
Ah thank you. Appreciate that and feel free to poach away 😊
Brilliant idea. Love the walk throughs and the detail you are providing.
Thank you glad you like them 👍🏻
TOP VLOG Guy,s & looking forward to viewing the future build progress 👍
Thanks Ken
Nice video and good ideas. Maybe a tip for placing the beams, first drill the holes in the wood and mark the rivnuts through this.
Love this bed idea
Very helpful video in attaching the structure with bolts to the side... I particularly enjoyed the determination in your face as you tightened the bolt!! Good on you for solving each problem as it presents and finding solid but tasteful solutions
Thank you, yes mixture of strength and dreading it not to work 😂
Super and simple way to add the double bed Excellent ida. Looking forward to the next video 👍👏
Thank you
Well done. Very well thought out and explained. I am sure you and your partner will have some great adventures.
Thank you, roll on Spring and our first trip!
Absolutely brilliant video! Had this idea in my head and didn’t know where to start! Now I do! So thank you!
Fantastic! Glad it helped!
Brilliant love the bed idea looks a quality fitting. Well done
Thank you 🙏
I like the bed design guys and great use of the aluminium extrusion 👍🏻
Thanks Simon 👍🏻
Top work as usual. Recently started a Citroen Relay L3H2 - using aluminum extrusion for the cabinet & kitchen framing. Great material to use. 👍
Yeah wondering if we could have used it more. Someone I know is using it for kitchen etc then ply lining. Working v well.
best bed build I've seen, well done fellas.
Thank you 🙏
Great design! Hugs from Brazil!
Thanks Marcus 😊
Great Idea...we have L1H1..mmm got me thinking now on this great idea..
Great job lads showing all your mistakes along the way. Takes guts. Great build quality.
Thank you. Good to be honest about these things.
Impressive looks like a quality job thanks for sharing.
Thank you, glad you liked the video.
Smashing idea with the bed 👍🏻
Thanks Mark
Awesome idea! Will be doing the same on my van, I will drill the wood first with a smaller drill & hold it up & drill through that into the metal.
Thanks, sounds like a good plan!
I did a similar build, making a bed that has pivototing sections around 5x 1" 10G aluminium tubing. It converts from bed to seat, but also slides out the back when needed. Both of us have hit upon the idea of having more living space when the bed isn't needed. Great job, well done. 👍
Sounds good! It really does make a big difference having a bit of flexibility.
Nice work again particularly framing the cutouts for the bed. I'm elevating my fixed bed to allow the storage of two bikes in the garage area, need clearance of 950mm in garage area for my plan.
Thanks. Yeah we definitely couldn’t fit a bike in our garage unfortunately.
Brilliant! Thanks 👍
Came over from Nate's channel, awesome design!!
Welcome and thank you 🙏
Perfect idea
Thank you 🙏
That is excellent.. impressive 💯👍🏻😊
Thank you 🙏
Fair play bud, brilliant idea with the bed, and will be super strong with the aluminium box section 👍
we're van shopping now and looking at going for a medium to short wheel base high roof transit sp this idea may just he an option for us !
Thanks, and good luck with your build. It definitely gives the flexibility of space in a shorter van and isn’t really too much hassle to open in the evening and close in the morning.
I really like your approach. Very systematic and practical. Your idea of the expanding bed slats has really got me thinking. We have so far planned to use the IKEA solution (ie non expanding) in our L3 model but the aluminium extrusion idea is compelling. Just a thought, given that you have a whole double mattress, where will that be stored when you’re in ‘day mode’?
Thanks 🙏 It’s certainly a light weight and strong solution. I think if we had an L3 we’d probably go for a fixed bed but it certainly gives more flexibility. Re the mattress, we’ve subsequently cut it in half so it stacks one on top of the other when we’re in day mode.
Very nice.
Thank you
Brilliant, once again, love your videos, so inspiring, I've just changed my plan for the bed after seeing this. What is the Sq dimensions of the aluminium struts you used?
Thanks Steve, glad you like them. The aluminium is 40mm square. From RS components.
I like this bed solution and found your video searching for extending beds. I'll be travelling 50/50 alone or with someone else so was thinking of having something 2/3 size double permanent bed, but to extend out to double. So not quite half half. Can you tell me the height you made this and where you fixed it, what height do you get garage space wise? Thanks for great video 👍
do you have a later video, once you have cut the matress down the middle and showing how you make it a smaller unit
What a great design, do you have a link k for the extrusions and the fixings please as I’d love to incorporate this idea into my van. Thanks
Thanks. They’re from RS components so check on there. 40mm extrusion.
Hey, thank you for your easy explanatory video! i dont have the metal slates but we do have some sturdy wood planks, would it work still to do this with them do you think? Kind regards! thanks again!
Yeah I think this would be ok if they’re rigid and would take the weight. Ultimately our metal is resting on wood so arguably the support is the more important thing!
Great video and explanations - thank you. I am planning to do something similar in my Crafter. Could I ask where you got the aluminium extrusions from or if you have a link even better! Thank you.
Thanks, glad you like it. I got the extrusion from RS Components. Ordered online and delivery was straight forward 👍
Thanks for the video! Great design and after picking up an l2h2 relay I'll be using this video as a guide to build my bed. Just a quick question, did you add the vertical supports under the bed for strength or was the aluminium extrusion enough to hold your weight?
Thank you. Glad it’s helpful. I did add them as additional strength but I reckon they’re not technically needed. More peace of mind.
Love your van build videos. Whats the size off the 2 big pieces you using for the bed support?
I think they were 38x89 CLS timber.
Great video and great design. Do you have a link for where you purchased the aluminium extrusion and was it 40x40. Thanks
Thank you. It was from RS components and yes is 40x40mm.
Awesome bed! What bit did you use make the m6 bolts sit flush on the slats and the face plate? It’s shown when you are constructing the faceplate but I wasn’t able to catch what it’s called.
Thanks. I think we just used a big countersink drill bit and then drilled the 6mm hole afterwards.
Brilliant build. Your conversion is so so much better and thorough than so many CZcams conversions.
Could you tell me what the aluminium bars are you’ve used to make the bed?
Thanks Jim, appreciate that. The metal bars are from RS Components called RS Pro Strut 40x40. Hope that helps?
@@OurVanPlan legend. Thanks a lot.
I love your videos and appreciate your answer on the RS Strut, could I ask where you got the M6 adapters from and what screw did you use to connect the slat to the strut. Many thanks! David
The adapters that slide into the strut and are screwed into are from RS components and the bolts are just from screwfix. Adapter details:
RS PRO Fixing & Connection Element T-Slot Nut, Groove Size 8mm
Stock no.:767-5654
@@OurVanPlan Super stuff, thanks guys! I’m finding lots of good info on your videos, your project looks amazing. Best, David
We are really liking the design in the recess, where did you get this from?
It’s just vinyl flooring. Can’t remember the exact name but I think I ended up getting it on eBay.
Brilliant video and easy to follow. I do have a question, I'm looking to do a similar design but I was thinking about having the bed so I could slide it both ways. So the "Day Mode" could also be in the further forward position allowing a larger garage space if needed. I can't seem to find videos of anyone doing this, wondered if there was a reason you decided not to? Thanks!
Thanks glad you found it helpful. I’m not sure how what you’re describing would work because at night you’d need to slide the bed back so you couldn’t use the additional garage space. That’s if I’ve understood it right!
@@OurVanPlan Sorry not sure i was clear. I think I actually sort of figured out the answer realising that obviously for you guys when you travel, you would always have it as a double so that's what you mean by having it back at night. However the difference is I'll be solo travelling mostly and if I had both slat sections as slideable, I could position it as a single further forward if I needed a bigger/taller garage space.
Hi! What type of wood and size did you use for the slats. Looks very well designed, well done
Thank you. The slats are pine (spare from our ceiling) and they’re 18mm x 75mm. I reckon we would have been ok with 12mm thickness.
This is a fab idea. But you haven't mentioned where you got your Alluminium extrusions from or dimensions of the wood used etc.
Thanks Duncan. The extrusion is from RS Components and the wood is 18mm x 70mm.
your videos are great and the workman ship is amazing. Do you have a link for the metal for the bed please.
Thanks Jason. I got it from RS components. Can’t remember exactly what they call it but it’s on their site.
@@OurVanPlan Perfect thank you, I look forward to the up coming videos, I'm interested on how you built the frame around the bed both sides on the panels.
I am currently building a L2H2 Boxer. Just curious is the aluminum extrusion you used 30X30 or 40X40? Love your build btw!
Thanks. It’s 40x40. Good luck with your build.
I’ve been looking everywhere for a design like this. Did you leave those wood supports in underneath or were they just there while you built it. I want to keep the underside open for storage.
It was 40mm extrusion from RS components. I kept underneath as open as possible but as I have a seat, boiler storage, water inlet and batteries there are a lot of uprights. You’d definitely need some under each fixed part of extrusion.
Hi Guys just watched your video on the roof slats could you tell me please were you brought them please Mark ATB
We got the pine from Sydenhams at Wickham in Hampshire. To be honest the quality wasn’t that great as a lot had splits in. We’ve subsequently been recommended Champion Timber so they might be worth a try.
@@OurVanPlan thanks so much ,keep them coming i have same van ATB Mark
Great video can you tell me what size alluminion extrusion you used for the bed and whete ypy got it from many thanks mark
Hi Mark, it’s 40mm extrusion and I got it and the connectors from RS components
@@OurVanPlan that's great have a lovely Christmas guys thank you
Nice idea and great explanation! What are the dimensions of the bars? Width and thickness? Thank you for sharing!
The metal bars are 40mm aluminium and the wooden slats 75mm x 10mm (possibly 12)
@@OurVanPlan Thanks! I am about to start making a similar bed and was a bit worried whether 10mm for wooden slats is enough
Love the bed and thinking of doing this in my L1H2 transit. What did you use to secure the fixed frames to the wood and also, how did you secure the smaller piece of wood that the extrusions slide on?
Thank you. We used the fittings for the aluminium extrusion to attach to the wood in all places. The slats are screwed into little M6 nut things that slot into the extrusion. The fixed part is attached using L brackets and the nuts that slot into the extrusion. Probably haven’t explained it well. But it’s all from RS components.
I don’t think I explained myself properly 😂
I mean the smaller pieces of wood on the sides of the van they are attached to the large piece. So the part where the edges of the extrusion slide along. I k ow you bolted the larger piece with M8 nuts and rivnuts but how did you secure the smaller piece as it seems to me to be taking the weight of the bed. Sorry, complete novice here and I need told step by step 😫
Ah ok we just glued and screwed those in (with a lot of screws!) but also the frame for the bench seat etc also buts up underneath to provide some vertical support.
Great idea but 2 questions:
1) Do the square edges of the extended slats ever catch on the bottom of the foam when you are collapsing it into 'day mode' ? (I was thinking rounded slats would less problematic)
2) In 'day mode' there is very little air flow between the slats. Is this a possible mould concern on the bottom of the foam ? (Probably more for when the van is not in use)
No to be honest we haven’t had an issue with the slats catching the mattress nor any issue with damp. I think there are still small air gaps which help.
Can you send a like as to where you purchased the aluminum extrusion and what size did you use?
Please!
It was from RS components and was 40mm
I wondered if the bed could have been mounted to the van somehow, rather than wood screwed to the van. Did I see that the support for the slats is held in by 4 small screws after all those heavier fixings where used to mount the wood beam to the van.
Yeah probably. I’d def design it differently now it’s done as you learn so much after the event! But to be fair the wood that the bed sits on is solid and has no problems or felt no give at all.
Was going to use the ikea struts but now I've seen this i think the aluminium extrusion is better. I assume you can easily screw a facing board onto the end one using the special nuts?
Just seen that's what you did!
Yep 👍🏻 we had to carpet it to hide the bolts but you could probably glue a finished surface to it if you didn’t want to use the carpet.
Hi. Nice design of the bed. Can I ask what size / thickness of the aluminium bars used? Do you happen to have a link to the 4 x bars used? Many thanks.
They’re 40mm aluminium extrusion and I got them from RS Components.
@@OurVanPlan thank you kindly. They look more solid then the aluminium struts people use from ikea. Especially when designing a sliding bed style.
Hi I am also converting a Boxer L2h2 could I ask what size timbers you are using for the bed as it looks quite substantial
Ah cool, the L2H2 club is very exclusive! The bed slats were made from leftover wood from the ceiling so they’re 18mm x 75mm pine. Probably a bit overkill but they do flex a bit when you get on and off the bed, so glad of the extra strength.
Question the name of the aluminium bar an where to find them to buy thanks in uk Watford London and the length you used many thanks great idea
They were from RS components and 40mm aluminium extrusion. They do all different types. I think the cut length was about 1.5m
Very good video!
I am 179cm tall, what is the actual usable length of your bed?thank you!
Thanks. It’s a full length double mattress so 190cm. I’m 180cm and plenty of space.
Amaze balls
What aluminium bars did you use, and where did you get them from please??
They’re 40mm extrusion from RS Components
Another brilliant job,, you should be getting way more views on your build, your workmanship is top drawer.
You may or may not find your bolts going into tie extruded aluminium loosen over time, put a drop of loctite 242 on them if they do.
Ah thanks. Appreciate that. I guess it’s just how the algorithm works. I did wonder about the bolts but good shout on the loctite 👍🏻
Sorry have a question now, what height do you have from the top of the mattress to the roof, can you sit up in it. Thanks
I dont have the height to hand but I can sit up in bed no problem.
what size was the aluminium please i love the bed and am looking to do same
Thanks. It’s 40mm extrusion from RS Components 👍
What sort of aluminium tube is that ? I thought it would bend with 2 people on it ?
It’s aluminium extrusion 40mm so quite thick and certainly impossible to bend! It’s less of a tube but more of a frame eg not hollow but has some structure inside it.
Hi what length m6 bolt did you use to secure the slats.... Thanks I'm advance
They weren’t very long maybe 30mm
@@OurVanPlan thank you getting back to about to mimick your bed build but ordering everything in at once
I guess you do not put any insulation where the bed is, in order to get 200cm width. Is that right?
Minimal insulation. So we had the 6mm closed cell foam insulation stuck on the metal and then the wood cut outs had silver foil insulation on. We don’t notice any major cold.
Hi, we're did you get the aluminium bars etc.
From RS components
What size extrusion did you use?
40mm from RS Components
dummy/rookie question - with the bed of this height, how can you open the back door from the inside? did you leave space for that?
Yeah there’s a gap as the bed doesn’t go right up to the door so can get my hand down to open the door no problem.
You could have drilled the wood first, offered the drilled pieces up as a guide . the same holes used to drill into the metal for your rivnuts !
Yeah but I wanted to use existing holes where possible. Your suggestion would be a lot quicker though!
Why inflict your choice of music
Because it is my video and a like having music in it 🎵
@@OurVanPlan sorry it's just I have to turn volume down and when the interesting part comes I sometimes miss important info!!!love your work.