Van builder shares private tips for a high quality build

Vložit
- čas přidán 13. 03. 2021
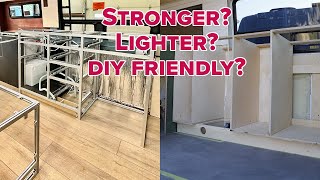
- How to measure square and parallel for your van wall cabinet. How to properly drill ceiling support mounts. How to design a galley module and How to treat a tongue and groove ceiling panel.
#onahumbleroad
#customvanbuild
#vanbuildsecrets


George.......how fortunate for everyone, that you decided to include your builds on CZcams. You're THE BEST!
Thank you for sharing your trade secrets. I work for a van building company here in San Diego. I've been a carpenter in the remodeling business for 30 years. Just started doing vans with this company. Feel like I'm starting over haha
Built like road-yachts. Watch with envy. Thanks.
This is why we chose George; his attention to quality and detail. And Alex is a true artisan! Apple-Tree
You must be excited! I agree!
I’m watching with interest!
Very wise choice, George and his team are incredible. Can’t wait to see your build complete.
Will be a fantastic one-of-a-kind! What colors are you going with on the decor?
Hello George, did you get the C+C machine in and set up as yet?. When you said you had on on the way,It sparked my interest. So here is my bold question ,Where does that apply to a van build? I have been afraid to ask ,I have been holding my breath science you anounced it, I am about to expire LOL . with regards richard
This takes "measure twice" to whole new level. Thank you for being a person of integrity.
you all prolly dont give a shit but does any of you know of a trick to log back into an instagram account?
I was dumb lost the password. I would love any tricks you can offer me!
@Imran Davis instablaster =)
@Langston Zachariah thanks for your reply. I got to the site thru google and im trying it out atm.
Seems to take a while so I will reply here later with my results.
Threaded rivets were wonderful!
Love the panel canvassing.
Carpentry needs to have a “master van carpentry” section.... thank you for sharing!
Many builders would probably keep their tips and tricks a secret.Thank you for sharing your knowledge. We appreciate you.
George & Company, clearly a Top Notch Group.
Love your videos, THANK YOU FOR YOUR TIME AND VAN LIFE CONSTRUCTION WISDOM
You Sir are a master at what you do.
Wow! That giant square is just.... Wow! 😂😂😂
Hi George
Love The Sunday Morning Humble Road Video with my Coffee !! Thank You !!👍
The tongue and groove panel, that is how they make the roll top desks. Great to see this evolution, George.
Measuring is the hardest part of construction. Thank you for explaining it so well. Measuring well is the Master status in any profession. You take it to a whole new level, bravo!
So nice to see your son, Alex working in your enterprise. He is also a master craftsman.
You did a great job of your past profession, of raising your kids, of avant garde van building, and of being an excellent teacher. Such a self realized person, truly a renaissance man. Enjoying the Sunday treat! 😎
love the big L Square great idea . Hey George looking very slim and trim . keep well
Your thoughtful process, attention to detail, and emphasis on quality is unparalleled. You and your “team” continue to raise the bar of excellence. As I re-watch this weeks video, an unspecified number of times, it’s hard not to anticipate and be excited for next Sunday’s new arrival. Thanks again George❗️😎
When I see all that’s going on in the Humble Road shop it’s amazing how far you’ve come from dreaming about building a van, to now working on two vans plus a remodel of another van simultaneously. When you mentioned van #1, I remember seeing the tour of it on CZcams channel New Jersey Outdoor Adventures. That video has had over 140,000 views, and it’s no surprise, your maiden build to the beginning of your collection of masterpieces, is still incredible to see. Your generous sharing of your tips and tricks is certainly invaluable to DIY builders. I can’t wait for Sunday’s to see what you’re up to with the builds. Thanks for another great episode of the builds. 🚐❤️👏🏼🙌🏻
NJOA will be doing a segment on the Pleasure-Way when it is ready.
mate, YOU ROCK, and WE thank you for the wisdom - the aligning method presented - gods may give you their grace.
Still, i have one question, can you make also a video with something LIGHTER? as in build? We all know drawers are adding A LOT of weight - respect to simple shelves - so, what about some weight savin?
Best of wishes, you rock!!
You are the best teacher. I can't screw in a light bulb and was at the edge of my seat watching.
Thanks for your Quality vLog.
A Nice Educational Sunday morning w/ Coffee and George!
Another great video George! I'm interested to see how you attach the upper cabinets to the wall and ceiling.
Another great video of divulging your secrets to perfection! Thanks for sharing, George! I hope you enjoyed me glamorizing your channel on my latest video yesterday! I was proud to showcase your channel, as, I enjoy watching it so much! Stay safe, my friend, and have a great and blessed Sunday!
Thanks for very nice video into your craftsmanship! What made my day a bit better are the Port-Star-Aft-Fore markings on the back side seen at 17:56 .. never thought that even Van can have Portside and Starboard, thanks.
Wow! Great construction lesson. And great products; I especially like the big sink and the marine latches.
The ceiling technique is something too.
Thank you very much!
Thank you for sharing! If you like Mastery, Competence, Patience, then you'll like Humble Road. It would be an honor to be in one of your vehicles no doubt.
It felt like you read my mind when you started to explain how to get the correct measurements for the wall cabinet frame. Thoroughly enjoyed your explanation and love the square and wall mount you created to make it all possible. Ingenious! And the tongue and groove ceiling boards held together like that! What a game changer!
I followed this channel for a long long time.. And the editing/camerawork is always top notch.. But considering what our Bearded Mr Road use to do for a living, i am not suprised. But i do NOT understand why it's still not +100K subs!? Or 3...or 500K... and it needs to get a bunch of good sponsors! Because just having your product show up on this channel, well...then you know it's quality stuff.
I appreciate that! Tell all your friends to subscribe. And tell them to tell their friends, as so on and so on!
This is invaluable ! Thank you !
Amazing work can't wait to see more great ideas
Am I planning to build out my own van? Heck No!
But yet I find myself fascinated by this video!
Thanks!
You make me want to build more than just one van, then you make me fear it because your attention to detail is WAY beyond what I have patience for. Respect
Impressive!
Thank you for sharing!
Love the music choice
Two minutes in and I’ve learnt more than anything from the hundreds of van videos I’ve seen ✨✨✨🙏🙏🙏
This is the best van conversion video I have ever seen. Pity, you guys are not in Australia. Those inserts are "Nutserts" here. Have a great day.
"How can a triangle be a square?...thats why I never was good at math." Hilarious! I love watching all the videos. Great information! Thanks for all your great tutorials.
Stop everything and watch! George thank you for sharing your journey. Including the not so pretty stuff 🎈
You're amazing! I am looking for a van and plan to call you to build my conversion van.
Deal!
These educational videos are more helpful than we can describe here. We are so grateful for your sharing your knowledge and skill and tips. Thank you.
Ah, I will have a better day after traveling along your humble road. ! Thx George
Always I’ve your level of detail and thoughtful design. Love also that you’re always evolving.
THIS IS SO HELPFUL!!!! I've been struggling to finish my van build to a high-quality level. I will build my own floor level and the canvas on the tongue-and-groove is BRILLIANT. Thank you thank you thank you.
The attention to detail is just astounding to me. In shop class everything I made came out looking like an ashtray. I still struggle to make any craft project look nice. The level of precision in these builds is mind expanding.
Someone can be a worker, or a craftsman, or an artist.
This guy is an artist. Great attention to details.
These must be expensive builds.
Great tips. I'm saving up for a van build and would love to have you be the one to work on it.
Great videos. Using lots of your tips, like riv nuts and “ mega floor square”. Thanks!
Your and your crew’s ingenuity is absolutely amazing! I really enjoy your videos, which amazes me.
Plus/cross nuts need more space for the initial placement as they are longer. So some different brand van may need the rivnuts
My head hurts from hitting it with my palm of hand and saying omggggggggg wow that is the right way...thank you oh great master 🍷🍷🍷
I always learn more here with George! One of my favorite builders! Very clear information that makes me dream of the open roads.
always good to learn something new from our favorite teacher .
Quite informative, thanks
On your double doors. Nice. Improve it just a bit more with some type of flush handles since this is isle space...
Great video, George!
I was only gonna stay for a couple minutes.... 18 min later and im not even mad. also, lol at the plus nut flashback 🤣
If I ever get rich and can afford a van and your price for a build...you are my dream. Love to watch your videos and marvel at the time and detail you put into each step of the build. Praying to one day fulfill my dream.....Thanks
On the break you should put under counter led lights
Your attention to detail is such an inspiration for all of my projects.
everything EVERY BODAY SAID & a sincere Thank you George for bing us along.
You have a great understanding of what newbies like myself would like to ask at various points. You always delivered the answer immediately when i wanted to ask a question :D
Ha! Glad it was helpful! But don't sell yourself short, we are on the same wavelength! 👍
I’d be curious to see the reading of a level measurement on the square...just curious! There’s so much more to be considered in a van build!! So much appreciate your engineering genius!
I just yelled, “That’s so #%^*+= SMART!” I love the way you think.
An artist's eye and a terrific attention to detail. Thank you, George for such a great description. You make it look easy but I know it is only through such care and thought.
Thank you so very much for sharing George and Alex! Beautiful and amazing job! 👍👍👍😍
Won’t be surprised if Humble Road becomes a Masters Class video training for the high end RV industry!
I am in awe of what occupies that cranium of yours. Right brain, left brain, and then there is Superior brain. My bucket list is to have George build out a Pro Master for me ... 🇨🇦🥰🙏🏼
Great tips George ! Thanks for sharing
You are a outstanding Van Builder !!!
Love the detailed information George!
Glad you liked it!
He is such a great teacher, the most amazing convertions, I wish I could try it, but must sell!
Great info as always. Thanks George. I may have to make one of those giant squares 👍
You should!
Re: doors - with the 80/20 you're perfectly setup for a bi-fold door with hidden center hinges. the door guides would ride in the center track of the aluminum.
Builds are coming along great!
Oh, George! You are so amazing! You spark ideas for my own build every day!
Happy to hear that!
Good Sunday morning to you all, happy Daylight Saving Time. Early risers just waking up at a normal time now. Glad this vid was here.
Thanks for reminding me of Daylight Savings! Saved my swim appt. You get the best info here!
I really never experience envy but it raised its ugly bead when I saw your rivnut/plusnut hydraulic set gun. I’ve already broken one hand tool by experimenting with too much pressure on a large rivnut and that was just a test!
Adventures in van building! Thanks for all the tips
My pneumatic PlusNut set tool was a very heavy purchase. But man, oh man, does it improve production! I'll be making a similar purchase on a 4/0 lug crimper next.
Another Master's Class.
Thanks George!!!
Glad you enjoyed it
Hi Goerge, thank you for sharing the details of how you work. Watching this video could make one think, every of these individual steps are easy and kind of obvious when you show it. But - and that is what makes you the master of vanbuilt, is taking into account the consequences that each of these little decisions can and will have to the next steps and sometimes to the whole project. Its always a pleasure to watch you working and to "hear you thinking" and seeing you building works of art. To be honest, I am a bit jealous, because most likely I will never own one of your vans.
You offer some fantastic tips and insight. Thanks again for sharing.
My pleasure!
this is an Awesome Video
I never miss one of your videos.
Really nice!
George, running the tape measure up to the ceiling requires a square off the second square...3 square job..
Aloha! Love watching ur meticulous style.U r a van building ninja 🥷! Love the show🌸🥰💗🙏
Some serious wisdom. I've lived in a van (box truck) for five years in my own home built rubble. I'm planning my next build. You have given me some things to think about here. 80/20, square and scribing the center line. Geometry...yes. Thanks!
I have watched many of your videos. We have a similar outlook on life. I wish you the best with your next build.
Gratitude George. Great square
Just found you and your channel! Brilliant stuff. I had the adventure of a lifetime driving the Baja peninsula in a truck and slide in camper for 3 months. Wanting to build a van for lighter travel. IDEA! You should be putting your designs into plans to be bought by people like me not able to pay a builder. I would pay you for 8020 plans/hardware lists for cabinets, bed platforms, shower stall and kitchen with drawers. Mix and match parts how I want or in steps due to cost. Easy, order everything precut with hardware and assemble according to your schematic. This is a fantastic opportunity to expand your business and it would be a huge contribution to the DIY community. Subscribed. Thank you.
Sunday Morning coffee van build with George - It’s like buttah!!!
Your attention to detail is amazing! Have you ever designed a build with twin beds? Searching for the best build for a disabled person who needs 2 twin beds instead of a queen or futon bed.
Lots of helpful tips-tha is for sharing.
Great video as always! Your videos are always full of gems of van building knowledge.
1:40 Strike the centerline on the van floor and measure off the centerline.
2:20 Levels are not the best reference in a van. Use the floor as the level reference. Faces should be made square or parallel to the floor.
10:30 Plus nut vs Riv nut (threaded rivets). Plus nut has more hold.
14:14 Marine single action latches.
14:30 Which blum soft close slides did you use?
1) 0:57 BIG SQUARE: Big wall square for getting correct dimensions for cabinets.
2) 1:25 VAN FLOOR CENTERLINE: How to determine centerline of floor from which to measure from.
3) 2:57 MEASURE CABINET PLACEMENT: How to measure for placement of cabinets so they are square and parallel to floor.
4) 9:38 PLUS NUTS: Drilling holes in ceiling ribs for Riv Nuts or Plus Nuts for ceiling panels. He sprays gray automotive primer into each hole after drilling so holes won’t rust. These are used for holes in surfaces so you can screw bolts into areas where you don’t have access to use nuts on the bolts. He uses 5/16-8 Plus Nuts. Both types are good but Plus Nuts have little feet on the outside so should be more secure than Riv Nuts.
5) 11:52 DRAWERS: Cabinet drawers are 1/2” thick pre-finished maple plywood.
6) 13:07 CABINETS: The top front area of cabinets extends 1” farther than the doors and drawers below to allow a sense of space.
7) 14:13 LATCHES & DRAWER SLIDES: Stainless steel marine door and drawer pulls. He uses Blum hidden soft closing drawer slides.
8) 15:06 CEILING PANELS: Panels are tongue and groove with painters canvas glued to back with contact cement. This enables the ceiling panel sections to conform to the curve of the van ceiling. Canvas attached to the panels also makes it easier to install each section to the vans ceiling. Panels are sprayed with two coats of primer (sanded between each coat) and then the canvas is glued to the back. After that each section is sprayed with top coat before installing on to the van ceiling.
Hi mate:
Love your builds, your attention to detail, and your willingness to teach.
Pro Tip:
When we use rivnuts and plusnuts in fabrication, we don't hit the drilled holes with a shot of spray primer from the front side to seal the exposed metal. That just doesn't do the job. Better is to use an earbud (Q-Tip in Yankee speak) coated with rust converter to scrape off a big drop of rust converter around the back (blind) side of the hole. That's where the bare, ragged steel burr is, and if you set the nut while the converter is still wet, it will bind the expansion nut and the sheet steel together fairly well when it converts/dries. The expansion nuts themselves lose their galvanizing at the joint from deformation anyway, and in a corrosive environment this method offers both superior rust protection and improved torque resistance. Don't take my word for it; try it on your test panel and tell us what you think...
Advanced Pro Tip:
Get a cheap 120ml (4 oz) push down alcohol dispenser bottle to wet your ear buds. As long as you keep water away from your ear buds, one of these little bottles half full of converter will seal hundreds of holes without contaminating the converter or spilling a drop- even if you knock it over a bunch of times while you're doing it.
Cheers from sunny Western Australia, and keep up the good work!
Tommo
EXCELLENT TIPS!!!! Thank you!
I love, love, love tamber doors. I would love to see you build one for a cabinet door some day. I would love to have a track-sliding tamber door and wonder if it would stand up to van life? Meanwhile, we get pseudo-tamber ceilings. I love that, too.
Tambours might be a bit noisy in a van.
Excellent video and van work.
Glad you enjoyed it
‘Nice’ ... you got that right !!
Damn George!! You just keep getting better!!🥰🥳🤗🤔
Reminds me of the techniques used by boat builders
Very informative and entertaining.
Great video as always! Thanks for sharing your tips. Which 80/20 extrusions do you use for the galley and upper cabinets, 1" or 1.5"? I've been watching closely trying to figure it out. I'm ready to start designing our framing.