Scaffold Pattern End Grain board Build tutorial

Vložit
- čas přidán 9. 06. 2022
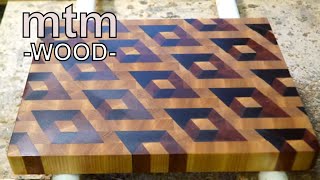
- This is an amazing and challenging pattern. My finished boards measure 12 1/2" X 14 1/2" X 1 1/4" and are composed of 32 triangle segments. I'll post the measured drawing of the segment components seen in the video on my FB business page here. / woodcreationsbydewayne
- Jak na to + styl


Excellent sound quality in video. Liking that clamp jig too. FWIW to anyone interested, I use wax paper under glue ups. If the parts are elevated, the drips just get thrown away. If not, any stuck paper comes off easily.
Молодец. Голова и руки на правильных местах. Приятно смотреть твои ролики. Творишь чудеса. Лайк всегда.
Thank you
Great pattern and great video on a very complex pattern. I did build this two times, second turned out better than the first. Thanks for the inspiration and for taking the time to put the information together so well!
Right on, thanks!
Thanks for not putting in a juice groove. Amazing work!
Lol Yeah I don't put them on any of my boards.
That's really cool! Thanks for showing your process
art at its finest, well done
Thank you for sharing this!!!
This is amazing. Thank you
Another great video. The precision required for such a good result is laudable
Truly amazing… thank you for sharing… cannot wait to try this one…
Cool! Have fun and work safe.
Great work 👍
Simply awesome, thank you for sharing this process.
Happy to help. Thank you.
Столько труда. Великолепная работа. 👍🏻
Thank you!! This is a few levels above me yet, but this tutorial is soooooo good I will be having a go at this soon
Beautiful piece of work, well done.
Thank you
Beautiful craftsmanship!
Thanks
Again Mr. Baker you’ve hit it out of the park with your educational tutorial . That is a beautiful end grain cutting board.
Thanks, it's a great pattern.
Great video very well done!!
Thanks
Thank you so much for doing this. As I was milling the boards down, I was like, "THERE IS NO WAY they're actually that thin." I came back to watch your video, & yes, they actually were. And they actually work.
Awesome, I’m working on a few of them currently. I do a lot of resawing and save thin pieces for other boards. I make the triangles a little differently now and have a short video on TikTok.
Amazing work, very creative! The best end grain pattern I have seen.
thanks
What an amazing Pattern, very nice work....way above my level of woodworking. Great video and sound. Well Done...
Thank you
Magnífico, sensacional !
It's an amazing pattern and the first tutorial of it's kind.
Gorgeous work man!!
thanks
새로운 디자인.. ㅈ 정말 아름다워요...
Another great board :)
Thanks
Thanks for sharing all your tips and tricks on how you do this. I've made a couple of boards patters but nothing like this. I look forward to the challenge.
Happy to help.
Incredible
Parabens muito da hora
You are going to please a lot of people with this. Very well done.
Thanks, I've always been one to share what I do.
absolutely love this board....and i also was hoping deep down inside that it would be a lot simpler to create...lol.
Here-Here! I second that motion.
It can be. After doing a few cuttingboards where triangles are the base repeatable pattern, I started looking at other patterns where (just like this one) the triangle could be substituted for other shapes. I've done some Google searching, and if you look hard enough, there is a pattern you can use - search for impossible pattern, Escher pattern, etc. It might take a little while, but it's there and looks to be a lot less complicated than this extraordinary example.
I'm just sayin' - the other ways to do this pattern are for mere mortals, just gotta look at it differently.
Simplesmente espetacular, muita linda essa tábua
Thank you. It's a great pattern that invites some interesting challenges.
Very nice your work. Thanks. I want meak it.tanks to you man.
Excellent job DeWayne. This particular project seems to require almost as much expertise in jig-making as in making the actual board.
The jigs are fairly simple but there is more than one way to do things. If you're making segment boards like the stacked diamond board in my other video the clamping jig is a must.
What a great piece of woodworking workmanship! My hope is that some day I can get to your skill level. You are a great inspiration!
Thank you, It’s just a matter investing the time and having the tools. You have an advantage of having my instruction.
I will try it sometime. I believe you are close to where I am in Asheville NC
I'm in California @@GK-qz3cm
Thanx for the video, looked like a sh@t ton of work but TOTALLY worth it, ur project came out killer !!!!
that's really Nice, Very Hard work.
Yes they are a lot of work.
Great Job Sir ❤️
Thank you
Muito bonito o seu trabalho tá de parabéns show de bola 😍👏😍👏😍👏😍👏
Thank you
Maravilhosa!!!! Eu não tenho todas essas máquinas que você tem, mas vou fazer do modo artesanal. Obrigado pela dica e o projeto.
You’re welcome and good luck
Genial obra de arte ...felicito por diseño, creatividad, paciencia y por sobre todo la dedicacion y el amor a la geometría en madera atte un humilde aprendiz
Thank you
Wow, Hello my friend.. All the best to your channel and hope you have a wonderful day !!!
I bet izzy swans adapter for table saw would allow you to run longer pieces
Also the octagon pattern blends the misalignment so it's less noticeable, but I understand your reservation. Hand planner rather than the jointer would also cut down on the misalignment.
Very nice
very nice.
extraordinario
Thanks
I personally don't like the aesthetic but the crafting skills to do this are form a true master 👏👏👏👏
Не засохший клей снемают шпателем,но не тряпкой....☝
WOW!
Quem me dera um dia eu fazer uma tábua igual a esta
What do have in the soak basin to finish? Do you soak more than once? Any issues with drips/runs in the finish or along the lower drip edge? Thanks Fantastic
I'm using pure mineral oil and I soak for about 30 minutes then place on a drip dry rack over night. Next morning I wipe on board butter which is a 4:1 mixture of mineral oil and pure beeswax. Search making board butter on CZcams for more info on that.
Love your cutting boards, could you post demensiona for glue jigs and cutting jig😊
I'll consider doing that. I've returned to my day job and not much shop time lately.
Amazing board Gary. how wide is board B & C. I see length and thickness, but mot width.Thanks for your help
I think the measurement you're referring to as length is the width. 2.42" for B and 1.36" for C. I make them 12" long but the length you make yours will depend on how thick you want your board and how many pucks you want to create.
Outstand work. Best pattern i have ever seen. One, may be silly question: Part A is made of cherry, part B of Maple and C+D are made of walnut? An admirer in Germany
Yes that's correct. Any wood combination can be used as long as there is contrast.
I truly enjoyed this video. I was wondering if this pattern was originally yours. It doesn't matter because everyone steals patterns, ideas and builds. The reason I ask is because I believe your skills are unbelievable and if you developed the pattern that would further my respect for your skill set .I have subscribed. I don't know how many videos you have posted but I feel the camera work could use some improving (like when you are stacking the individual pieces into the v-shaped jig. I wonder how many I will discard before I get it right. And we all know being off a couple thousandths is expected. If you have to reset your fence or blade or whatever. That's part of "handmade". And, it was cool how you incorporated 3/4" stock to keep the price down. Really, Really Cool. Thanks keep them coming. Super cool.
PS - what glue did you use? What blade on your saw?
Thanks.
Hi, Thanks for the comment. The pattern is not my original design. It stems from a segmented wood flooring pattern made in Italy. Someone in a FB group introduced it and his name is mentioned in the beginning of the video. I was excited to bring the tutorial to CZcams as it is a fairly fresh pattern on the end grain board scene. My first build was a struggle but things get easier once you have good test pieces and the jigs made. As for glue I use Tight Bond 3 and my rip blade is the Forrest Woodworker 2
DeWayne, These 3D boards bend my mind. I have the skills to make humidors, jewelry boxes, and hand-carved arch-top guitars. But I want in on the headaches of expanding my skill level by doing what you do. These are beautiful and you are quite skilled. The first thing I need is to replace my beloved 25-year-old Craftsman and buy a prission table saw, what is the model number of your SawStop. And is it the saw to buy in your opinion? Thanks, Dave.
Sounds like you’re at the appropriate skill level. I used a Craftsman contractor saw for many years and made lots of nice furniture, cabinets, boxes etc. The fence on that saw was its weakest point. It would seldom lock perfectly parallel. I have the Sawstop 1.75 PCS and it’s a huge improvement over the contractor saw. I think having your tools well tuned is key. I scored my Sawstop at an estate sale for $1000 and if weren’t for that I’d probably still be using the contractor saw. The Sawstop is an excellent saw and yes I recommend it. There are other saws just as nice minus the brake feature. A good solid T-glide or Besmier style fence is recommended
СУПЕР !!!!!!
I love the board. The measurements in the beginning of the video do not add up. Do you have an updated diagram with measurements?
I didn’t use math to arrive at the measurements. Just test cuts and fitment. I measured the pieces with 100th “ scale dial calipers. The measurements will get you in the zone and as mentioned in the video make your own test cuts and setup pieces. Measuring the triangles is tricky as you may apply more pressure than I do with the calipers.
Deixei o meu like e me inscrevi no canal
Why not glue all the triangles into final board? Any reason to do it in rows?
Amazing build!
When you give it a try you will find out.
@@dewaynebaker2924 i am making a paper template before i start cutting wood. Let's see!
I checked your FB page from the description and it seems that you are in Vacaville! Do you hold any workshops? I am in Davis and love to participate in one if you are organizing one. Thanks!
@@ashutoshsrivastava303 Yes, Im in Vacaville. I’m just a hobbyist and don’t hold workshop classes. I don’t mind having a visitor and I’m usually out in the shop on weekends. If you use Facebook message me there and we can discuss
@@dewaynebaker2924 that's perfect! Thanks again.
I checked the dimensions of the drawing of the triangle that is presented at minute 17 of the video. But they turn out to be mostly wrong, because they don't match mathematically. Can you explain to me why?
The center triangle letter A is 1.635 from tip to tip. I didn't arrive at my dimensions by using math I made test cuts that fit then measured them. In the video I recommend creating test cuts to check the fit.
What is the digital read out on the planer
Wixey digital plainer readout.
Although this is a truly awesome design and finished product, there seemed to be a way to make it simpler by gluing blocks together rather than cutting the individual pucks, then gluing. Is there any definitive reason for one method over the other?
I've seen it done a couple different ways but haven't tried them. One method eliminates the small triangles in the log glue up but the proportions looked off to me. The other method glues the triangle logs in row's before slicing to board thickness.
@@dewaynebaker2924 Thanks for getting back. It is always foolish to ignore those with experience, but the latter way you have mentioned seemed to be easier, quicker and more reliable, so I had just ordered if there was some flaw in that method. Also is seems imperative to be able to make these items in bulk, so every opportunity to save time, space and labour yet improve consistency seemed to be paramount. Thanks again. Conor. Scotland.
Awesome board!!! Thanks for sharing the build. If you were going to sell this board, I’m curious to know what you would ask.
I do offer them for sale and have been asking $250 plus shipping. I include display stands, care instructions and board conditioner.
Scaffold Pattern End Grain board Build tutorial💞👍🏻🤞
Do you have a pattern that you give out. I would like to make one.
I have a photo of the pattern in a post on my page here facebook.com/Woodcreationsbydewayne
@@dewaynebaker2924
I don’t have a Facebook account. Could you email one. Thanks
@@markstachovich9312 1.Woodworker@sbcglobal.net email me here and I will reply with the photo.
Is this guy incredibly tall? Looks like he’s towering over his table saw and other tools…
Yep, I'm 6' 10"
@@dewaynebaker2924 😮 Ok it was either that or you lowered all your tools for some reason! 👍🏻
Amazing board !!!
I was gonna guess 7’
I saw a guy in another video loosen clamps after an hour and wipe off excess glue and then reclamp.
hour of clamping time is sufficient with Tightbond 3. The glue is slow to cure on the underside that lays flat on the melamine clamping jig. I like to take it out after a couple hours then stand on edge overnight.
Lijkt op Escher
Yes, I hear that a lot.
Where are my x friends
K my brain hurts
Lol 😆
You ruined an otherwise very interesting video by adding horribly intrusive and annoying music.
Oh well....