Harley Davidson Glow Sign

Vložit
- čas přidán 13. 09. 2024
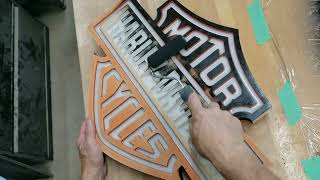
- I made this Harley Davidson sign for a good friend of mine. It's unique because the engravings glow in the dark. I did this by filling them with epoxy mixed with glow powder. The sign was cut on my CNC router. It turned out great!
Lemme know if you would like a sign like this. Or if you would like to try it yourself, I can cut the sign and send it to you to take it from there.
You can see my website post with a list of build materials and where to get them here: www.redneckdiy....
Check out my website at www.redneckdiy.com


I love that you expose the mistakes and the lessons learned.
I don't get bored while watching the CNC machine cut out the details, Feddie
+Dayle O'Brien Me either!!!! Thanks for watching.
I just found your channel after watching David's Trolling PSA video.
I can't tell you how grateful I am that you show your trainwrecked projects! I mess stuff up all the time, and it makes me feel a lot better about all of my mistakes. Plus, there's no better way to learn than from your mistakes.
Great video and I can't wait to make my way through all of your uploads!
+Toby Miller Thank you for the kind words, Toby. I really appreciate it! I try to keep it real on the vids. If I screw up, I'll tell you. Not a "fake til you make it" kind of guy! Stay tuned!
I am the lucky recipient of Feddie's ridiculous, unmatched talent. The sign just got hung in my new office, it's fantastic! You gotta order one of these signs, you will love it. Thanks again Feddie!!!!!
Dave Martino You da' man, Dave. It looks great in your office right next to the Harley Davidson chair! Diggin it......
How does one cost?
Nice video Freddie. I have a couple pointers that I have learned with my experience with working with different epoxy resins. The bubble problem you experienced was most likely due to excessive heat generated by the resin curing process. The curing process of resin is an exothermic reaction. The more resin, the higher the heat load. Now, certain resin's are better than others for filling large volumes. The pour on finish that you were using is not designed to go thicker than 1/8" typically. The best thing I have found for filling large volumes is a clear casting resin. The pour on finish works great for a skim coat but gets way to hot when curing, causing the bubbles.
Now, you are exactly right about the CO2 helping pop the bubbles. A little trick I came across is to use a CO2 tank or can and pop the bubbles that way. Much easier than breathing on the resin for the hours that follow. If you make another project like this try to use some Amazing Casting Resin from Alumilite, suitable for pours up to two inches thick. This is the easiest and most accessible resin I have found. Keep up the great work man.
Did I mention Feddie is an artist, a craftsman, an engineer, a mad scientist, and like my sign, 100 percent one-of-a kind original. And always and most importantly, my friend!
Dave Martino You're too kind to me, Dave. I believe the sign is officially a hit on CZcams. Told you it would be. :-)
Got more out of that than any project others have put up in a while. Showing the steps and issues you had, has probably saved a lot of people the same problem, including me. I have to make a few trail signs and I think this would be perfect for those. This project and the commentary was exactly what we need on other channels. They should all take note of your effort to educate and help fellow wood worked and makers. Continued support for your time and honesty is much appreciated.
Finally, someone that explains what they are doing without lame music. Just do it and show it. Very easy to understand and nice work. Got the plans to that. I want one in my shop.
My home-built CNC has been sitting idle for a while. Great inspiration to fire it up again. Awesome tip on the CO2 bubble zapping, too! Thanks for all the effort to make such a quality video.
Thomas Utley Thanks for watching, Thomas. I really appreciate the kind words and encouragement. Now, get out there tomorrow and fire that thing up! I'll send you the Harley vectors and tool paths in V-Carve pro if you want them. Just holler at me at blazingnailgun@gmail.com
What perseverance you showed on this project for your friend. Great example of "if you don't succeed try again (and again, and again)"
Really find your videos helpful and entertaining, keep them coming.
tzxj3n Thanks, TZX. I appreciate you watching and sending me some kind words!
About to do a sign for my garge and a buddy of mine. This saved me from running into the same problem, thanks man!
BAD ASS!!!!! nice thinking outside the box and sticking to it even after failed attempts. Keep up the good work sir
Kevin Riddle Thanks Kevin. I appreciate the encouragement!
I love learning from other people's mistakes - thanks for sharing your blooper roll.
Dave Landry You're welcome Dave. I like to show that sometimes it's not as easy as it might seem.
Great demonstration on showing us how to stick with something no matter what challenges may present itself. Learning a lot from your videos, on how to do/fix/create something as well as your video presentation “OUTSTANDING”. Looking forward to your next release
The Handy Outdoorsman Thanks Handy. I appreciate the kind words and the views!
I'm making a sign for my cousin and my uncle suggested to watch your video, I'm much appreciated for the amount of time you spent with this.
Very nice piece. I have used pour on epoxy and you are correct it is tricky, but very rewarding when the project is complete.
Great work. Glad you got the grit to push through and teach about the mistakes.
Look in' good, Feddy! That finished piece looked really really good! Props to you for sticking with it. I don't know that I would have. And thanks for sharing what you learned!
BradleyMakes Thans Bradley. I appreciate the kind words and the view!
Freddie, I love unique projects and yours was exceptional not just as a product but the presentation as well. That fact that you admitted some of the failures and remedies shows your passion in woodworking. I think the steps you showed were the right amount and the explanations in between were simple and to the point. That turned out beautifully. Congrats on your continued success and Thanks so much!!!
Received my sign and could not be happier.... thanks brother!
Wow, one of the BEST how-to videos I have ever watched on CZcams! I love all the details, you are a master woodworker!
Thanks!
Very nice Feddie! The project turned out fantastic. Thanks for throwing in the bits about the mistakes - saved a lot of fellow woodworkers a ton of grief! Who would have thought the wood would outgas after the finish had been put on? Learn something new every day! Subbed!
+Houston Firefox Thanks for watching, Houston. I really appreciate the view, the sun, and the kind words!
Nice job on that. Good on you for going over the failures - that helps just as much maybe more.
***** Thanks for watching Joe. I really appreciate it.
Great job. I enjoy learning more about the mistakes made then creating the actual project. You do great work.
I LOVE this sign!!!! I work with epoxy for "fun" and have learned lots doing it. GREAT JOB
+edwardsrc7 Thanks!
That is a sweet sign. Thanks for showing the problems you ran into as well.
Dustin Wren (Mr. Wren) Thanks Dustin!
Wow, this is a cool project. The wood is gassing because the air in the wood is expanding while the temperature is rising when epoxy is applied. When you heat the wood and apply the epoxy while it is cooling down, it shouldn't gas. Adding a layer of epoxy as base coat is a great idea!
+Johannes Fröhlich Great explanation and tip, Johannes!!!! Thank you for sharing!
Thanks so much for doing this video I am getting my CNC in 3 weeks (I hope) and this advice on finishing is invaluable
Hey thanks for not replying to my question, but it only made me to look for answers elsewhere :) but.. I made my first sign with epoxy and with the glow powder, and thanks to you I did the 3 layers of epoxy for sealing the wood, so I basically did not had any bubles :) thanks again and nice video and the sign is perfect! :)
The first sign of a true craftsman is to resolve the problems he encounters and the second is to freely pass it on. thanks
What a lot of unexpected work, Feddie! But man did it turn out great. Appreciate you going through your trials to teach those of us who would never have known that it's not as easy as it looks. Way to hang in and work through it. Turned out great. Love your vids. Troy
secondwind75 Thanks for the encouragement, Seconwind! I really appreciate it and I appreciate you watching my stuff.
Awesome job thanks for the teaching to jumpstart me into the world of signs and the examples of what not to do. Thanks again love it
Always enjoy Freddie that you show what it took to get to finish line ... I’m a newbie about to try my first tabletop with aqua fortis and making sure I know how to “seal the deal” because it’s a high traffic location that I’ve got to finish out with poly - hoping it works and I’m going to have many straws on hand just in case! 👍 nice job on the sign - gave me some cool ideas ... my teenage boys are forever raiding the frig at 2am ... might like that tabletop to glow - “it’s bedtime” but think my wife would just have me customize my dog house. Great video!
Love you videos Feddie! My wife and I have been making signs all week. I showed her one of your videos I stumbled on when trying to best understand how to paint letters in v-carved pine. The first thing she noticed was that your CNC machine looked just like mine, you have a bunch of Festool, just like me, and she swears I have some obsession with General Finishes milk paint. We live in a parallel universe!
CNC is such a learning curve! I have spent 18 months refining the machine, processes, etc, etc, and still, realize that pine is pine. No 2 pieces have the same density and route the same. Feeds and speeds are really hard to dial in as a result. I'm using Amana vbits but would love to exchange emails on your settings and experience.
Great video with HD clarity popping those pesky bubbles. Nice finished product!
smith-models Thanks for watching and taking a minute to send me some kind words!
HI NEV FROM AUSTRALIA I REALLY LIKED YOUR VIDEO IT WAS CLEAR AND INFORMATIVE EASY TO UNDERSTAND
THANKS
Glad you persevered with it I loved it thanks Aaron from the UK
aaronstill Thanks Aaron. I appreciate you watching!
Really enjoying your videos from someone who pretty much watches all the wood working videos on youtube! Nice sign and love your shop and home that you built! Keep up the great work!
I just bought my first CNC, this video has given me a lot of ideas thanks. Look forward to seeing more of your videos. thanks
+Marc Eaton Very cool, Marc. Lemme know if I can help out somehow. You are gonna see the world with whole new eyes now that you have a CNC!
Very, very informative. Like the alternatives to Glaze Coat demonstrated step by step. And I can't wait to get a project going just to use the glow in the dark powder!
Thanks for the honest and detailed explanations. Yes, CZcams transmits often the impression a project could be done in minutes rather than days... and without any mistakes for sure ... at least by all other makers except myself ;-)
norm1124 Thanks Norm. I'd rather keep it honest than have someone try it and blow it up and then blame me. :-)
Awesome mate, well done. It has given me more ideas to do in my own shop/shed now.
Thanks Freddie for sharing your 'train wrecks' and the solution for them damn bubbles. I have hope now! Failed projects here I come. Right on.
Very nice video hope your buddy got to see it because he will appreciate the sign a lot more seeing that you spent so much time and material cheers
Excellent video thank you very much. I had a very similar problem on a table top that I did. I used the West System base with the 207 Hardner. That's a 200 dollar bill just right there. This stuff is the highest glass like, mirror like finish epoxy I have ever seen. My table was white oak. The bubbles formed on this table like there was somebody underneath of it pressurizing the wood with an air gun! I chased the bubbles with a torch for two hours. Finally walked away and called the project junk. I still have it and I plan on trying to sand it down and add a second coat. I don't know if this will work but the table is so beautiful I don't want to give up on it so soon. I might use a lower cost epoxy just because I don't want to throw away another 200. Thank you for the information in your Video.
Real nice.!! I know a couple of guys who would dig one of these....Now just gotta get that CNC.
+Mark Vreeken Thanks Mark!
It turned out amazing. I just started using glow in the dark powder n paint from Art n Glow. I did an oil painting of mustangs running from a storm under a full moon. I just started putting think coats of the blue for the skippy n yellow for the moon. It's turning out amazing. I've learned you can't rush it. Me newbie love your channel. Toodles debs from Texas.
Thanks so much for your honesty and video so refreshing people being human! Cheers
Troy Kloszynski You're welcome, Troy. I appreciate you watching!
Very cool idea using the epoxy mixed w/ the glow powder. Your sign came out awesome!
Thanks!
I love your videos! now i want a cnc router lol
Some that I've seen that use the epoxy on tumblers put a fan on it. Could help with bubbles. Haven't tried it myself though. I have a cricut machine and now badly want a cnc router. Awesome sign!
Very, very nicely done. (I could watch the CNC machine run for days at a time.)
Looks awesome! I could listen to you all day long, I love your work.
very clean & nice logo,loved it.loved the the job you do,its very clean & good
Your badass man. Thanks you saved me allot of time and heartache.
When staining I put it on with a brush , wipe it off and then take an air hose and blow out the text quickly wiping the excess away. I find this works very well for me.
Awesome sign. I’ve been using epoxy on a lot of projects, a trick I’ve used is make your first coat of epoxy and cut it 50/50 with acetone and apply it with a brush and let it soak into the wood to help seal it from inside the wood.
Great tip. Thanks for sharing.
Freddy that sign is awesome. I am a fan. Thank you for detailing this on your channel.
+Bill Murray Thanks Bill. I appreciate the kind words!
Subscribing! Finally a video that deals with real world problems and solutions with epoxy and wood. Also thanks for the glow powder/epoxy ratio - missing on most videos on youtube. I'm setting up shop this year, building my own CNC and hope to use epoxy in this way. Early experiments have been similar to your results. Thanks for this incredibly useful video.
That sign is really good
I like it a lot. Great tips save people money, thanks Feddie.
Robert Chanclor You're welcome, Robert. I appreciate you watching!
Great Video. The commentary was spot on and I love your tips.
The sign came out fantastic Feddie! Nice job buddy!
good job love the sign, your must of been stoked
Thanks Lee!
Lucky guy to have good friend like you that would go to all that trouble so many times for him! BTW, it's probably the best use of a CNC I've seen for a long time but I might just be a bit prejudice as a Harley guy - haha.
Thanks for the tip about dealing with epoxy first. If you’re willing to do with a different aesthetic, the manufacturers of these powders often recommend using a white paint as the background to get most light out of the glow powder. Maybe go with a really dark stain or paint on the face of the sign and white paint in the recesses.
Checking out your back log of vids... I'm def in the right place. Glad I got to meet you. I might pepper you with a handful of noob cnc questions if that's o.k.
+Greg's Garage I'm glad to make the connection too. We can learn from each other. Just holler if I can ever help out somehow and I'll do the same!
Just discovered your channel and now subscribed. great project. I found a lot of value in seeing the issues you ran into and how you overcame. Looking forward to trying some of that glow-in-the-dark epoxy.
Awesome job Fred! Very interesting project I'm sure your buddy loved that sign. That CNC wood router sure does make the possibilities endless LOL
skwerlee Thanks! I appreciate the kind words. I love my CNC. :-)
Your frick'in awesome! I found your videos about 45 minutes ago and can't stop watching. I know nothing about wood working but always wanted to learn. THANKS!
and u should look into lichtenberg fractal imaging the applications are endless and a lot of fun. if you do i suggest to make a box to cover the the transformer with a on off switch for safety. ive made log slice stool benches pictures fire place mantles. incredibly beautifull
Excellent work and very creative! Great job
+Digital Swagg Thanks!
Your hard work paid off big time I love it
Great video and the view you have from your shop is awesome as well
Very cool! I learnt something very important with this video!! So many times I've tried something and I just didn't work out and I ditched the project. Thank you sir for showing that there is always another way and to stick with it. If you would have ditched the project nobody would have seen how to do this! I love it! Great job! Thanks for the inspiration.
Ryan
Mac n Wood Thank you for the kind words and encouragement, Ryan. I really appreciate it. I think if the real truth were told, most of the folks who make these vids would show that it was a lot more difficult than is usually shown in a short video clip!
well don't feel bad I'm a 30 year veteran painter and I would have done the same processes you did. very cool project you want to try a matte finish lacquer varnish it looks awesome ps did I forget to tell you kick ass project
well done mate ... I would love a CNC Router but a bit too expensive for my blood but the sign looks great ...shame we didn't see it lit up at night.
Another great video, Feddy! I really look forward to seeing what projects you have in the mix.
Dennis McCamley Thanks Dennis. I really appreciate the kind words. Too many ideas and not enough time and having to make a living in between has me kinds bogged down at the moment. :-)
What an awesome looking sign! And what a cool friend you are! Really like your delivery style! And the video production quality is great, as well! Liked and subbed!
Awesome sign man! Brilliant idea!
+Travis Martinez Thanks!
So glad I found your channel Feddy!! Awesome work and keep up the great vids
Bennie Hoskins Thank you for the kind words, Bennie. I really appreciate it!
thanks for the powder measurement demonstration. it will help me on future projects.
well done man - it turned out super clean and I like that - did you try compressed air set to a low psi for popping the bubbles?
+Nick Ferry Sorry I have gotten so far behind on responding to comments. Covered up!!!! Did not think of compressed air but that is a great idea. I'll keep that in mind next time. Oh, BTW, hows that noggin this morning? I'm betting you are hating life about right now... :-) (That's an inside joke to all the readers who are not at Woodworking in America 2015 this week.....)
haha it is fine for now - #wia2015 is a blast! It was great meeting you!
Brilliant, no other words for it, enjoyed every minute of the Video....Thanks
Great Job! I have watched several of your videos and also have subscribed. I have gotten several great ideas from what you have done so far and will be attempting my own. Nice Work. Thanks again!
That is such an awesome sign. Nice work.
Awesome work Feddie!
Darrell Coquillette Thanks Darrel. I appreciate the encouragement.
pretty fantastic... if only they made stuff like that over in ireland,, id love to get something done
Great sign and after 6 months of little projects you answered the question on why I get frosting when mixing epoxy to a wooden base much appreciated 👍
Got to give you a 'thumb's up' for persistence and perseverance, if nothing else. A great looking sign. Thanks for the video.
KSFWG Thanks! I appreciate the kind words.
Excellent video my friend thank you for sharing 🙏🏻
Excellent! Looks great!
I need one by Christmas!
Very nice . I hope your buddy watches this and understands all the hassle you went threw to make this for him lol
Ha!
Love this video. Well done Freddy.
That was an awesome idea , and it was really good that you followed thru too the end and finished the project
Styrmir Þór Einarsson Thanks you for watching and sending some kindness my way, Styrmir. I really appreciate it!
That's sick man! Nice work!
Jason Tetterton Thanks Jason. I wish the video and photographs could capture how cool it looks in person but it just doesn't.
Cool idea...I was wondering if you could cut the lettering all the way to the other side and place acrylic on the back side that is lit by an LED strip where you could change the colors and light intensity?
Great job! The glow idea is epic!
+Tools In Action Thanks!
Awesome video, very informative. Thank you for your time and sharing your efforts.