Polymer Clay Tutorial, a Quick and Easy Kaleidoscope Cane

Vložit
- čas přidán 27. 08. 2024
- This Free Polymer Clay Tutorial shows you how to make a quick and easy Kaleidoscope Cane. The video takes you step by step through the complete process and gives tips along the way.
It shows a simple skinner blend, and how to use this twice to create 2 basic canes with inserts, and then how to create a simple but effective Kaleidoscope pattern with them.
I hope you enjoy the video, if you do, and would like to learn how to make a more complex cane, I have both a free CZcams tutorial, and a more complex PDF tutorial available from my Etsy shop, links to both are below.
The links I mention in the video are here:
Natasha Bead / How I choose Colours for a Kaleidoscope : • How I choose colours f...
Conditioning Polymer Clay Quickly : • Conditioning Polymer C...
Basic Skinner Blend : • Basic Skinner Blend Tu...
Polymer Clay Kaleidoscope Tutorial - • Polymer Clay Kaleidosc...
If you like my work, then please do have a look at my website, www.fionaabel-s... and follow me on Facebook / fiona.abelsmith and Instagram. / fionaabelsmith.artist
I also have a number of Polymer Clay Tutorials to buy, both in my Etsy shop, PolyOriginals - www.etsy.com/u... where I have more tutorials in a PDF format, and as a video tutorial here - polyoriginals.t...
The Fun Kaleidoscope Cane Tutorial is here : www.etsy.com/u...
The music from the video is English Country Garden by Aaron Kenny and is available from the CZcams Free Audio Library.
Thank you so much for watching.


Fiona, I cannot thank you enough. I have spent the last week playing with clay, and with some success, which would not have been possible without your tutorials. You are clear, concise, and lovely to listen to. Thanks again. 🧡
I am so happy to hear you are enjoying your clay, thanks so much for leting me know, and for such a lovely comment too :)
I love how easy you tell is
Thank you very much :)
This is exactly what i needed. I have a bad habit of attempting projects above my skill level then beating myself up for not being perfect lol. This is complex enough to satisfy me and simple enough i may actually do it well.
Fantastic Allan, I hope you have great success with it, although pushing ourselves is always a great way to learn more, just try not to beat yourself up if it isn't perfect ;) Thanks for commenting :)
You are such a good teacher. Thank you for your kindness in sharing it with us.
You are very welcome, thank you Saionara Reis :)
Fiona Abel-Smith PolyOriginals , 😊
I can't believe you got
6 different patterns out
of that! That's incredible
and so beautiful too!
thanks Renee glad you enjoyed it despite the adverts ;) (Still giggling :) )
You're very easy to follow x
Thank you so much Jo 🙂
WOW! I did it, thanks to your wonderful guidance- thanks so much! I did have a little hole left in the middle, 😝 but pretty awesome for my first try!
I am so happy for you, and don't worry about the hole, that is quite normal when you first make these canes, but as you gain in confidence and practice, so the little holes will disappear, I certainly had them when I began making canes ;) thanks so much :)
As a relative newcomer to polymer clay, and an absolute beginner regarding canes, I thought your tutorial was quite brilliant. You explain everything so simply and clearly, without ever sounding condescending. I've actually made a kaleidoscope cane now - not even on the same planet as yors, of course, but at least I know what to do and what to aim for ! Thank you, thank you, thank you.
I am so happy to hear that Sheila, you have made my day, thank you so much for such lovely comments :)
I love it and if you use “icy” colours and translucent you could make some beautiful snowflakes. I am going to try it now 😁
Absolutely, they would look fab :)
Thanks so much for such a detailed tutorial, I made my very fist cane ever using the tutorial, I’m so excited that with a little practice I am able to create something so cool. Your a great teacher and I look forward to creating more projects using your videos.
Your first cane, of wow, that makes me so happy to hear, thank you very much :)
you have such a soothing voice! a pleasure to watch and listen to.
Thank you so much Aiesha :)
Yea she is really good and teaching too I'm surprised she doesn't have more subscribers.
@@alphacat4927I think so to.. she is very good explaining how to do the steps..
She could record audiobooks for children.
This was really helpful! Thank you!
So glad it was, thank you :)
Fiona you are so easy to listen to and watch thank you so much
Thank you very much Mary :)
Amazing. Thank you for expanding my creativity level
Thanks so much Chrys :)
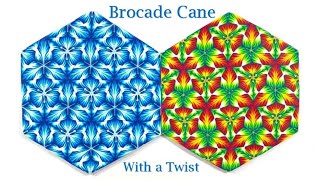
I love the "flower" (bottom right) and the "cube" (top right) patterns ! I mean, they are all lovely, but those appeal to me especially :)
So glad you like them, it is what I love about doing kaleidoscopes, you never know what is going to come out, and are usually happily surprised :)
Lovely. Thanks so much Fiona. I needed a reminder that you can achieve stunning results with simple caning techniques.
Thank you Genine :)
Thank you so much for putting this on youtube! I’m absolutely new to clay and already made such beautiful things thanks to your videos. It’s a pleasure to watch and learn from you! I love your canework!
Thank you so much, I am so glad you liked the videos and are having such fun with polymer clay :)
Gorgeous!
Thank you Melissa :)
Another inspiring tutorial. You are slowly, but surely converting me to a caner. I love how you take "cane science" and make it easy and playful. Thanks for sharing your expertise and artistry.
Oh wow, what a lovely comment, thank you so much :)
Wow, another hit! I picked up some great tips there that can improve my own canes.
Maybe in the next video like this, you can show us some examples of the work you make with these finished pieces (pendants, brooch etc). I would love to see what you made with those finished designs.
Thank you Siobhan, will do :)
Superb as ever. It's lovely that the same basic cane can make so many different end result kaleidoscopes. Thank you Fiona!
You are welcome, thanks Janet :)
Deine arbeiten gefallen mir sehr, vielen dank, daß Du Dein wissen mit uns teilst.
Sie sind herzlich willkommen, danke :)
I love you Fiona, you have made me feel confident again plus you have inspired me to get back to my clay. Your voice and method of teaching is calming and concise.Thank you lovely lady. xxxxx
Oh wow, thank you, thank you, thank you, you have made my day :) Big hugs :)
Thank you, Fiona - what a beautiful cane.
Thanks Caroline :)
Thank you so much for sharing Fiona! Your work is brilliant (and I love the soothing delivery of your instructions).
You are very welcome, thank you so much :)
I am so excited! Never did it before it turned out beauty! Wanted to show you, alas I am technologically challenged. This has been a joy to do! You are Awesome
That makes me so happy to hear Rhonda, thank you :) if you were on Facebook or Instagram you could post pictures and tag me, but don't worry if not, knowing that you are pleased with it is good enough for me :)
Fiona Abel-Smith PolyOriginals I’m on Facebook what do I do?
@@rhondasquires7770 I'll see if I can find you and send a friend request, or you find me and send me one, then when you post a picture, add my name, once we are friends it will highlight my name, click on it, and you will have tagged me in the post :)
@@rhondasquires7770 Can you send me a friend request, there were a few people who came up when I entered your name and I don't know which one is you ;) :)
I love your tutorials! So calming and then when done there is an excitingly beautiful piece!
Thank you so much Judy :)
Great tutorial. Really liked the results
Thanks so much George :)
How beautiful! Thank you for so handily removing the mystery from kaleidoscope patterns. Great tutorial.
Thanks so much Laurie :)
Amazing and gorgeous! Also your voice/accent is so calm and soothing.
Thank you so much Maxeen :)
I’m fairly new to polymer clay and will be trying my hand at canes for the first time. This video was easy to follow and informative! Thank you for sharing your knowledge :)
I am so happy to hear that, thank you jenny :)
Very beautiful
thank you JoAnn :)
Thank you Fiona! It struck me when you were reducing your cane why my kaleidoscope canes are not always even...... The sides should be equal!!! From now on I will reduce my canes on a squared sheet and hopefully, I will make better kaleidoscopes! Well done for getting this done in the heat, I can only make colour blends as everything else melts!
Thanks Liz, yes even sides - yay! I am surprised the FIMO Soft wasn't melting - I certainly was ! :)
Merci beaucoup pour votre réponse.
Wow, such simple design with outstanding results, colors are beautiful together!!!!
thank you Clay Girl :)
Lovely tutorial Fiona. Love your colour choices, as usual, resulting in a very nice kaleidoscope cane.
Thank you Marion :)
It's so relaxing watching you and listening to you. Another great tutorial Fiona! Thank you!
Thank you so much :)
I’m fairly new at all of this, and this video tutorial was wonderful! I’ve been somewhat scared to try a kaleidoscope cane after my first attempt went soooo wrong, but you’ve made it seem non-scary and I will definitely be trying it again! Thank you so much!!
I am so happy to hear that, thank you so much :)
Thank you!
Thanks Veronica :)
Good afternoon. Great job.
Thank you :)
Thank you so much!
You're welcome, thank you 🙂
How clever, so much variety from a simple combination. Lovely.
Thank you Sarah :)
Thank you for the clear instructions!
Thank you Lori :)
Love it Fiona, lovely colours, clear instruction (which is great). Thanks for sharing
Thank you so much Rosie :)
Another excellent, inspirational tutorial! Thank you Fiona.
Thanks so much Bella :)
Thank you so much for this tutorial! I have been searching for a Kaleidoscope cane tutorial for a while and this is my favorite one. very easy to follow
thank you Billie :)
You're a fantastic teacher Fiona. Thanks a million & 6 !!🌿
Thanks so much Becky :)
lots of possibilities here
Thanks Beetique :)
Beautiful cane and great instruction. Thanks Fiona!
Thank you :) I am loving your tutorials too :)
Love your choice of colors!
Thank you Colleen :)
So in love!!❤️ What a great Color combo! As always...fabulous, Fiona!! Tfs!!
Thank you Cindylee :)
I have definitely got to try this one. You make it look so easy.
yes definitely give it a go Leslie, thank you for your comment :)
Fiona, another winner❣️👍🏻. So easy ...and very well explained. I’d like to see if I can cover a small bowl with it. ( for my rings). Thanks for sharing.
thank you so much Gloria :)
Very BEAUTIFUL
Thank you Chii :)
Thank you! This was very helpful!!!
Thanks Chloe :)
Love it! Can't wait to have a play! ❤️
Thanks Aoife, can't wait to see what you do with it :)
Thank u Fiona
Thanks Christy :)
Thanks for these very clear explanations.
Thank you Sylvie :)
Hi Fiona Thank you for this tutorial, I now feel confident to try it
Thanks Ann, definitely go for it :)
Wow I’m so glad I stumbled upon your video! This is lovely and so calming to watch :)
I'm so glad too Jess, thank you so much :)
Lovely instructions, lovely cane:)
thank you so much Abi :)
WOW Fiona! You just amaze me evrytime I watch a videos Beautiful! Thank you for Sharing!! Hugs Liz...
Thanks Liz :)
Fiona Abel-Smith PolyOriginals Welcome ❤️
Fiona Abel-Smith PolyOriginals welcome ❤️
Fantastic work very artistic 😘
Thank you Ann :)
Fiona Abel-Smith PolyOriginals you’re very welcome Fiona x
Your parrots are lovely.
thank you Kim, did you mean patterns? :) because I just watched it again to check I didn't have any hidden parrots in there which I had missed ;)
I'm sorry thought I heard birds in the background. My bad.
Oh I wish I did, it may well have been our local birds, but sadly no parrots, more likely to have been sparrows or finches :)
I love that different patterns as it is really beautiful colour. Really, it is simple different ways although I never thought of it as you are really inspire me. I will try it myself as see what is happening. :-). Thank you so much.
Thank you Helen :)
I love it so much !
thank you :)
Superbe, magnifique, bravo pour votre travail et merci pour ce diy.
Merci beaucoup Ingrid :)
Gorgeous! My kind of colours. xx
Thanks Valerie :)
Amazing
I love this thanks so much for this tutorial!
Thanks Christy :)
These are beautiful!
Thank you Penny :)
Wow!!!
thanks so much :)
So pretty!
Thank you Siobhan :)
Beautiful
Thank you Kylie-Anne :)
Beautiful, I also see you like a block or 3d square,which is really need to
Thank you :)
Amazing, thank you
Hello...your voice is so calming. I'm new to clay crafting and I think I can do my first attempt with you. Could you put links for mate you're working on. Thank you
Thanks Veronica, did you mean links to the pasta machine I work on? If so, this is the normal reply I give :)
The pasta machine I use is an Atlas machine, at home I use the 180 (a wider machine) and when travelling or on workshops, I use the 150. I have always used the Atlas machines and I find them very good for Polymer Clay. However, there are other very good makes, such as the Imperia machines, and of course those made specifically for use with Polymer Clay. Ginger Davis Allman, from The Blue Bottle Tree has a number of articles on Pasta Machines - thebluebottletree.com/?s=pasta+machines which may prove helpful in choosing a machine.
Here is a link to an Atlas machine, (for reference only, as obviously there are many other places both online, and in stores where they can be found), and it is worth searching around till you can find a good deal on one. I hope that is of some help. www.amazon.com/Marcato-8320-Machine-Cutter-Instructions/dp/B0009U5OSO/ref=sr_1_3?crid=BPH5K7P26RQT&keywords=atlas+pasta+machine&qid=1556786279&s=gateway&sprefix=atlas+pasta+machine%2Caps%2C211&sr=8-3
If you meant the glass board, the link is here - Glass cutting Board - X Cut, search under glass, cutting, mat - www.amazon.co.uk/Xcut-13-inch-Tempered-Glass-Cutting/dp/B009W9BOGO/ref=sr_1_2?s=kitchen&ie=UTF8&qid=1550664510&sr=1-2&keywords=glass+cutting+mat
@@FionaAbelSmithPolyOriginals yes...thx
Bellissimo...brava...
Grazie Rosanna, :)
J'adors on peu faire plein de motifs different bonne idee
Merci beaucoup Sabine :)
superbe toutes ses possibilitées merçi
Merci beaucoup Regine :)
Awesome👍🏻❤❤
thank you :)
I tried this but with different colors. It is Okay but it doesn't have enough contrast. Thanks for the lesson I will get better and keep watching your videos.
Thanks Cheryl, and yes to get the right mix of contrast is something you only really learn by getting it wrong, something I did many times :) xx
Merveilleux !
Merci :)
Lovely work. Do you bake your work in a regular oven that’s also used for food? Do you cover it to protect food from fumes if any. 😊
Thanks so much Janice. You must have chosen probably the only video of mine where I don't mention this 😉 yes you can bake in an ordinary oven - always follow the manufacturer's instructions for the brand of clay you are using - and I always tent my tile/pieces whatever I am baking them on, in aluminium foil. This is to protect the clay should the oven spike during baking - but does also of course contain any fumes should the clay get too hot. I would never bake the clay at the same time as baking other food of course. At home I also have a little table top oven that I use to bake smaller pieces as it uses less electricity than a big oven. I hope that helps 🙂
C’est magique, un très grand merci pour votre talent.
Pouvez-vous me dire si vous faites cuire dans le four à combien de degré et combien de temps, merci beaucoup.
Merci beaucoup Yves, Comme il ya tellement de différentes marques d'argile. vous devez suivre les instructions sur la marque d'argile que vous utilisez :)
How do you make pictures in the cane like butterfly or something
Try this video of a horse head cane as an example :) czcams.com/video/9gjrOn7L5lc/video.html :)
Hi Fiona :) I was wondering if you can make coasters with that kind of way of doing things? I am making my own tiny home and want to use art to show off a lot on my home and think this would go great with the windows I will be making out of resin along with the matching table so want something like this for coasters.
Yes Susan, they would be perfect for coasters :) Many people make polymer clay coasters. Not sure if by tiny home you mean your own home or a dolls home, but just remember that polymer burns at quite a low temperature, so hot drinks etc would be fine, but no saucepans or such ;)
@@FionaAbelSmithPolyOriginals Yes I ment my own tiny home need something that does not require much fix it up and can take it on the road when I need this way and have the possibility to sell crafts too inside. The house I am in now requires so much fixing it just would be much easier to just build my own home on wheels and know it dont need more fixing. My idea was to have both door windows done in resin like stain glass and sounds like now someone with me also wants the windows to glow lol so. I will be also making the kitchen table the same way as the doors so it matches threw out the home and thought those coasters would be great for cups and glasses would complement the table and house lots :)
Sounds lovely, @@highlandergirl59 so yes, coasters for glasses and cups would be perfect :)
@@FionaAbelSmithPolyOriginals Thank you will keep watching your videos and learn more because those would be very pretty :)
Fiona, how do you recommend storing your finished pieces for the weeks or months while awaiting craft fairs to start?
As I sell all most of my pieces boxed, I have a stash of boxes, so when I have a piece finished and ready to go I get it all boxed up and ready. I found that the easiest solution for me, and easy then to grab and pack when I was off to a fair. If you don't box, or on occasions when I don't, I wrap each piece in a facial tissue, and then store them in A4 plastic bags, nicely spaced, and each bag labelled with what's inside, so again, they are quick grab and go's for doing any fairs. I am sure there are many other options that others use - perhaps put the question out there on some of the Facebook sites? But these are the methods that work for me :) I hope that helps.
Fiona Abel-Smith PolyOriginals Thank You!
I love your videos was just wondering where you get your clay from?
Thanks Susan :) did you want to pm me and we can chat about clay ? :)
Your tutorials scare the bejeezus out of me lol. Love to watch, too intimidated to try 😔
Oh no, don't say that :( So glad you like watching them though, maybe one day you'll give one a go, thank you :)
Hola... Can be hook up a Kaleidoscope with a crochet hook?
Hi Yasira, thanks for the comment, I think it may have lost something in the translation ? I'm not really sure what you are asking, so sorry.
These commercials are so
irritating. The computer
algorithms keep on sending
me these diet and exercise
ads and I'm only a size 12
which I don't think is that fat
for an older woman. In the
1940's the average woman
was a size 12 and was not
considered overweight. It's
not a health issue either, my
waist isn't over the limit yet.
( If your waist is over 34 inches
it's considered a health issue. )
The algorithms think I must be
a size 20 or something because
I ordered a catalog from a plus
size company ( sizes start at 12
and go up to like 40 something
so now the computers think I'm
really fat.)
You've made me giggle Renee :) I know the adverts are annoying at times, but as I do these tutorials for free, the only way I get even a very small income is from the adverts, and even then, only when people let them run just a little bit longer than when the skip button comes up. So if you can possibly bear with them, then I and other similar CZcamsrs can continue to make free videos for you to watch. :)
Hey I love your video! Canes are so tricky, I never get them right >.< I love seeing people put their time and dedication into clay~ it’s an awesome hobby to share! I’ve got a couple of videos myself if you’d like to check them out 💕
Thanks Lacuna :)
BBC
BBC? :)
Your video is really blurry
So sorry it is blurry for you :(