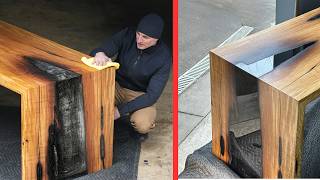
How to Make an Ocean Resin Table with a Glowing Epoxy River

Vložit
- čas přidán 15. 08. 2024
- How to make an ocean resin table with a glowing epoxy river full written tutorial here: pahjodesigns.c...
In this video tutorial, I show you how to make an epoxy beach table real sand and reclaimed cypress wood. Learn how to embed objects in resin and mix glow powder with resin in this step by step ocean table tutorial.
The live edge wood and transparent blue resin really looks like a real beach scene.
★ TOOLS / SUPPLIES (Affiliate Links) ★
Epoxy Resin: amzn.to/3TBdmlw
Translucent Blue Dye: amzn.to/2J6D9Bl
Glow Powder: bit.ly/3Ba2fbX
Translucent Blue Dye: amzn.to/3TlHaTl
Odie's Oil: amzn.to/3yYLvnw
Black Light (Test Glow Powder): amzn.to/3MNyEtU
Pearl White Pigment Powder: blackdiamondpi...?sca_ref=21666.692iRwfpRo
Black LED Light Strip: amzn.to/3se59bu
CA Glue: amzn.to/3yZOCvg
Mini Torch: amzn.to/3DfuU1j
Heat Gun: amzn.to/3SdLanG
Countersink Bit: amzn.to/3TlVxau
Drill: amzn.to/3TEVRkh
Raw Steel Hairpin Legs: amzn.to/3THdcZJ
Furniture Wax: amzn.to/3yYncpT
Silicone Caulk: amzn.to/3TlVYBE
Measuring Containers: amzn.to/3MW2b4L
Resin Stir Sticks: amzn.to/3sdKxQo
Nitrile Gloves: amzn.to/3gsmj27
Sheathing Tape: amzn.to/3THdUWT
Tape Gun: amzn.to/3TlX3JI
91% Alcohol: amzn.to/3gfkeXi
Fleur De Lis: amzn.to/3TWaRur
Sand Dollars: amzn.to/3zlJa6r
Track Saw: amzn.to/3VJmPck
Random Orbital Sander - Festool: amzn.to/3MLMVaJ
Festool Sandpaper (220 Grit): amzn.to/3VX72ab
Festool Track Clamps: amzn.to/3N3H2WB
Japanese Hand Saw: amzn.to/3sd4lU5
Dewalt Trim Router: amzn.to/3DewaS7
F Clamps: amzn.to/3Se2t8h
Bosch Miter Saw: amzn.to/3TcR2il
Bostitch Brad Nailer: amzn.to/3Se2IQJ
1.5" Brad Nails: amzn.to/3TFLYmi
Air Compressor Retractable Hose: amzn.to/3TDkw8P
Combination Square: amzn.to/3SkqDxC
★ FOLLOW ME ★
Website: pahjodesigns.com
Instagram: / pahjo_designs
Pinterest: / dodaddydiy
Facebook: / pahjodesigns
* For licensing / permission to use: Contact - info(at)do-daddy(dot)com
Music by Epidemic Sound (www.epidemicsou...)
© Pahjo Designs, LLC
PO Box 1155
Pearl River, LA. 70452
#beachtable #epoxyresin #oceantable - Jak na to + styl


I love glow in the dark. I was excited to see you make this table because I have someone who wants me to make a table for them and it will be my first time so I'm like very nervous about getting started. It came out beautiful. I really love it
Greetings from PCB!
Whoever winds up buying this from you will be getting 100% quality craftsmanship! It’s magnificent!
Thanks Stace! 🤙🏼😘
how much would a table like this go for?
This1Unbox - from 800 to 1500. This one would go for 1250.
Hope you are signing your pieces, you do great originals. Have you tried dropping the dye directly onto the resin after pouring to get a contrast in colors? This piece is beautiful, can't stop watching your work, subbed. Stay blessed, wonderful God given talent you have!
Thank you very much. Yes, I've done resin projects with dye, pigment powder, acrylic paint, & release agents (silicone oil, etc.). Check out my resin art project on my channel.
Love your job amazing work and video because you explain in details everything sometime beginner has a thounthans doubt, concerns and afraid and videos like this explain very good.
Thanks for share and teach us beginners.
Thank you very much for the compliment and I'm very happy my videos help you. Be sure to visit my website for more in depth explanations on all my projects.
That's was awesome to watch I am testing the waters with this type of wood working. On a 14x14 sheet of plywood.
Awesome! Let me know if I can be of assistance. I have more projects like this along with more detail on my blog - bit.ly/2IYuz5k
Love the look.
Thank you!
Where did you get all the sand dollars from ? Wife loves them And would love to make her something like this
Awesome work
Thank you!!
Are the led lights connected via a dc adapter or battery pack?
These are connected via a wall adapter. I use a walk adapter on most of my projects.
@@PahjoDesigns I’m trying to figure out a way to have led’s for a coffee table without having a cord
Is it more transparent in person? I like pro marine but it never comes out as clear as glass. I switched to super clear ill be using on my next project to see if it's any better.
Our family's condo is right there on East Pass. Love Destin.
I live in Crystal Beach and love it here.
Hi I loved the way your table turned out but I was wondering how much epoxy resin did you pour each time?
Navarro Edwards - I used pro marine epoxy, so I didn’t pour more than 1/4 to 1/2 inch with each pour.
Hi, how long between your pours? Did you wait till the resin was completely cured?
Well done.. I like how easy your approach was!
Hi, I am enjoying your epoxy river tables and had a couple quick questions...
1. How hard is it to get the epoxy perfectly level with the wood, so there is not a ridge or bump where the resin and wood meet? What would help to make this as smooth as possible?
2. If I topcoat the wood with poly or some other topcoat, do I go over the top of the epoxy too? Or do I avoid it?
3. Lastly, have you ever used an electric hand planer to help smooth out the top or clean up leaked resin?
Thanks for your time...,
jlynchtx - very good questions. I appreciate you asking them as each are important and require different techniques.
1.). It’s not difficult as long as the boards & resin mold are level before the resin is poured. They need to be the same thickness and secured to the mold bottom. To secure them, I like to use 2 scrap boards (normally 2x4s) and clamp them horizontally across the table at each end. This makes sure the boards do not shift during the resin pour. If one board is not level with the other board, the resin will rise higher on the lower board - although, some people like this look. Just be sure to keep things as level as possible. I also like to pour a little more resin than the height of the boards then sand it down a little. There are 2 other techniques I've seen people use, but haven't used myself. The first is to use a router with a router sled to flatten the board. The other technique is to flip the boards upside down so the top of the table is at the bottom of the resin mold then work your way backwards.
2.). Yes, you can go over the epoxy with a water based or oil based top coat. I did this in this project. I do find the river not as clear as it would be if the top coat was resin; however, it is still very clear and unnoticeable to the untrained eye. Oops - I just noticed I didn't answer your question. It's an either/or scenario b/c the epoxy may not adhere well to a top coat. It all comes down to the type of look you want. If you want a more natural, matte look - you probably want to go with a satin top coat like I used in this project. If you want a glossy look with maximum protection, go with a epoxy resin flood coat. Or, you can do a combination of both which requires a bit more work. I did a combination finish (epoxy top coat for river & shellac top coat on the wood only) of both on this project: czcams.com/video/hPr_qGWFBa4/video.html
To maintain the top coat finish over time, simply sand with 320 grit and reapply. To maintain the epoxy top coat, simply apply polish with a buffer. The maintenance on a top coat would only be to remove scratches.
3.) Yes, I have when I had a really bad resin leak on the bottom of one of my tables. It worked fine, but I don't like using my electric hand plane b/c it makes a mess and leaves burn marks. Probably due to the fact I don't know how to use it appropriately (i.e. user error). However, it was the perfect tool for removing resin from wood. I have a plethora of hand planes that I love using and I used these after I removed the cured resin to get a flat surface. Here are the 2 projects where I used an electric hand plane. The first I used to clean spilled resin and the second I used it to clean up some uneven parts of a beach slope that I shaped with a grinder.
First Project: pahjodesigns.com/led-epoxy-resin-river-table/
Second Project: pahjodesigns.com/epoxy-resin-ocean-table/
Hope this helps. I have detailed tutorials on all my videos on my website: pahjodesigns.com
Pahjo Designs Thanks for taking the time to answer my questions!
No problem - I'm happy to help. Good luck with your project and, if you don't mind, send me a pic when you are finished.
You did great
What did you put down as your base underneath? It doesn’t look like melamine....
It’s a scrap piece of melamine with furniture wax on top.
Wonderful. You're awesome!
Thank You!
awesome table, only i would have used a mixture of different shells.. but, Damn nice...
Thank you, Sir. I agree with the shells. I have a another video coming out soon with all sorts of cool seashells. I put a few pics on my Instagram - @pahjo_designs
Dang!! That a lot of epoxy! I personally would have added more sand. A lot cheaper and you use less epoxy resin. All in all, once again, excellent work!
Ladywood2 Thank you! I didn’t use as much as I could have. ;). Sand causes bubbles.
I would love to meet up some time to see your work. Do you train at all? I'm thinking about doing this as a hobby in Sarasota.
Hi Kirk, thanks so much. I’m in Destin Florida. I thought about doing a video training series, but haven’t done so yet. I do have many DIY downloadable plans on my website available for download. do-daddy.com/shop/
Hi, how are you please, where can I find these 2 products?
Links to product i used are in the description or on my blog: pahjodesigns.com
Sea foam dear sir, next time you should add some with the white epoxy, besides that it was absolutely beautiful.
SakuraKatya94 - great idea, I’ll definitely use that next time.
@@PahjoDesigns Cool, thanks for the replying and keep making beautiful videos. I don't know if I will ever do any epoxy projects myself, but you make me want to.
Excellent execution, though I might've used Beech! XD
MegaRetroRocket - thank you! Definitely agree, but the cypress was free. :)
Love the videos, cant stand the music, I would rather hear the slow hum of the sander
Thanks for the feedback. I’m glad you liked the video...
スカシカシパンいいね!!(#^.^#)
That a piece of mango?
John Edelmann - it’s Cypress.
Would be nicer with just wood imo
melanieenmats - maybe I’ll do that in the future. thanks for the feedback.
what is with the discs!!! would have better without them mate.
They are sand dollars.
You do amazing work but your choice of background music leaves a lot to be desired. Anyone who would enjoy listening to hip hop music most likely wouldn't be watching your videos.
Thank you for the feedback. What type of music do you prefer in videos?
Really nice work , really bad music .
Want to build your own Live Edge River Table? Visit my blog post to download the digital plans for this project: bit.ly/2O6sESe
Thanks for watching!