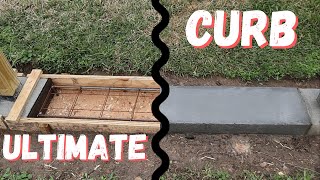
The ULTIMATE Concrete Landscape Edging (DIY Concrete Garden Curb)

Vložit
- čas přidán 4. 06. 2024
- 🛠 Tools and Materials Used: amzn.to/3PuEqUT
🧰 RapidSet Concrete Used: www.ctscement.com/product/cts...
Learn how to build concrete landscape edging with this DIY guide! Building a DIY Concrete Garden Curb is a great way to separate your garden from the rest of your yard. Additionally, building your garden curb edging out of concrete will ensure that it will last a very long time (unlike wood that will rot or that HORRIBLE plastic edging...).
In this video, I will show you how to:
1. Plan out and prepare the Site for the New Concrete Landscape Edging
2. How to Build the Concrete Forms for the Concrete Garden Curb
3. How to Mix and Pour the Concrete for the Concrete Garden Perimeter
4. How to Install Control Joints so that your Concrete Garden Curb won't have random cracks
Here are the Tools and Materials Needed to Complete this Project:
- Concrete Finishing Trowel: amzn.to/3Za9tHu
- Concrete Edging Trowel: amzn.to/3m2KQh5
- Concrete Grooving Trowel: amzn.to/3IDNi5x
- Dry Concrete Mix: www.ctscement.com/product/cts...
- Concrete Mixer: www.mudmixer.com/andrew
- Concrete Forms: 2"x4" and 2"x6" Lumber
- Stakes: amzn.to/3xZMqDb
- 6' Level: amzn.to/3HowUDn
- Expansion Joint: amzn.to/448r3xE
Link to Concrete Bag Calculator: www.ctscement.com/concretecal...
I almost always use Rapidset's 24/6 Concrete Mix for my concrete projects since it is easy to work with and cures within 24 hours. However, if you are only pouring a limited amount of concrete, Rapidset's Mortar Mix or CementAll could also work!
Here are my other Concrete projects!
How to Build a Concrete Sidewalk Entryway: • How to Pour a Concrete...
How to Replace a Broken Section of Concrete: • How to Replace a Segme...
How to Resurface Old Concrete: • How to Resurface Concr...
5 Ways to Mix Concrete: • Five Ways to Mix Dry C...
Be sure to subscribe and hit the notification bell so you don't miss any future videos! I have some big plans for the font of the house that I hope will boost the curb appeal!
Follow me on Instagram: / atimprovements
Check out my Blog: Atimprovements.com
Subscribe to my CZcams Channel ⬇️ czcams.com/users/AndrewThron...
Check out my Website for additional DIY Content: atimprovements.com
▬▬▬▬▬▬▬▬▬▬▬▬▬
🎥 MY CZcams GEAR
Camera (Iphone Max): amzn.to/3d5HxSo
Microphone (Maono Condenser Mic): amzn.to/3RCAb7N
Tripod: amzn.to/3Rz5Gj3
Mini Tripod: amzn.to/3Rvt2WM
Lighting: amzn.to/3d4QdZ5
▬▬▬▬▬▬▬▬▬▬▬▬▬
🛠🧰 TOOLS THAT I USE
Carbide Tipped Drill Bit: amzn.to/3S0hdIM
Tapcon Screws: amzn.to/3OxEWxh
Drill: amzn.to/3JICKkk
Tape Measure: amzn.to/3HaTWgE
Circular Saw: amzn.to/3BFotC4
Masonry Drill: amzn.to/36yP1JW
Level: amzn.to/3HowUDn
Hammer: amzn.to/35fIpiT
Chalk Line: amzn.to/3MwSDg8
Clamps: amzn.to/3HLqwpK
Drill: amzn.to/3JICKkk
Sawzall: amzn.to/3HcdeSI
Circular Saw: amzn.to/3BFotC4
Jig saw: amzn.to/3I6lcyd
Air Compressor: amzn.to/34TatJf
Framing Nailer: amzn.to/3JGpBYU
Roofing Nailer: amzn.to/3BEAuYF
Orbital Sander: amzn.to/34UwlUD
Bar Clamps: amzn.to/3JjFrJe
▬▬▬▬▬▬▬▬▬▬▬▬▬
Thank you so much for watching!
*All content on the Andrew Thron Improvements CZcams channel reflects my own opinions. Please seek out guidance of professionally trained and licensed individuals before making any decisions. Links in the description may be affiliate links.


Now I can edge like a pro. Thanks.
I egded to this video
I use pieces of 1inch pvc as the spacers between the forms and just leave them in there and pour on top to make drainage holes. Looks good. Needs rebar though
Using a reciprocating saw as a vibrator is a great idea. I would have placed a couple of #3 rebars in there for good measure in case roots push on it as the plants mature. Also, tooling control joints in wet concrete is tedious. I'd finish it smooth and cut them into the green concrete with a diamond (or abrasive) blade in a circular saw. Thanks for the content. It looks great.
nothing quite like edging with the help of a vibrator!
thanks for showing me the way to edge correctly
Great job Andrew. You always put out a great show with all necessary, helpful information included. That concrete machine is fabulous and the ATI Team is too.
Appreciate it, Patrick! Thanks for watching! And Ryan came through big time on this one 💯
i edge to you patrick
saw trick was brilliant. I don't do concrete but that looked like a fancy tool until you explained what it was love watching videos like this
Appreciate it - glad it helped you out!
Now i can edge all the time thank you
2x6 forms seem a bit of expensive overkill....contractors mostly use 1x or even 3/4 ply...good DIY video
i do agree.
New to the channel but love all the tasks. The part for us beginners is the supplies and the right mixing of the concrete. Other than that it is nice to see the finished product on here.
Welcome! I appreciate it
Not overkill at all, trust me. Nice work!
Great content Andrew! You make it look so easy in each video. Just wondering when you’ll be doing a deck project video.
Very nice and professional job. Such a pleasure to watch how everything is done correctly.
I appreciate it, John! Thanks for watching
This is my agenda this season. Planning the dimensions and process so this was helpful
Good luck with your project!
Nice job. And I've never seen anyone use an empty reciprocating saw to vibrate forms to eliminate air pockets. I'm always pleasantly surprised when I get to learn a new pro-tip. Thanks for that! 👍
Appreciate it! Thanks for watching!
Hammer
Great work and info. Thanks!!!
That is really awesome! You make it look so easy.
I appreciate it - Thanks for watching!
4:13 I was NOT PREPARED for those arms!! Wow 🔥🔥
This is what I need… love concrete
Just what I needed to see! Great job
Appreciate it! Good luck with your project.
More involved than I had thought. Thanks.
I feel like every project is like that haha thanks for watching!
finally some good edging
Nice job & looks great. You probably could have done something fancy with the drain/downspout. Taking it down into ground and angling out into a French drain for your lawn or for the new flower bed.
I appreciate it. And you are totally right. I just kept it simple 👍
THANKS FOR SHARING
👏👏👏
Excellent instructions!
Thanks!
Great job Bud!!!
Thanks!
I really like the look of this. I'm wondering how it would work in central WI zone 4b and do you think we'd have to do anything different? Thanks for sharing this!
I love your channel, Andrew. Keep it up! I feel obliged to let folks know that curbing-in landscaping CAN be equivalent to purposefully damming water up against a foundation. Drainage is key! With this in mind, the gutter above the bed in the video is showing clear signs of overflowing into the bed. This is a worst case scenario! All of this to say that DIY landscape curbing is fine, but drainage must be assessed as part of the project.
Bro you’re killing it with the house. Love your concrete builds 👌
Appreciate it! It’s almost done ✅
Good stuff man
Great job!
Thanks!
Looking sharp Andrew!
Appreciate it, John!
Awesome man, looks really clean. Going to try something similar in my front yard. Keep the great content coming!
Appreciate it! Good luck with your project!
Good job..nice little projects😊
do you need rebar Im making a small flower bed for mailbox thanks
love the video first time doing this
Now i can edge in class
Nice job Andrew.
🙏🙏
Looks good. I would have used washed stone instead of crusher run though especially since you wanted it for drainage.
Good job, love the finish. I won't be able to leap out there and do any of that but I could instruct some neighborhood boys..
I appreciate it. And I had some neighbors come by as I was doing the project haha
Any recommendations on a finishing trowel for a slab? Steel/mag, etc.
Great video and a new subscriber here. Quick question, what remedial work did you perform to fix the crack after it appeared in the control weak point you created (1 months ago after the pour)?
Great idea using oscillating tool
It definitely helps!
Awesome job
Thanks!
Good job! Having done this a number times myself i know how much time and effort is required. I always put in a # 3 bar centered but i think I'd more inclined to mix in a reinforcing fiber next time.
I think a stick of rebar would have been a good idea in hindsight. Hopefully it holds up for a while regardless!
LOL 6 inch's deep and for a flower garden and you think it needed rebar and fiber cement
@@davidstreling3690 I should have been a bit clearer. Instead of a #3 bar, I'd be inclined to add some fiber and and joint it where I think it may crack. Ultimately the base would determine what if any reinforcement is needed.
Never even heard of the MudMixer Now I want one
Haha it’s pretty nifty
Hi. Interesting project. Do you have frost in winter? Or why don't you put reinforcement inside?
I don't usually edge to that kind of stuff, but i get why some people might
Hi Andrew do you live in winter state? Just curious what frost might do to this? Would rebar help that? Thanks for the video!
dig the tip on using the sawzall as a ghetto vibrator. I will use that tip
Hammer drill works too!
For some reason this looks easy but I’m like! 😬 especially in South Florida where when you dig 3 inches you hit coral rock!
Commenting for the algorithm - 10/10 video
Appreciate it!
Good work
Thanks!
Personally I would just use nice pavers for this kind of thing. But it looks like a bang-on job
My 72 year old back hurts just watching you dig HAHA Great job! But I would have put in curves HAHA
Highly recommend a plate compactor for any significant job. The tamper gets old fast! Nice work!
Beautiful job. Do you have to treat the mulch for termites?
Good Job.
Appreciate it!
I would have suggested brushing or brooming to give it a texture. Also, would have pulled the board on the front off, rubbed and brushed it too. But overall better than what you had before.
Texture definitely would have helped to hide some of the imperfections - that’s for sure. Thanks for watching
Man, you're getting better in your presentation..
Appreciate it! Feedback is always welcome 🙏
@@AndrewThronImprovements if I may, I think the pace is okay, but maybe put more 'fire' in the presentation, just a little bit..
you forgot motor oil on the 4x 4 framing to reduce the bumpy side finish on the cement when you pull the wood framing off.
Rebar is good to put in too. And a drill 2 ft down keeps the curb from flipping
LOL flipping
Nice job, I got a feeling my Wife will want concrete garden beds if I show her this..:). My only suggestion is I would have used a single strand of rebar through the middle (probably overkill) and I would have built the forms by ripping a single sheet of OSB or plywood.. Cus I'm cheap...:)
Haha the OSB is actually a pretty good idea! So is the rebar - definitely wouldn’t hurt
Any reason you did not put any re-enforcement into the forms?
VERY NICE 🙂👍
Thank you 👍
Holy shit, the second I saw sawzall, I knew what yiu were doing, never thought of this. Nice video.
A Hammer Drill (SDS) also works. Thanks for watching!
Amazing. Why not put the landscape material on top of the compacted soil to mitigate migration of gravel into soil?
Hey great job , how about a driveway with a round about , just a half circle? Any idea how to get it round ? I don't know if wood would bend,
Use luan/ plywood
pouring concrete with water when it dries help to prevent cracking, especially when there's direct sun. For lazy solution - cover concrete with soaking wet blanket :)
Good tip - thanks for watching!
Looks good! Some steel would have been good to avoid those cracks
Damn, respect - looks amazing. Considering doing something like this myself, but a bit worried it might keep water both outside the border but also, inside - and then against my foundation. Any thoughts regarding rain/storm water and this border? Cheers!
Appreciate it! I thought about drainage concerns, but ultimately I decided that the gravel subbase of 5.5” would allow for enough drainage without much ponding. It also is Approx 6’ from my house - not like 2-3 feet
Just cut out a part of the concrete when you lay it get a drain extender and do it that way.
not a bad idea at all my dude@@codyshields5218
That is good job but you miss RCB( Reinforced concrete Bar). Always while you pour concrete use RCB
nice.
HELAL OLSUN DAYI OĞLU
Take the grass that you cut out, lay it upside down in the planter, when it dries out knock the excess dirt out and throw away the grass, it will be so much lighter in weight.
why didn't you put geotex fabric on ground first before the rock. Love your detail!
I forgot and only remembered after I put the first bit of stone down haha I appreciate it!
From experience you have created a pond. One day you will get so much rain that it will fill up and travel under your home. The fix is to enclose it away from the hose and add 2 inch pvc for drainage
One of the biggest "tricks" in building with concrete is to let it dry as slowly as possible (by for instance covering it with plastic sheets).
Look it up...
What size of gravel did you use in the base? Also, not criticizing but going with a rounded contour would have softened the sharp edge of the house. Personally, I'm not big on one "box" to finish off another "box" look.
You don’t add rebar inside the newly poured concrete to reinforce the edging?
While that mud mixer is a great tool the mark up on it is absolutely insane for what it really is if you would take it apart. i assume the cost of manufacturing that thing can't be more than 600-800$. Besides that i absolutely love the ideea you just gave me and the knowledge i gained from your video. now time to start my project too :)
It’s definitely expensive and not needed if you have a wheelbarrow and a shovel 👍 thanks for watching!
The expansion board isn’t necessary where exterior concrete contacts exterior concrete. It’s recommended when exterior meets interior (driveway against garage floor).
Fair point - I just went for the “better safe than sorry” approach. Thanks for watching!
@@AndrewThronImprovements starstruck I am! Thanks for the response dude.
So you’re saying exterior concrete doesn’t need expansion joint because it doesn’t expand ? 😅
Interior floors will have a substantial temperature difference than exterior. The expansion board lets both monoliths move independently. Where everything is in the same environment it will all move together.
Would love to get a rough estimate on how much $/ft this method cost. I'm considering using ground contact lumber for edging but know its a temporary solution to a permanent need. Thx!
When you say, "let it set up a little bit before finishing." How long do you mean?
Pretty slick. As a concrete guy I could nitpick but it would be petty to do so. Well thought out and executed. 👍
I appreciate the comment and for holding back haha but I am always trying to get better so constructive feedback is very much appreciated (especially if you are qualified haha)
Not really holding back. I would have added maybe some number 3 rebar but I wouldn't say it's necessary. Like I said. Nitpick.
Я б положил б ещё пару арматур или армировочную (кладочную) сетку в бетон. И на мой взгляд щебня много наложил.
А так "it's good" и выглядит "perfect"👍💪
Awesome video! Question about the control joints. I see that when you went back to make the surface smooth, these control joints had been removed. At one point, after pouring the concrete into the forms, did you remove the control joints?
Control joints didn’t go anywhere.
Maybe a reinforcing rebars in the concrete?
Wouldn’t hurt - but probably a bit overkill for this situation
Good video, made me realize I should just hire a pro 😢😅, but thanks
Thank you
what do you think about pouring concrete against the foundation, almost like having a sidewalk running around your house, rather than landscaping, thank you
Funny you ask. I live in Italy and here sidewalk around the house is the rule. I’ve recently built a new house extension and I asked the architect if I could have no sidewalk or very narrow so I could plant shrubs close to the house as you guys have in the US. He said no. A sidewalk of at least a meter (3 ft) around the house is necessary to prevent excessive rainwater from leaking into the foundation and causing damp damage to the wall. Consider that here all houses are brick and mortar and need impermeable barrier to protect walls from humidity rising up from the ground.
Hope the info is useful. Cheers. 👋
Hey Andrew have you tried the dry pour method that you see all around CZcams, would like to see your input or video on it.
I have not. To me, it seems to be a bit of a fad and cheap substitute for the tried and true method. But I may give it a try!
why not just say when you have an expensive piece of equipment you want to use it@@AndrewThronImprovements
I would never recommend that dry method, you will never know if there are dry pockets below the surface until it fails
As someone who cuts his own grass, hooray for not putting in a stupid curving curb or just dropping landscaping stones.
no rebar no weep holes no expansion joints. GL.
For the amount of labor that takes and the time expenditure Belgium block would have been mich faster and a MUCH more beautiful finish. Just an FYI from a 35 year pro.
What area of the country are you in i.e. does it freeze and snow there because if it does those things are going to crack and break in a year or two of winters.
Next project...clean up those moldy gutters!
Cost?
love how sexy concrete borders can be
why no armature in concrete?
no need for rebar?
A stick or two of rebar probably would not have hurt!
👍👍👍
It looks very good when it’s new, but after several winters will be completely different and difficult to repair and remove too.