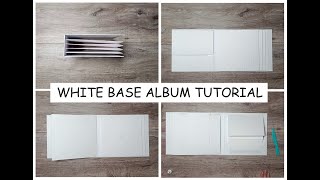
BLANK BASE FOLIO TUTORIAL ✨✨ | Album less than 2 hours | ~ Start to Finish | Scrapbook Mini Album

Vložit
- čas přidán 23. 01. 2024
- Hi, there! Welcome to my CZcams Channel! Hope you enjoy this video!
Thank you so much for watching 💕
This folio measure is 6,50 x 8.50 inches. I made this less than 2 hours.
Most of the time I used 8.5" x 11" Cardstock: 110 Lb./300 g/m2.
But for this album I used a medium heavy one (8.5" x 11", 180 g/m2).
I suggest to watch the video before preparing your pieces and working along. You should cut and prepares all your pieces before starting your album.
My measurement is here in the description box down below -- ›
FREE Printable pdf version:
drive.google.com/file/d/11oIa...
~~Some Products Mentioned~~
✨Chipboard - I used pizza box LOL. (you can use 12 x 12 Chipboard - Heavy - 52pt) - www.scrapbook.com/store/sbc-c...
✨Base paper - A4-size any black cardstock from 92 Lb./ 250 g/m2, example -
www.scrapbook.com/store/con-1...
✨For binding - A4-size any black cardstock from classic 180 g/m2., example -
www.amazon.com/Cardstock-Prin...
✨Universal hobby glue - www.littlebiteverything.net/p...
✨Camera Clear Stamp - www.aliexpress.com/item/32889...
✨Photo Frame die - www.aliexpress.com/item/10050...
✨Corner Punch - 2 in 1 - www.amazon.com/Xcut-Corner-Pu...
✨ We R Memory Mini Envelope Puncher - www.amazon.co.uk/We-Memory-Ke...
✨Score Board - www.amazon.com/We-Memory-Keep...
I hope you are love all the project what I shares.
If you like my video be sure to let me know what you think in the comment section below.
Please, give me a thumbs up!
So if you haven't subscribe my chanel, clicking that little button right there :D
And I'll see you the next time!
---------------------------------------------------------------------------------------------------------------------
Here is my measurements:
Chipboard: Cut (2) pieces at 6.50" x 8.5"; (1) pieces at 1.25 " x 8.50";
Black cardstock (1) piece at 15.50" x 9.50" or (2) piece at 8" x 9.50" (join together)
Cover inside (left side):
A: Cut (1) at 4.75" x 8.25" and score on the 4.75" side at 0.50" and at 0.75”.
B: Cut (1) at 6" x 8.25" and score on the 6" side at 0.50" and at 0.75”. And I used my mini Envelope Punch Board to create an opening on the side. *** Follow my video.
C: Cut (1) at 5.25" x 9.25" and score on the 9.25" side at 0.50" on each end and. Then I used my mini Envelope Punch Board to create an opening on the side, (pocket). *** Follow my video.
D: Cut (2) at 6.25" x 4.50" and and score on the 4.50" side at 0.50".
E: Cut (2) at 6.25" x 4.25" and and score on the 4.25" side at 0.50".
F: Cut (2) at 6.25" x 4" and and score on the 4" side at 0.50".
UNIT 3 (left side):
3A: Cut (1) at 7.50" x 8.25" and score on the 7.50" side at 5/8 " and at 1.25”.
3B: Cut (1) at 6" x 6" and score on the 6" side at 0.50" on each end then rotate and score on the 6" side at 0.50" on each end. Than cut it in two piece as two triangle. *** Follow my video.
UNIT 2 (right side):
2A: Cut (1) at 71/8" x 8.25" and score on the 71/8" side at 0.50" and at 7/8”.
2B: Cut (1) at 5" x 9.25" and score on the 9.25" side at 0.50" on each end and. Then mind the two corners with corner punch as me, (pocket actually).
2C: Cut (2) at 6.25" x 47/8" and and score on the 47/8" side at 0.50" and at 5/8”.
2D: Cut (2) at 6.75" x 41/8" and and score on the 6.75" side at 0.50".
2E: Cut (2) at 71/8" x 3.50" and and score on the 71/8" side at 0.50" on each end and then on the 3.50" side at 0.50" (pocket actually).
2F: Cut (2) at 61/8" x 41/8" and make a pencil mark from each end at 5/8" then cut this out like a window. ** optional Cut (1) at 57/8" x 37/8from Acetate Sheets. ** I didn’t use it.
UNIT 1 (left side):
1A: Cut (1) at 7" x 8.25" and score on the 7" side at 0.50" and at 0.75”.
1B: Cut (2) at 12" x 4" and score on the 61/8".
1B2: Cut (2) at 1.25" x 4" and score on the 5/8".
1C: Cut (2) at 4.75" x 6.25" and score on the 4.75" side at 0.50".
1D: Cut (1) at 5.25" x 2.25" and and score on the 5.25" side at 0.50" on each end and then on the 2.25" side at 0.50" (pocket actually).
Middle:
G: Cut (1) at 6.25" x 7.75" and score on the 6.25" side at 0.50" then score on the 7.75" side at 0.50". (pocket actually).
H: Cut (1) at 6.75" x 3.25" and and score on the 6.75" side at 0.50" on each end and then on the 3.25" side at 0.50" (pocket actually).
Thanks for watching!
P.S.:
I never say that anything is my idea or invent things ,
I get inspired from pinterest and so many youtube videos same as you do . :)
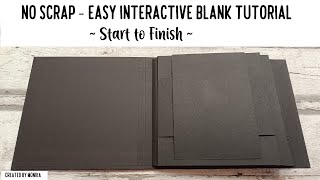
#base #scrapbooking #tutorial #interactivo #tuto #folio - Jak na to + styl


This is awesome. Love your tutorial style. Thank you!
Thanks for watching! 😊
Another awesome tutorial.....many thanks!! Nothing wrong with using a pizza box ☺I must say....you using that thicker tape is a great idea, it looks more enforced.....I have experienced many times when i make mine....there is a rip.....well that could be to the lack of my knowledge 😆lol .....will definitely give this a go.......Cheers Mel from Australia x
Hi Mel! 😍 It's fantastic that you follow me from Australia. I'm glad that you also find it for a good idea to use masking tape as enforcing. Have a great day! 😍
@@monikacsikos You are most welcome....yes loving your tape idea,...have a good day too 😍
Love your albums! Thank you Monika 💜🌼
Hi, thanks! Thanks for waching! ❤
Love this folio Monika. Thank you for the easy to follow tutorial. 🌹❤
Thank you! ❤
Thank you so much for sharing this. I absolutely love it. And thank you so much also for the measurements.
Hi, Thank you for watching! ❤
It was so nice to see a different design on the Folio. It was so easy to follow along while you made it. Thank you for sharing it.
Thank you for watching! ❤
Great folio! Thanks for sharing the tutorial ❤
Hi, thanks for waching! ❤
Piękna baza albumowa, będzie ślicznie ❤️.Super❤
Hi, thanks for waching! ❤
Love it, thank you for sharing ❤️🇨🇦
Thanks for watching! 😊
Gracias por compartir. Muy bien hecho. Bendiciones!!😊
Thanks for watching! 😊
Super folio, enjoyed
Thanks for watching! 😊
Love this tutorial.
Thanks for watching! 😊
I made this album using Mintay Eloise, it turned out amazing. Thank you so much for the awesome tutorial. Your talent is something to be proud of.
Thank you for watching! ❤ I wish I could see your final album. 👏
Hello! C'est une belle base d'album !!! Merci beaucoup, bonne soirée. Bye bye
Thanks for watching! ❤
Monika, lindo seu projeto. Sou do Brasil e adoro seu trabalho. Obrigada pelo pdf, pela disposição em gravar e pela paciência em responder a todos. Achei muitas dúvidas nos comentários respondidos.
Já salvei o vídeo como predileto.
Só vim mesmo agradecer. Muito obrigada. Deus lhe abençoe e guarde. 🙌🙏🙌❤
Hi, Thanky for watching! I'm glad you like my albums. I love to doing it. I'm grateful you found me. Have a wonderful day! 🤗❤
Amei ❤
Thanks for watching! 😊
Sim mto talento excelente tutorial vou fazer obgd. Obs. Perdão dificil foi escutar a musica ate q coloquei no mudo. Ufa! q alivio😂❤🌟🌟🌟🌟🌟🧚♂️
Thanks for watching! ❤Yes, it's hard to find good music for such a long video that everyone likes. But it's good that there is a solution! 😂👏
Merci pour se tuto cela fait 4 ans que je réalise des albums j'adore ...
Thank you for watching! ❤ Have fun and have a good job!
Thank you. I love following your albums. Can you please share where you got the frame / pocket metal cutting die from please??
Hi Emma! 😍 Thanks for watching! I refrish the video description box. Now you can find the information.
Hello I'm new to your channel and have subscribed. ❤ How you make your covers. I make journals and notebooks and would like to incorporate your techniques. Do you have a tutorial listing ALL THE MATERIALS you use; ie tapes, glues, paper thickness ruler and so forth. My biggest question is what kind of tape are you using to first bind your spine to the covers (is it just masking tape) and what kind of tape has that yellow backing?
Thanks for all of your awesome tutorials. Appreciate you being so clear and precise.
Hi! Thanks for for watching and subscribed! 😊😍 Unfortunately, I don't have an exact material list, because most of them are not available in your country. I live in Hungary. I buy most things here. At the beginning of the video, I only show what is needed. Most of the time I used 8.5" x 11" Cardstock: 135 Lb./200 Gsm. But for this album I used a medium heavy one (8.5" x 11", 65 lb./176 gsm).
Yes, for the spine to the covers is it just a regular masking tape. In my country is difficult to purchase tyvek.
How I make album COVER:
czcams.com/video/WOCyvEeZZtQ/video.html
Have a fun and crafty days! 😍
Thanks@@monikacsikos
Thank you Monika. I'm thinking of you this album from a trip could you please tell me how many photos we could pout. Thank so much Mona 🥰🇨🇦
Thanks for watching!😍 About 60 photos can fitt in the album. 😊
You can see the final result here:
czcams.com/video/1vqHqWDTupw/video.html
Love this! Can you tell me where you purchased the frame die from?
Hi, thanks for waching! ❤ Die cut is from Aliexpress :D
Hi Hun,
I'm a little confused by your use of glue on the double sided tape, I'd have thought the liquid glue would ruin the stickyness of the tape, have you found it worked better with both? Is there a particular brand you use or would most (decent) brands work?
The folio looks great & I can't wait to make one and fill it! Thank you so much for doing the tutorial and posting it, am looking forward to watching more xx
I do this also. It gives you time to move your card stock if you haven’t placed it correctly. Does not effect the tape.
Thanks for the perfect explanation! ❤ And thanks for watching! 😊 Have a nice day!
what kind of tape are you using on the cover when assembling?
Hi, thanks for waching! ❤ The name is TESA - Masking Tape Classic
What kind of tape did you use for the spine? What brand?
Hi, TESA the brand name of the yellow masking tape, if you asking this. Thanks for watching! 😍
What number on the punch board are you lining it up at for part B
The paper is marked for aligning at 1-1/2 inches.
Hi. Can you tell me the exact minutes in the video? I could help you better. 😊
It was the markings for the pockets. What line on the punch board did you line the pocket pages up with.
Pls I like very much your videos but I don’t know how can I get the measurements. Where is the box.?
drive.google.com/file/d/11oIagwwSK8gdpxZid0u5NqHdsAHeCSxv/view?usp=drive_link
Dans la description de la vidéo 😊
Hallo Monica. Wat mooie album. Ik vind er mooie,
Komt nog een vervolg?. Alvast bedankt.
Liefs Yvonne 😘
Go to the more button. Scroll down. Voila!
Thanks girls! 😘 Thanks for watching! 😊
Bonjour, merci pour votre tutoriel. C'est très bien expliqué.
J'ai réalisé un mini avec votre tuto, "le temps d'une pose". Il se trouve sur ma chaîne si vous voulez le voir.
Bonne journée 😘
Thank you! ❤ Absolutely gorgeous. I love the color, the bird, and the your page edges. You are so talented as well. Thanks for sharing! 🌹😘 I subscribed to your channel.
Merci à vous pour l' abonnement a ma chaîne. Et pour votre tuto 😍😍
Que pena que no ponga las medidas, soy de Chile y no le entiendo nada de como hacer su trabajo,voy está hermoso.😢😢😢😢😢😢
Se proporciona un tutorial descargable en la descripción y un enlace debajo del video. Espero que lo encuentres.
Everything is in the description below the video.
É só converter. Sou do Brasil e aqui tudo está em cm, mas não deixo de fazer nada por não ser a mesma unidade de medida. E mais, ela deixou um PDF com todas as medidas. Nao tem erro. Aproveite esse belíssimo tutorial.
I love the product being made, but the music was a bit much to take.❤
Thanks for watching! 😊
turn the volume off. problem solved.