Whirlpool/Kenmore Washer Drive Tub Wear Pad

Vložit
- čas přidán 17. 05. 2010
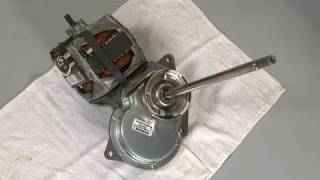
- This video provides step-by-step instructions for replacing the drive tub wear pads on top loading direct drive Whirlpool washing machines. The most common reasons for replacing the drive tub wear pads are when the washer vibrates too much or makes a sound of metal grating on metal, or when the washer tub is off balance.
Click here to purchase Part #285744: www.repairclinic.com/PartDetai...
Additional washing machine repair, troubleshooting tips, help with finding your model number, and part replacement videos: www.repairclinic.com/RepairHel...
All the information in this wear pad replacement video is applicable to the following brands: Whirlpool, Kenmore, KitchenAid, Roper, Maytag, Estate, Inglis, Crosley, Amana, Admiral
Tools used: flat-head screwdriver, Phillips head screwdriver, pliers, putty knife, 7/16” socket, spanner wrench, hammer
Connect With Us!
plus.google.com/+repairclinic
/ repairclinic
/ repairclinic
/ repairclinic
Join our free VIP email list for discounts and money-saving tips: tinyurl.com/pnnh3be
Check out our blog: www.DIY.RepairClinic.com
Don't forget to like and comment on this video, and subscribe to our channel! - Jak na to + styl


I have a 2007 Kenmore 800 washing machine that looks almost exactly like the one in the video. It was vibrating a ton and very noisy during spin cycle. I found that the rear lower suspension pad (285744) had worn out. There was a little of the pad left, but metal had clearly been scraping directly on metal as there was a pile of metal dust on the floor just below the rear suspension pad. I decided to replace all 3 suspension springs, the counterbalance spring, and both sets of 3 suspension pads (285744 and 285219). I moved my drier out of the way, then removed only the body on the washing machine to get access, skipping most of the disassembly in this video, which seems fraught with pitfalls. With some awkwardness and difficulty I was able to replace all the parts. Once the springs are removed, it is fairly easy to move the tub around to get clearance for removing and installing the pads. The filler spout gets in the way a little. Wood shims and/or a helper can make it easier. I didn't need any special tools, just gloves, pliers, putty knife, screwdriver, and $40 in parts. The 285219 pads were the most difficult to install but I was successful and my machine doesn't vibrate anymore.
I had one of the pads fall out while I was doing something else. I was able to put it back in by laying the machine on its side and using my fingers.
There is no need too take the tub apart I did not even take the springs off although you can. Just prop the tub up with 2x4 and change snubbers one at a time moving the 2x4 as you go save some major time.
Washing machine had bad shake so I got wear pads and the tools I need to change them at RepairClinic, watched this video to guide me and that's all it took. Machine spines nice. No more shaking!
I recommend following the steps in the video and taking apart the machine because you get to clean every thing at the same time. You'd be surprise to see how nasty it gets in there.
Thanks RepairClinic!
The pads worked well and I took someones advice and didn't remove the tub. I don't have a spanner wrench. I did clean the inside of as much as I could get to and also replaced the springs which are pretty cheap. I had a little trouble getting the old pads out because they had been worn almost paper thin.
Be very careful about tapping the new pads into place with a hammer. They are very fragile and I just busted a pad while trying to replace them.
where can I find those thing
My Kenmore washer(110.20712990) has developed a shake during the spin cycle and I noticed black shavings on top of my gear case. Does this mean I have worn wear pads or is it something else?
Mike Law The wear pads could be causing the issue, but we are not sure the black shavings indicates a specific issue.
***** My washer has two sets of pads; should both sets be replaced? Also, when replacing the pads should all the suspension springs be replaced since they're not expensive and given that my washer is 15 years old?
Mike Law That would be a good idea since they are likely worn too.
You do not need to remove everything
There IS a need to take it apart. When yo do you will realize that the machine's tub and parts need a serious cleaning. The top of the tub will be filled with soap scum and dirt.
Take the time to take it apart and give all the parts a good clean.
Just lay the machine down, punch the old ones out with a screwdriver and pop the new ones in. less than 2 min job.
Can't you just flip the washing machine on its side and replace the pads from the bottom?
You can try but we think they will be harder to get to. The tub will be pulling down on the springs and they will be significantly harder to unhook and reattach.
Well I just did it that way, and it was super easy. Snapped the pads on with a channel lock pliers.
***** Congrats!
***** I am about to perform this surgery this week...got a little uneasy when I see this video taking the tub apart etc. One site Davesrepair.com doesn't mention the tub dis-assembly ...so you did it without all that? Good I will try...any tips?
Forest Rodgers We recommend following the steps we outline in the video.