Chinking a Log Home Instructional How-to

Vložit
- čas přidán 29. 08. 2018
- TIMELESS WOODCARE PRESENTS:
HOW TO INSTALL CHINKING
Step One: Clean the surface area
Tools needed, a clean rag
Step 2: Installation of Grip-Strip Backer Rod
Tools needed, Grip Strip and a sharp knife. Make sure to cut the Grip-Strip at an angle to insure proper fit. Be careful to avoid cutting the backer rod too narrow, as to never leave a gap. Check your work as you go, adjusting accordingly. Knots can be tricky. Additional material may have to be trimmed from both sides to accommodate for the natural irregularities of the log. Be sure to maintain a vertical face on the front of the backer rod for the application of the chinking.
Step 3: Staple Grip-Strip in place, this is optional depending on the log configuration.
Tools needed, a pneumatic nail gun and nails or staple gun and staples.
Hold Grip-Strip firmly when nailing into place. Care must be given to maintain a vertical posture. If a nail pulls the edge in too far, use a razor to release some of the tension. (2:26) Cut end angles to fit as needed. (2:30) Overlap and fit to insure a proper fit when installing two pieces together. It is important that no gap is present. Go back and check your work to ensure that all sections are nice and tight. Add a staple if needed
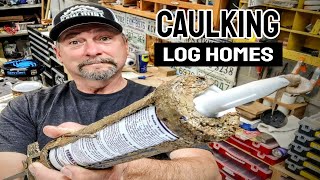
Step 4: Loading Chinking Gun
Tools Needed: Chinking gun, chinking, bucket follow plate
Push firmly down, unscrew end, attach bucket thing, push down handle realease and pull up steady and slowly on the handle. Then tilt back the gun to release pressure. Screw nozzle on gun. Squeeze handle to eliminate air pockets and bring the chink to the tip of nozzle.
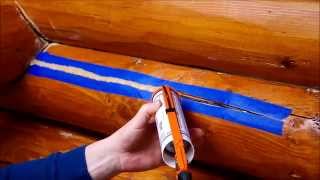
Step 5: Apply Chinking
Tools Needed: Chinking gun and chinking
Get a good amount in a corner to start, take your time to apply in a straight line with even coverage. You might get surprised by an air pocket. Hold steady and squeeze handle to work out the air. Only go a little at a time so you can_____and fully get a section smoothed out before moving on. Keep in mind that you might have to have multiple rows of chinking to completley cover the gap. Go back in between the rows to fill in gaps that occur.
Step 5: Spreading Chinking
Tools Needed: Trowel and a mixture of 50% water and 50% alcohol
Spray small sections to work as you go. Use trowel to smooth out chinkning working out all uneven areas to a smooth flat vertical surface. Use different widths of trowels as you go to best accomdate the gap you are working on to smooth. Work to get a small section that you are focusing on at a time as smooth and flat as possbile. Be sure to go back after you have a section smoothed out and wipe off any splatter that has occurred while it is still moist. Wrap a rag around the trowel to clean up the edges. This cleans along to keeping a crisp edge. Use straight horizontal strokes when smoothing chinking. Go back over the section and fix any issues noted to the desired smoothness. The smoother the better. Apply more spray to each segment as you go as needed. If its more sticky, spray as needed. Long strokes in a short section help to get a smooth surface. Bring down to smooth shoulder of edges that occur close to the top. Spray past where you are troweling. Bring high spots to fill low spots. Have rag handy to wipe off as needed. Heres a corner tool that works handy. You can use the trowel and pull left to right as well as right to left. Take you time. Its worth getting right. At the end of the section if you are going back over it and it needs more water, spray water directly on trowel.
Step 6: Let it Dry. DO NOT TOUCH
Tools needed: Patience.
Let it dry X amount of time initally it will take up to X amount of time to completely cure.
Bonus Info: Powered Pump
Tools needed: A powered pump and chinking material
If you do two to three lines of chinking at a time it will actually develop a film over it and will not spread and cause lines to form. Focus on one line at a time. It will be nice and flat which is the desired effect.
Happy Chinking!


All of us in the office here at *Log Home Mart* of Wisconsin Rapids, WI absolutely love this video.
Very relaxing to watch.
Great video!
Great video! Love the music too.
Very nice work!
Thank you!
Great job 🍻
Tools needed: bucket pushy downy thing
There has to be something quicker then this God it wouldn't take 3 months 7 days a week for house 2000sq ft
Is like making a cake , good video
good, fast, cheap. pick 2
Tools needed : patience.
🤣🤣🤣
friend, would you help me a lot by telling me where to get the powered pump that you are using? I work for CMU and firestop believe me I thought too much about using something faster to apply the caulking! Could you help me with that information? I will apreciate a lot . Blessings
Where are you located?
Is the Alcohol denatured or just like drug store alcohol?
Bucket pushy downy thing lmao
This woman should've cut her tip to about 2/3 of her desired bead size. This way she could've applied product not only faster, but she could've used the tip to tool as she was applying the bead. This is how you save a bunch of time. The cleaner your bead when you apply, the less tooling is required
what's up with everyone using fake chinking nowadays? cement looks better IMO and lasts longer
Cement holds moisture and can rot wood. New stuff is like a caulk with latex base
Mortar fails 10:1 over properly installed synthetic chinking.
@@pigs3diff1s1977 10:1? LOL. My home was built in 1982 and still has the original chinking in absolutely perfect condition. Mortar. If you install it without wire mesh behind it yes of course it will fail. Properly installed mortar chinking will last half a century or more.
@@SkinnySkinch friend, would you help me a lot by telling me where to get the powered pump that you are using? I work for CMU and firestop believe me I thought too much about using something faster to apply the caulking! Could you help me with that information? I will apreciate a lot . Blessings
J
Pro tip from a professional Caulker of 32 years. Cut that tip too a bigger size and apply one bead. This takes too much time.
Great video otherwise