Nice video to understand the module workings. Its design is not flawed, it has a very specific use case. The 5v psu onboard is to help you drive the microcontroller that will be plugged in externally, while the voltage input to the board should always be what is mentioned on the relays (5v in this case but there are 12v and 24v relay boards of exactly the same type available)
Great mod🎉 , a 2 amp regulator put to better use to supply about max . 6 amps The opto coupler Leds would need only each max .0016 milliamps even less because of the transfer ratio because of the virtually zero current needed to drive the ULN darlington transisor bases.
Thank you for your educatif video, and I'm having issue with the relay, only 14 of 16 is working. How can i fix this issue and how do i know why I'm having this isuue
Just to add a few things to this conversation, the overall design that these modules copy is flawed then each copy gets slightly worse depending on which clone they copy. Irrespective of VIN applied directly to relays or this fix being applied the optocouplers are really unnecessary, no isolation provided since the grounds are common and the Sink driver could be directly driven from the Arduino. My unit shipped with the Voltage flaw this video fixes, but also the common trace shared by the Relays is slightly below 1mm in width, which according a calculator is less than ideal for the total current of 1.28A when all relays are active. Also on my unit there is no cutout between the Relay's COM pin and the driver side. Overall regardless where you got your board from I wouldn't trust it for high voltage or current applications.
I totally agree with your statement. Unfortunately we have no control over design and quality control. if it was from a proper manufacturer, it should have had model number with proper 100% isolation. But 1000s of people buy this and I noticed interest and request from viewer and purchased it. Thanks for sharing your opinion. Cheers. Ahmad from Canada.
I don't believe there is a flaw in the design. 1. Regulated DC via a voltage regulator is not required to operate a relay. . 2. Not good practice to use Vcc(Logic Supply) from the 5V regulator to supply voltage to relay coils. While there seems to be "back EMF" diodes installed at each relay there is an issue of "back EMF noise" on the Vcc(Logic Supply). It is better not to generate back-EMF noise in the first place by connecting relays to 5V to later rely on the flyback diodes to remove the noise. Therefore the solution is not ideal. . Here is what is really going on. . 1. This PCB was never designed to have 5V relays installed. . 2. This PCB was designed to use relays with Vcc_PCB between 7-24VDC where Vcc = relay coil rating voltage. . 3. If you have 12V relays installed there is nothing wrong with the PCB design. . 4. Some "idiots" (Entrepreneurs!!!) in China decided to manufacture these PCBs with 5V relays. . 5. This PCB should never have 5V relays installed. . 6. Here is the same PCB ( www.aliexpress.com/item/32555988376.html ) with 12VDC relays. You can't say that the design is "flawed". If you apply 12VDC to this PCB there are no problems. . 7. It would be more accurate to say that the "PCB was not manufactured to design specification by installing 5V relays. . 8. I blame the buyer for buying a product which has obvious flaws. I personally would have never bought the 5V variant of this PCB in the first place. . 9. The solution of connecting the coils to the 5V regulator is flawed because "isolation" has been made worse than it was originally. . 10. The modification might "work" but I would never fly in an aeroplane with this modification.
@@jackhoffman6120 In addition, the hole in the PCB is a safety measure to avoid the electrical field of the 230V phase from polluting the digital circuit. If you run a wire through that hole, you're injecting a (free) voltage in your digital circuit. On a table it's not an issue, but as soon as you connect a live wire to that bottom relay common pin, if you ever touch any digital pin, you can die! That nasty 230V will create an electrical field, that could be 60V or more in your "patch wire" because it's too close to the 230V pin. Once you touch it, or anything it's connected to, you're dead.
@@robojax Notice that the optocoupler are useless on 5V board after your modification, since on both side of the optocoupler you've the same power source. Knowing the chinese law that any component is worth removing, until it breaks: if they haven't done it, it's because it's wrong. The relays they have installed have nothing to do with the voltage regulator. It's just a coincidence. The 5V of the regulator is for the µController connector, not for the relays. You must power your board with the voltage rated from the relay (in that case, 5V).
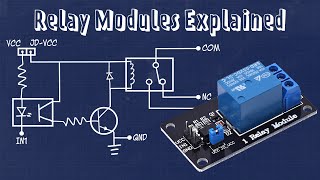
Hi i wouldn't say that the design is entirely flawed but just that it doesn't make sense for this specific version of the board with 5V relays (12V and 24V versions are fine). It's also good (for the 12 and 24V versions) that they don't use an onboard regulator to power the relay coils since relays don't actually need the low noise regulated voltage at their inputs, so this can be left to an external PSU sized appropriately (again 12V and 24V versions of this board make more sense). The 5 Volts from the switching regulator are there only to drive the ULN inputs which are rated at 5V for the ULN2803A model (the chip contains an input series resistor in the Darlington array). It's also a good idea to avoid powering the MCU from those 5V since the same track goes to the phototransistor side of the optocoupler along with the ULN inputs and after the fix it also goes to the relay coils so it defeats the purpose of isolation.
You are welcome. The best thank you for me is to not skipping ads and Subscribing 🔔 to my channel, and liking 👍 the video. It is greatly appreciated. 🔔 😊. I will reply to all Subscriber's 🔔 questions. So make sure to Subscribe.😊 .
Thanks for the video! I have this board, but without the regulator circuit components. Can I simply regulate the voltage nicely to 5V (1A) into the Vcc and GND inputs? Presumably this would still work to drive the relays at higher current, without affecting arduino, because of optocoupler configuration? Thanks!
Yes. you can connect 5V at the point where 5V regulated should be, it should work. You are welcome. Please subscribe. I appreciate it and helps my channel grow. Thank you
Hi Peter, according to datasheet, for LM2596S chip on page 4 and 6 at 40V and 4.5A, it has operating temperature of 120°C snag.gy/gZH2cI.jpg, see datasheet www.ti.com/lit/ds/symlink/lm2596.pdf and because 16 relay x 80mA= 1.28A, the 1.28A is less than 1/3 of 4.5A current so it should be okay.
Thanks for your video, Ahmad. I notice however that before your fix, when the whole voltage was reaching the relays, it was only reaching the “on” relays - is this correct? So, with your fix, each relay is always supplied 5v, even if a given relay is “off”?
Dude if the relays have 5v on them you have a 5v board not a 12v board. Don't input 12v. Just input 5v and ground pins. You may try to use 5v and ground on the screw terminals. DO NOT USE BOTH AT THE SAME TIME.
Hello, at 0:50 I mentioned that you can use 5V. the problem is this sold as 12V relay module. see it here www.aliexpress.com/item/33034614509.html and on eBay www.ebay.ca/itm/253122556171
The boards in your link show 12v relays, not 5v relays. Maybe a mistake in shipping or ordering. The board i have cannot be altered (no bottom layers ) . If I ordered a 12v and got 5v I would just return it. Interesting fix though.
Hello, Thanks for the trick. I tried to used the device with a KL25Z board - not an arduino/ This board outputs 3.3V GPIOs, and it actually fails to switch the relays. Using an adjustable supply , I need to raise input to 3.7V approximately to have the relay switch - which confuses ma as according to your schematic and PC817x datasheet, the input diode forward voltage should actually be (lower than) 3V. Do you have any suggestion ? Thanks
In my project, the relays are initially ON,, (because there is +ve Common in relay board) But I don't wanted to be like this... How I can give the initial output of ardiuno to relay board as "HIGH".. Where I can modify the ardiuno program..?
hi Robojax, I bought a 5v 16 channel relay and is opto coupler but not opto isolation. Y looking your video and instruction in your page and I need C1 1000uf25v, C2 470uf16v, LM2596 s adj 3amp and 33uH radial inductor (7x10mm or 9x12mm? thanks for your answer
hey bro. I have a problem with the module, I did everything as in the movie, only the LEDs light up, the relay does not respond (on the relay i have 4.33 volts) something could I do wrong?
if had typed what I did in video, it would have been 20 or 30 pages or more. So video is the best and ONLY way to make is simple. I showed every step and explained how it work.
If that is the case, search my for my other video which I have explained on how to drive a relay. then you can draw 16 of that and it would become this module. There is no schematic for this available.
can the input from the arduino be changed from + switching to - switching? im using a nano with a 24 channel board but it switches the - tive power, can the 16 channel do this?
Yes. that is called "LOW" trigger (with -) and "HIGH" trigger (with +). This video is about fixing the problem in the PCB. Please watch the main video on this 16 channel relay module here czcams.com/video/Q9aBI4ELKC4/video.html and it will tell you how to do.
Robojax thank you, the other thing on my board is their is no voltage regulator or capacitors in the same area, i have found out from the supplier of the stair controler board that the board outputs -12v and the 16 channel board i have is 5v. am i better to just buying some 12v relays and then using the controler to switch them instead of the relay board? thanks for help
I use 24 v rectifier as you said it's the maximum voltage it can tolerate. I connect the gnd and VCC pin from 16 channel relay module to Arduino. My ardiuno heat up and the 25 v capacitor burst ! What happened !!!???
why rectifier? Perhaps capacitor. Why did you connect the voltage to Arduino? The external voltage is for the module and NOT for Arduino. Watch The original Introduction video with wiring and introduction.
@@robojax external voltage of 24 v is supplied to relay module. From the module pin mark as VCC and gnd, I connect it to vin and gnd of Arduino. I have not even connect the Arduino to computer and when I was connecting the other pins, the Arduino began to heat up and caps get blown up. Thanks for reply. I think we cannot power up Arduino from this relay module, right? I am just a hobbyist not an expert but I like watching your video. Thanks for your videos.
You made me to watch my video to see if I made mistake. First of all i mentioned that the relay (each blue relay) is 5V and I have mentioned it over 20 or more times. So there is 2 points. 1-Input voltage 2-Relay voltage. we have the LM2596 which can accept up to 40V see it here www.ti.com/lit/ds/symlink/lm2596.pdf?&ts=1589483394094 at 3:45 I have shown this LM2506. I hope no question is left now. Follow and check if your module after the LM2596 gives 5V and measure the relay voltage as I shown. so your input voltage can be up to 25V (Capacitor voltage) . See this photo too. snipboard.io/bK5rF0.jpg Please replay and tell me that you got it and understand. Thanks.
@@robojax thanks. May be, I got mixed up somewhere. I will study your video again. Thank you. I wish I studied electronics. It's very interesting. Pls explain multiplexers with breadboard someday. I have some concept of it, but not the demux


Nice video to understand the module workings. Its design is not flawed, it has a very specific use case. The 5v psu onboard is to help you drive the microcontroller that will be plugged in externally, while the voltage input to the board should always be what is mentioned on the relays (5v in this case but there are 12v and 24v relay boards of exactly the same type available)
Great mod🎉 ,
a 2 amp regulator put to better use to supply about max . 6 amps
The opto coupler Leds would need only each max .0016 milliamps even less because of the transfer ratio because of the virtually zero current needed to drive the ULN darlington transisor bases.
Great work Jack . Thank you very much for the video.
You are welcome Tommy. this is Ahmad
Thank you for your educatif video, and I'm having issue with the relay, only 14 of 16 is working. How can i fix this issue and how do i know why I'm having this isuue
Just to add a few things to this conversation, the overall design that these modules copy is flawed then each copy gets slightly worse depending on which clone they copy. Irrespective of VIN applied directly to relays or this fix being applied the optocouplers are really unnecessary, no isolation provided since the grounds are common and the Sink driver could be directly driven from the Arduino. My unit shipped with the Voltage flaw this video fixes, but also the common trace shared by the Relays is slightly below 1mm in width, which according a calculator is less than ideal for the total current of 1.28A when all relays are active. Also on my unit there is no cutout between the Relay's COM pin and the driver side. Overall regardless where you got your board from I wouldn't trust it for high voltage or current applications.
I totally agree with your statement. Unfortunately we have no control over design and quality control. if it was from a proper manufacturer, it should have had model number with proper 100% isolation. But 1000s of people buy this and I noticed interest and request from viewer and purchased it. Thanks for sharing your opinion. Cheers. Ahmad from Canada.
I don't believe there is a flaw in the design.
1. Regulated DC via a voltage regulator is not required to operate a relay.
.
2. Not good practice to use Vcc(Logic Supply) from the 5V regulator to supply voltage to relay coils.
While there seems to be "back EMF" diodes installed at each relay there is an issue of "back EMF noise" on the Vcc(Logic Supply).
It is better not to generate back-EMF noise in the first place by connecting relays to 5V to later rely on the flyback diodes to remove the noise.
Therefore the solution is not ideal.
.
Here is what is really going on.
.
1. This PCB was never designed to have 5V relays installed.
.
2. This PCB was designed to use relays with Vcc_PCB between 7-24VDC where Vcc = relay coil rating voltage.
.
3. If you have 12V relays installed there is nothing wrong with the PCB design.
.
4. Some "idiots" (Entrepreneurs!!!) in China decided to manufacture these PCBs with 5V relays.
.
5. This PCB should never have 5V relays installed.
.
6. Here is the same PCB ( www.aliexpress.com/item/32555988376.html ) with 12VDC relays. You can't say that the design is "flawed".
If you apply 12VDC to this PCB there are no problems.
.
7. It would be more accurate to say that the "PCB was not manufactured to design specification by installing 5V relays.
.
8. I blame the buyer for buying a product which has obvious flaws. I personally would have never bought the 5V variant of this PCB in the first place.
.
9. The solution of connecting the coils to the 5V regulator is flawed because "isolation" has been made worse than it was originally.
.
10. The modification might "work" but I would never fly in an aeroplane with this modification.
@@jackhoffman6120 In addition, the hole in the PCB is a safety measure to avoid the electrical field of the 230V phase from polluting the digital circuit. If you run a wire through that hole, you're injecting a (free) voltage in your digital circuit. On a table it's not an issue, but as soon as you connect a live wire to that bottom relay common pin, if you ever touch any digital pin, you can die! That nasty 230V will create an electrical field, that could be 60V or more in your "patch wire" because it's too close to the 230V pin. Once you touch it, or anything it's connected to, you're dead.
@@robojax Notice that the optocoupler are useless on 5V board after your modification, since on both side of the optocoupler you've the same power source. Knowing the chinese law that any component is worth removing, until it breaks: if they haven't done it, it's because it's wrong. The relays they have installed have nothing to do with the voltage regulator. It's just a coincidence. The 5V of the regulator is for the µController connector, not for the relays. You must power your board with the voltage rated from the relay (in that case, 5V).
Hi i wouldn't say that the design is entirely flawed but just that it doesn't make sense for this specific version of the board with 5V relays (12V and 24V versions are fine). It's also good (for the 12 and 24V versions) that they don't use an onboard regulator to power the relay coils since relays don't actually need the low noise regulated voltage at their inputs, so this can be left to an external PSU sized appropriately (again 12V and 24V versions of this board make more sense).
The 5 Volts from the switching regulator are there only to drive the ULN inputs which are rated at 5V for the ULN2803A model (the chip contains an input series resistor in the Darlington array). It's also a good idea to avoid powering the MCU from those 5V since the same track goes to the phototransistor side of the optocoupler along with the ULN inputs and after the fix it also goes to the relay coils so it defeats the purpose of isolation.
Hi, it is all about the actual each pieces of relay. if relay operating voltage of relay is 5V, then it should receive 5V
and if you want to use this 5 volts bord to command 220v? what's hapen?:_?? all the purpose of relay not exist anymore
Hey man, you're the best. Thanks a lot for this video! Great!!!
You're welcome! Please subscribe. I appreciate it and helps my channel grow. Thank you
awsome video and excelent instructions thanks
You are welcome. The best thank you for me is to not skipping ads and Subscribing 🔔 to my channel, and liking 👍 the video. It is greatly appreciated. 🔔 😊.
I will reply to all Subscriber's 🔔 questions. So make sure to Subscribe.😊 .
Great video, thank you!
Thanks for the video! I have this board, but without the regulator circuit components. Can I simply regulate the voltage nicely to 5V (1A) into the Vcc and GND inputs? Presumably this would still work to drive the relays at higher current, without affecting arduino, because of optocoupler configuration? Thanks!
Yes. you can connect 5V at the point where 5V regulated should be, it should work. You are welcome. Please subscribe. I appreciate it and helps my channel grow. Thank you
Have you tested regulator temperature with all relays ON and 24V power supply?
Hi Peter, according to datasheet, for LM2596S chip on page 4 and 6 at 40V and 4.5A, it has operating temperature of 120°C snag.gy/gZH2cI.jpg, see datasheet www.ti.com/lit/ds/symlink/lm2596.pdf and because 16 relay x 80mA= 1.28A, the 1.28A is less than 1/3 of 4.5A current so it should be okay.
Thanks for your video, Ahmad. I notice however that before your fix, when the whole voltage was reaching the relays, it was only reaching the “on” relays - is this correct? So, with your fix, each relay is always supplied 5v, even if a given relay is “off”?
this module has 5V voltage regulator. The job of regulator is to keep the voltage 5V for relay regardless if you connect 9V or 10V or 20V
Dude if the relays have 5v on them you have a 5v board not a 12v board. Don't input 12v. Just input 5v and ground pins. You may try to use 5v and ground on the screw terminals. DO NOT USE BOTH AT THE SAME TIME.
Hello, at 0:50 I mentioned that you can use 5V. the problem is this sold as 12V relay module. see it here www.aliexpress.com/item/33034614509.html and on eBay www.ebay.ca/itm/253122556171
The boards in your link show 12v relays, not 5v relays. Maybe a mistake in shipping or ordering. The board i have cannot be altered (no bottom layers
) . If I ordered a 12v and got 5v I would just return it. Interesting fix though.
I just checked the video and toke the screen shot that shows the relay's used are 5V. see it her snipboard.io/6MJLl0.jpg
Thank you!
You are welcome.
Hello,
Thanks for the trick.
I tried to used the device with a KL25Z board - not an arduino/
This board outputs 3.3V GPIOs, and it actually fails to switch the relays.
Using an adjustable supply , I need to raise input to 3.7V approximately to have the relay switch - which confuses ma as according to your schematic and PC817x datasheet, the input diode forward voltage should actually be (lower than) 3V.
Do you have any suggestion ? Thanks
this module is LOW trigger. if your device outputs 0 volts, and 3.3V it should work.
@@robojax Yes, that was what I expected. But indeed nothing happens unless I raise the output to 3.7V (through an external adjustable power supply).
In my project, the relays are initially ON,, (because there is +ve Common in relay board)
But I don't wanted to be like this...
How I can give the initial output of ardiuno to relay board as "HIGH".. Where I can modify the ardiuno program..?
Please watch the main video czcams.com/video/Q9aBI4ELKC4/video.html
hi Robojax, I bought a 5v 16 channel relay and is opto coupler but not opto isolation. Y looking your video and instruction in your page and I need C1 1000uf25v, C2 470uf16v, LM2596 s adj 3amp and 33uH radial inductor (7x10mm or 9x12mm? thanks for your answer
hi, don't try to make the power module it would cost more than buying the LM2596 PCB module which has everything and it is cheap.
great nice
Thank you. Thank you for not skipping the ads and keep watching them. This will help me a lot.
My relay board is the same as yours, but it came without any capacitors. Could you please tell me the speficications of those capacitors?
I just check the module where it in the shelf in garage. C1 100μF 25V, C2 470μF 16V.
@@robojax thank you very much.
hey bro. I have a problem with the module, I did everything as in the movie, only the LEDs light up, the relay does not respond (on the relay i have 4.33 volts) something could I do wrong?
if had typed what I did in video, it would have been 20 or 30 pages or more. So video is the best and ONLY way to make is simple. I showed every step and explained how it work.
My board has 5v on the inputs....
Can you send me the detailed schematics with all components value because I need it in my graduation project . Thx
If that is the case, search my for my other video which I have explained on how to drive a relay. then you can draw 16 of that and it would become this module. There is no schematic for this available.
Can you send me the link plz
search for "relay robojax" and you will find it.
Get schematic diagram for this module:
bit.ly/16chRelay-Schematic
can the input from the arduino be changed from + switching to - switching? im using a nano with a 24 channel board but it switches the - tive power, can the 16 channel do this?
Yes. that is called "LOW" trigger (with -) and "HIGH" trigger (with +). This video is about fixing the problem in the PCB. Please watch the main video on this 16 channel relay module here czcams.com/video/Q9aBI4ELKC4/video.html and it will tell you how to do.
Robojax thank you, the other thing on my board is their is no voltage regulator or capacitors in the same area, i have found out from the supplier of the stair controler board that the board outputs -12v and the 16 channel board i have is 5v. am i better to just buying some 12v relays and then using the controler to switch them instead of the relay board? thanks for help
yes you can use your own switches.
Would I need to fit the voltage regular and capacitors to use 12v to control it?
sorry I didn't get what you are referring to .
I use 24 v rectifier as you said it's the maximum voltage it can tolerate. I connect the gnd and VCC pin from 16 channel relay module to Arduino. My ardiuno heat up and the
25 v capacitor burst ! What happened !!!???
why rectifier? Perhaps capacitor. Why did you connect the voltage to Arduino? The external voltage is for the module and NOT for Arduino. Watch The original Introduction video with wiring and introduction.
@@robojax external voltage of 24 v is supplied to relay module. From the module pin mark as VCC and gnd, I connect it to vin and gnd of Arduino. I have not even connect the Arduino to computer and when I was connecting the other pins, the Arduino began to heat up and caps get blown up. Thanks for reply. I think we cannot power up Arduino from this relay module, right?
I am just a hobbyist not an expert but I like watching your video.
Thanks for your videos.
You made me to watch my video to see if I made mistake. First of all i mentioned that the relay (each blue relay) is 5V and I have mentioned it over 20 or more times. So there is 2 points. 1-Input voltage 2-Relay voltage. we have the LM2596 which can accept up to 40V see it here www.ti.com/lit/ds/symlink/lm2596.pdf?&ts=1589483394094 at 3:45 I have shown this LM2506. I hope no question is left now. Follow and check if your module after the LM2596 gives 5V and measure the relay voltage as I shown. so your input voltage can be up to 25V (Capacitor voltage) . See this photo too. snipboard.io/bK5rF0.jpg Please replay and tell me that you got it and understand. Thanks.
@@robojax thanks. May be, I got mixed up somewhere.
I will study your video again.
Thank you.
I wish I studied electronics. It's very interesting.
Pls explain multiplexers with breadboard someday. I have some concept of it, but not the demux
you are welcome. I have video using multiplexer but I just put it on my list to have pure multiplexer.
Schematic chart is inaccurate
Which part? Provide information so other a know too.
Hindi me video banao
मुझे हिंदी नहीं आती।