Everything You Need to Know about Breadboards

Vložit
- čas přidán 22. 07. 2024
- Accompanying article: www.makeuseof.com/tag/what-is...
The breadboard is the bread-and-butter of DIY electronics. Breadboards allow beginners to get acquainted with circuits without the need for soldering, and even seasoned tinkerers use breadboards as starting points for large-scale projects.
If you are taking your first steps in the world of DIY or microcontrollers, you might have received a breadboard in your Arduino starter kit or Raspberry Pi starter kit. Let’s look at what a breadboard actually is, where they came from, and how you can make use of them. - Věda a technologie


Thanks for explaining the origin of the ‘breadboard ‘ as used in prototyping.👍
this.....this is amazing. I am VERY hyperactive and i physiclly cant sit through a long video and i need this for a project. you are fantasic. you just earned yourself a sub.
Appreciate you jumping right into it, clicked on another vid 12 min long, my add could never
Just needed to see the backside of the headboard to understand which pins are connected and which not! THANK YOU !
I have a Uniset (Czechoslovak) electronic prototyping tool, and it has 2 medium sized breadboards, with 4 split power rails that deliver 12V, 5V, -5V, -12V.
All power is generated internally.
excellent, showing the metal plug strips on the back was so helpful
I knew perfectly what is a breadboard, but not the history or reason for the name. You deserved the like just for that bit... :)
Pedro . . . I thot this would be a tutorial on baking? but ur right... it actually taught something so I gave it a ThUmBs up too :)
What are the red green and black pieces attached to a breadboard called?
@@awamanneh3710 Bent Wire as jumpers to connect power rail to components.... Better a late reply than no reply ever.
@@ATH3IST-FLuKE true
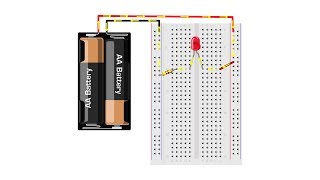
Alright so the positive and negative power sides need to have a power source hookedup to tgeir respective power sources ++ --. Then you get another wire and connect it to say row 55 from a negative port. Then if you place a led light, one of the two conductuve prongs must be in row 55, while the other in say row 54... so long as another wire closes the circuit from row 54 to positive charge. I think i got that down. That was the hardest part, thanks man.
Thanks mate. Look at all the warm reactions as well. Keep em coming!
Perfect video. Thank you!
nice and short exactly for my brain thank you
great video, thanks
Thanks for the help, i got a breadboard from school so i can play with circuitry! and i didnt know how to use it!
@MrRainbow228 bruh
thanks it helped me a lot ✨
Thank you so much!
Nice video, thanks :)
thanks for your video)
Really?! They used a piece of wood and metal components to keep continuity vaguely consistent because wood hates to carry current unless such a high difference in potential/voltage is applied. Good video.
Perfect explanations
can you tell pls? can we cut the breadboards to get smaller breadboard for use it in small rc car? Or if i cut breadboard it will be no work
They r for prototyping, so u shouldn't need 1 at all. Its possible to use just the 2 bar part but its still the same length & still require a power source wired to it. Boards with onboard power or a usb have additinal wiring so cutting could render the feature useless. U can save space by connecting via wires and solder connected to a lithium battery
Instead of using the jumpers on the end you could of just connected your power supplies positive to the top rail and the negative to the bottom rail or vise versa. Correct?
yes.
Thank you
Thanks for the information
good video i am getting a kit and all of the beginer parts
Right to the point
AMAZING
Thanks
Are the resistors necessary
Yes because the power to the LEDs will blow them
When i look at breadboards, i see them as kitkats, like i could snap them in half
👍
Him:don't need a soldering iron
Me : buys a pencil ,aluminium coil ,6v battery 😂
little do we care about your life
Yeah my kit came from a micro bit kit
HELP! I GOT MY BREDBOARD STUCK ON A TABLE BECAUSE I REMOVED THE YELLOW STICKY PAPER THAT WAS UNDER MY BREDBOARD! thanks alot D:
nevermind (;
Ohh i thought it is called breadboard because it is perforated like a bread😂😂😂
I’m making a voice box for my woody doll
Now i am way more confused.
😎
So funny language
nOT GOOD ENOUGH TOO LITTLE INFORMATION never even showed how the wiring was done ..... only showed it already done
Typical MakeUseOf content... Everything is utter bs
Do you have the iq of a winter room? You stick the cable in, it’s not rocket science.
if you use a breadboard, you already should know how to do wiring, and he did show an example of wiring.
the tittle was “everything you need to know about breadboards”, meant to explain how the pins on the breadboard work
@@LPvi1 its trash tutorial , ive seen better .