DIY Smokeless Fire Pit [with a sealing strategy others missed!]

Vložit
- čas přidán 14. 12. 2022
- PLEASE DO NOT SUBSCRIBE TO THIS CHANNEL
This channel was started as an experiment with videos re-uploaded from the original channel I made. If you enjoyed this enough to subscribe and want to see my latest projects you'll find them here: / averagedadchannel
If you want to see how I built the flagstone patio, check out Part 1 here!
• DIY Flagstone Patio on...
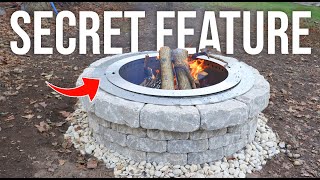
In this video I make the fire pit surround from the prior flagstone patio video into a smokeless fire pit [inspiration from Haxman and How to Home channels]. This is accomplished by mimicking the design of popular portable steel fire pits. No, it is not 100% smokeless, but it is a dramatic reduction that makes it much more enjoyable to sit around.
If you have ideas on how to improve it further, comment them below! If you subscribe, let me know in the comments so I can thank you as I really appreciate it!
Haxman, if you ever read this, please let me know. It is a great honor.
Affiliate links (if you're going to buy them anyway, use these links to help out the channel, thanks!):
Fire pit insert: amzn.to/3PEebs1
Hi-temp Silicone: amzn.to/3PEYQrp
Hi-temp Spray Paint: amzn.to/3DGLAzg
Non-affiate links:
Tumbled Belgian Wall Block: tinyurl.com/mr26r5re
Tumbled Belgian Wall Wedge: tinyurl.com/2p82rtux


PLEASE DO NOT SUBSCRIBE TO THIS CHANNEL
This channel was started as an experiment with videos re-uploaded from the original channel I made. If you enjoyed this enough to subscribe and want to see my latest projects you'll find them here: czcams.com/users/averagedadchannel
I would like to see a comparison( USING THE SAME FIRE )having the air intake ports in the bottom bricks BLOCKED vs OPEN.
I'd suggest adding a couple more courses of stone to raise the height of the walls of the fire pit. I noticed iron kettle firepits at a beer-garden once where the top of the kettle was about 4 feet tall...this allowed the smoke to drift off at about 7 feet or so...hence, without any air features added (it was just a big iron kettle), no smoke in the face. You wouldn't have to make it 4 ft. tall, but just raising it up a foot or two (along with the air-flow features) you'd achieve the same thing...any smoke you had, would go above the heads of those seated around the fire.
This. You need to raise the height to get the vortex going. You could dig the pit lower too.
Thanks for an awesome video. Carry On Sir!
Well done!
The reason you see more flames burning on the Solo stove is because it is taller and narrower, so the log flames are much closer to the holes, so you see more of the secondary burn.
I built mine out of a 35" wheel and welded a sheet metal shield around the outside leaving it open at the bottom... with sufficient flame it's EPIC... you do have to really get a raging fire going to make it do the best work!
all the secondary burn holes are doing is directing smoke back to flame to then again
burn maximizing usage increasing efficiency. woodstove and wood insert for home heating have been doing this for many years
Looks really great
Thanks Rob!
Thank you
Great job 👍🏼 Your design is probably the best that I’ve seen on CZcams to date to get the coveted secondary burn (fire fingers).
You already know the basics of how to make the fire as smokeless as possible. Fire to heat the walls, fuel below the holes, and primary and secondary combustion air intake.
The only thing missing is a “fire ring “
A 1 and a 1/2-2” lip, smaller than the diameter of the fire sleeve on the top of the fire pit. I’ve seen a few comments that people have suggested, be it another layer of pavers or a metal cowl or something to that effect.
I 100% agree with these suggestions.
It’s up to you to decide what is most aesthetically pleasing for your taste.
There are videos of Solo Stoves or diy versions that show the difference between with a fire ring and without. Check it out.
To those that say that it it has to be taller, I disagree. Narrower, maybe…
Most of the videos I’ve seen are huge firepits and the fire is not near the wall.
I’ve built four solo stove type fire pits. My favorite is the one that I use for camping. 12” bowl inside of a 13” bowl. With a 12” bowl cut down for the “fire ring “ The depth is only about 5 inches and it gets incredibly nice secondary burn 🔥
I heard you mention that you might increase the size of the secondary burn holes. I think that you’re hole size is good perhaps making more holes between the holes you have. Try a fire ring first though 😉
You think the shape has anything to do with the effect of air circulation?
For instance, for those of us with square fire pits.
@@tylerdavis5701 there are camp gear makers that make secondary burn wood stoves and fire pits.
Most of them are rectangular in shape and they usually only have the secondary burn holes on the long sides.
For a a square firepit, as long as you have enough intake at the bottom, relatively well sealed chamber to heat the air and keep the fuel near the walls and below the secondary burn holes you should be able to get a good secondary burn 🔥 along all sides. A fire ring or top flange is a great help to get the effect!
There might be a diminished effect at the corners due to the fact that you can’t put the wood too close to the corners.
My suggestion would be to start the secondary burn holes a little bit away from the corners a few inches.
You can always drill more holes after, but you can’t undrill holes 😉
I hope this helps you and good luck with your build. 👍🏼
I’d like to try building a square version but that would require some welding and metal work out of my wheelhouse.
I have a Solo Stove and love it. I want to build something like this near our woods, and your design looks spot on. I like how you used some skinny bricks and pulled them - looks nicer than having all large blocks and removing some of them. I even have some leftover flagstones and will use them like you did. Great look.
Thanks Bill! Good luck on your build!
The ones I used are just concrete landscaping stones. They could crack eventually from heat but I haven’t had a problem so far
Thanks for watching!
Great help on my build! I did 6 holes in a 12" tall ring around 1 5/8" at the bottom (away from the intake holes as much as possible to get the air to start heating up) and formed my own top blocks with concrete, I think it works better than I expected.
Nice! Glad the video was helpful and the concrete capstones sound like a great addition
Hey dude! I like your vibe and how you get things done. I'm sure this is a fun little thing you do on the side, but keep it up. It's all good stuff.
Thanks Ian, appreciate it
Use JB Weld extreme heat instead of that silicone
Great video thank you! Mightve missed it. Did you remove any stones other than the 4 at the bottom? What final size holes drilled at top of ring? See any issues if add a top cap? Thank you
You still get smoke no matter what you do. It just maybe a little less smoky. Save yourself a lot of work and just have openings at the bottom of the pit for better air flow and burn dry wood. If you make all these modifications remember you are going to burn up your wood at a highly accelerated rate for a minimal return on having less smoke.
Hey J, agree to disagree on this one. The holes for the secondary burn seem to be working very well, friends have said after an hour to two by the fire they cannot smell any smoke on themselves when they are home afterwards.
It does go through fuel much faster this way, but that was a tradeoff I was willing to make.
You make a good point about bottom air supply only. An extreme example- I have a full size burn barrel with the top and bottom cut out sitting on 3 big rocks (~8” off the ground). Are no other holes in the barrel. This will essentially turn into a blow torch and the barrel will glow and burn the snot out of you. Only smokes to begin with or if you load it down. Will burn up wood very quickly. So obviously a balancing act. Fun to think about.
I totally agree. I feel the heat of the fire is the main thing to havevless smoke. Build a superhot fire it will smoke less no matter the setup. Thats why it smokes most at the start (not hot enough)
Hi. Great work up for the video. Did you try taking out more of the skinny brick to allow greater airflow? How did you decide on 4 vs more/less?
Another viewer mentioned adding another layer of bricks. Not sure if that would help, but if you did, you could use the flatter, wider type to give it more of topper. You could use construction adhesive if it’s heat tolerant.
Hey Alan, thanks for the feedback! I did try taking out two more skinny bricks and didn't see much improvement. I plan to add some construction adhesive or mortar to better seal it up this summer and potentially add some concrete toppers
The biggest difference I have noticed between the DYI smokeless pits and the Yukon is how much air is actually beneath the wood being burned. I imagine is the Yukon fills with ash it smokes a lot more. Although of the 3 videos I have watched so far, this one really looks the best. I love the look of the slimmer blocks you used between the larger ones.
Thanks Frank, appreciate it
The slim blocks are certainly a noice touch!
You need a curled lip on top facing in like half air foil to creat that -/+ pressure
Hey Aaron, that’s a good point, I’ll try to add that when it’s warm out again
The only thing I can think to improve it is trying to seal the stones and ring with concrete to increase pressure in the secondary burn. Other than that, it is really g👍👍👍
Thanks! Good idea, I may try to add that in next season
What if you put an extra layer of stone on top that went in a little bit to give the secondary combustion one more chance?
Hey David, that’s an interesting idea. I think it may look strange if you used the same stones and scooted then in but I’ve seen a couple tutorials for diy custom concrete caps so I may try that when it gets warm to improve it further!
Thank you for sharing this. Quick question. Does it matter where the air gaps are placed? Bottom layer enough?
For incoming air you want it to just be on the bottom so it heats as much as possible as it rises up between bricks and insert
Any luck improving the “coveted” finger flames? Currently working on mine and glad I came across this video, super helpful! Thank you!
Hey TJIWM! I have not yet made any improvements unfortunately, haven’t been able to dedicate much time to it.. but glad you found the video helpful!
Maybe adding some vanes between the two walls to cause the air to take a longer path to the exit hole, giving it longer to heat up before it hits the flames. Also possibly adding a layer of insulation between the metal and the stone, so less heat is transmitted into the stone, although heating up the stone will cause it to radiate heat to people nearby so that's a trade-off.
Looks good, but I was wondering how much is the gap between the ring and the blocks, also would a large gap help or hurt?
The gap is probably 1/2” to 3/4”? A smaller gap will allow a larger percentage of the air to come I contact with the hot insert, the hotter the air gets the faster it’ll rise and shoot into the fire at the top-so relatively smaller should be better
Thanks Morgan Wallen
Do you think it would work to add a fourth layer of pavers on top of the metal lip or would that be too unstable?
Hey Rose, I think it would be stable enough, ideally you would use stone caps or pavers without the small bricks in between to crest a lip that further pushes the air back to the center
Could also add masonry adhesive on stones to make it all more secure. I haven’t done that in the event I need to reconstruct it
At 19 seconds DON'T cut material that is wider than it is long on the table saw because of the increased chance of kickback. Material being thrown backwards into the person by the saw blade that binds up on the material.
Yup great point, a lesson I’ve learned since then, thankfully not the hard way
Maybe someone could correct me if I'm wrong. My assumption before watching a couple of these videos was that the smokeless features would work if you left the ring off the bottom with holes at the top, so the smoke filled air at the top would be pulled in and recirculated to the bottom and through the fire making a more complete and less smokey burn.
But the explanations show the opposite.. The air entering from the outside and in through the holes at the top, somehow reducing smoke.
Which explanation is correct? and if it is the latter, how does this serve to reduce smoke?
Hey Steve, thanks for watching. The air in the double wall chamber will be heated and rise, so will be drawn in from the bottom and exit the top exterior holes. This pushes the smoke into the center which is typically hottest, burning it off. A misconception may be that the smoke needs to contact the flames again to ‘burn away’ when really it needs to just be heated enough for the carbon and other components of the smoke to burn away
I know this might be a stupid question but where did you get your bricks from? Im having a hard time finding the spacer bricks that match blocks at lowes and home Depot
Menards!
The burnholes might be a tad big? Smaller holes might shoot air or smoke faster than bigger ones.
Ya in hindsight I probably should’ve started a little smaller and tested it and made bigger if necessary
Ive noticed if i just build a big fire it will have minimal smoke no matter the setup
Hi my son just built the brick part and filled it with the stone stuff that goes in it or the special rocks that it goes with so is it still the same or its better to put that bowl on the inside?
Hey Bella, the black ring will help significantly if you use it and put holes in it, otherwise I suspect it will look like the side by side I did towards the end of the video without the smokeless features
@@Average_Dad where can i get the ring from? How do i keep the wood from smoking so much where it makes us sick?
@@Dalaila77 Depends where you are, but there are a load on eBay and Amazon. The drier the wood the less smoke there will be, even with a standard fire.
@@lotuselansteve ooooh okay thats what it is it was raining the day before and we forgot the wood outside thank you :)
You don't want the secondary burn holes to be too big because then the air will lose pressure and leak out into the fire vs being forced into it
Ya in retrospect I would’ve started with them a little smaller probably and experimented more
Right. Air thru smaller holes will (assuming the same volume of air) have higher pressure and perhaps reach further in toward the center of the fire pit. But what is the pressure? It is heat rising either inside the fire pit (sucking air thru the holes) or between fire pit and blocks (pushing air thru the holes). I'm guessing most of the effect is air outside the fire pit, as most of the air inside the pit will be satisfied from underneath. In either case, reasonable sealing will help, and the Solo has an additional advantage - the height to width ratio. More height means higher velocity / more pressure for the air, as long as the vertical distance is hot and heating the air.
Did you do an all the surrounding yourself? Do you have a video on that as well?
Yup, lots of work and a couple weekends but less than $600
Check out the videos tab on my channel
How many of each of the bricks am I to purchase from Menards please. Wanting to recreate yours for my yard
64 of the larger blocks and 44 small ones! Good luck!
Dear Guys
Is there some project for this steel ring with holes? I see the diameter is around 30" right?
Do you mean a link for the fire ring product? I bought the ring and drilled the holes myself
Hello
In fact here in Brazil is not popular external fire places like yours and I wanna build exactly the same...so diameters tickness are important also... if you can share more build infos I will apreciate
Regards from Brazil - Porto Alegre City 😊
What bricks did you use for this? Im from the Netherlands and for the life of me, i cant find these bricks
Greetings to the Netherlands!
I found them at Menards, a big box store in the US, looking at large home improvement/garden centers is probably your best bet (if you haven’t already)
But do they need to be fire proof stones or what kinda stone, thanks for answering and the video sir!
One thing that all of these smokeless attempts don't seem to do is place a grate at the bottom to keep the fire from resting on the bottom. Wouldn't a grate that raises the wood up a bit help the oxygen to get under the fire to help more? Love everything you've shown here and think it's the best video I've seen and like that is shows both a gap at the bottom to feed underneath and then the ones above for the channel.
Hey Ray, thanks for the comment and kind words. I thought briefly about trying to have some sort of grate to elevate the fuel from the 'floor' but decided against it eventually as they were not cheap to buy, and DIY-ing one by cutting up metal did not sound super fun. At the 5:30 mark you can see I have four blocks in the pit that help keep the wood up some and allow a channel for air to come between all of the to the very middle, so that's my 'poor man's version' of your suggestion I using for now.
@Average_Dad I was thinking about the extra bricks you added to seal the bottom. What about pushing all the bottom row bricks flush with the insert and then the other rows out to get the 1" gap? It would cause the look of the whole structure to have that overhang so without trying it not sure how aesthetic that would look but it would make a good seal I'd think(and could easily high heat caulk it). Otherwise if easy to cut, could cut off an inch on each row 2 and 3 brick to make it look even.
Bigger holes
Great video honestly the only thing I could see that needed a bit of work was the lighting between the background and the foreground. (you’re face needs to be a tad brighter) But great delivery and everything I hope the CZcams algorithm takes this and runs with it.👍
Thanks Rep^2!
I assume you are referring to the intro? Ya my camera sucks and my lighting is a shop light with tissue paper over it 😄
Hope to continue to improve in the future!
I think you are going to have real challenges to beat the performance of the other smokeless units unless you downsize considerably. There is definitely a correlation between size and amount of smoke produced. either that, or build a bigger and deeper fire!
Hey Roger, yup it may not beat them but it works pretty well for a DIY built in, I may add stone caps in the future for some more height to help it more
@@Average_Dad I use paver stones too with those rectangles ones in between and I went 4 levels high but I wanted to make it larger but idk how to do that I was thinking maybe use two rectangles in between each rumblestone but idk