Effortless Knot Hairstyles Step by Step Tutorial with Designer Pins

Vložit
- čas přidán 22. 08. 2024
- Effortless Knot Hairstyles Step by Step Tutorial with Designer Pins
In this easy-to-follow tutorial, learn how to create chic, effortless knot hairstyles using designer pins. Elevate your hairstyle game with these step-by-step instructions that will have you looking runway-ready in no time. Whether you're heading to a brunch with friends or a glamorous evening event, these knot hairstyles are perfect for any occasion. Follow along and master these trendy looks to add flair to your hairstyle routine. Discover the power of designer pins in creating stunning hairstyles that will leave everyone asking for your secret. Elevate your look with these stunning hairstyles today!
Your Queries:
Knot Hairstyles
Step-by-Step Tutorial
Hairstyle Ideas
Hair Styling Tips
Designer Pins
Elegant Hairstyles
Chic Hairstyles
Hair Accessories
DIY Hairstyles
Effortless Hairstyles
Trendy Hairstyles
Rubber Bands
Hair Pins
Braided Hairstyles
Hair Tutorial
Easy Hair Tutorial
Wedding Hairstyles
Hairstyles for Long Hair
Bridal Hairstyles
Bridesmaids Hairstyles
Prom Hairstyles
Formal Hairstyles
TIMESTAMPS:
00:02 - Tying the hairs into a knot
00:06 - Repeating the knot process
00:16 - Tying all the hairs together
00:26 - Adding designer pins
00:33 - Tying the top hairs into a small section
00:39 - Creating plates on the tied section
01:03 - Joining the hairs from the sides
01:08 - Tying the side hairs on the back
01:31 - Fixing hair pins
01:34 - Tying the top and side hairs together
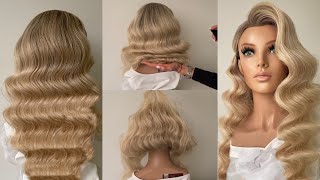
If you're looking for some effortless and chic hairstyles, you've come to the right place! In this step-by-step tutorial, we'll show you how to create elegant knot hairstyles using designer pins as a finishing touch.
To start, take the hairs from the sides and tie them on the back, forming a knot. Secure the knot with rubber bands. Repeat this process with more hair sections, tying them using rubber bands. Once all the hairs are tied, fix them together at the end and secure with a rubber band. You can then add some designer pins to add an extra flair to your hairstyle.
Next, we move on to tying the hairs on the top into a small section. Tie this section using a rubber band and then divide the hairs into two parts. Create plates on one section of the hairs, fixing them carefully till the end. Join the hairs from the sides in small sections, following the same steps for the other side. Fix the hairs in a lining way, joining them in between the plated hairs. Tie the hairs till the back and secure them properly. Complete the look by fixing some hair pins.
For the final style, take the hairs on the top and join them with the hairs from the sides. Fix them as shown in the video, tying them carefully in small sections. Take the hairs from the sides in a lining way and join them in the middle, creating plates. Repeat this process for all the hairs, tying them one by one. Fix the hairs till the end, making plates along the way. Tie all the hairs together, join them in the middle, and follow the same process till the end, fixing the plates.
With these easy-to-follow steps, you can create trendy and elegant knot hairstyles using designer pins and hair accessories. Whether it's a special occasion or you simply want to add some glamour to your everyday look, these DIY hairstyles are effortlessly stylish. So grab your rubber bands, hair pins, and get ready to get creative with your hair!
Thanks for watching and don't forget to subscribe for more easy hair tutorials. 🌸✨ - Jak na to + styl