Build Your Own Affordable Hydroponic Grow Tower (Under $50) | Aeroponics | Vertical Garden

Vložit
- čas přidán 20. 04. 2023
- Build Your Own Affordable Hydroponic Tower Garden (Under $50) |How To Build Vertical Garden Tower | DIY Hydroponics
Inspired by Mike's Garden Tower @KeepOnGrowin
• $10 Hydroponic Tower G...
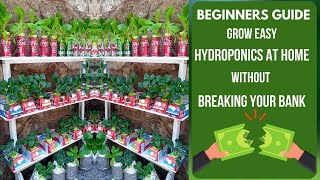
This tower is made from six 2-gallon buckets.
Each layer has the capacity to accommodate 4-8 plants per bucket with a growing cell size of 2 inches that fits perfectly with a pool noodle.
The structure is supported vertically by a 3/4" pex pipe. I made a tiny holes around the pipe to create sprinkler like or pattern on each layer of the bucket using a 1/16 drill bit to ensure an even distribution of water to each growing cell/hole. There are 6 in total vertically, so each bucket has it's own individual sprinkler like pattern or mist.
The pump can raise water up to 10 feet in height, and the reservoir is a 5-gallon bucket
Nutrient Solution
10g Masterblend Tomato formula (NPK)
10g Calcium Nitrate (CN)
5g Epsom Salt (Magnesium Sulfate)
5 gallons water
Here is how to make your own nutrient solution
• Mix Your Own Hydroponi...
Here is where you can get the water pump
➡️amzn.to/3UVXWtX
Here is where you can get the Masterblend
➡️ amzn.to/43V1BLM
Other supplies I used for my hydroponics needs
➡️ www.amazon.com/shop/healingho...
Disclaimer: Some of these products are affiliate links, when you purchase any items from these links. As an Amazon Associate I earn from qualifying purchases without any extra cost from you. This helps support my channel. Thank you!
#hydroponics
#hydroponicsforbeginners
#lettuce
#hydroponique
#hidroponik
#diyhydroponics
#hydroponicfarmingathome - Jak na to + styl


This tower is made from six 2-gallon buckets.
Each layer has the capacity to accommodate 4-8 plants per bucket with a growing cell size of 2 inches that fits perfectly with a pool noodle.
The structure is supported vertically by a 3/4" pex pipe. I made a tiny holes around the pipe to create sprinkler like or pattern on each layer of the bucket using a 1/16 drill bit to ensure an even distribution of water to each growing cell/hole. There are 6 in total vertically, so each bucket has it's own individual sprinkler like pattern or mist.
The pump can raise water up to 10 feet in height, and the reservoir is a 5-gallon bucket
Nutrient Solution
10g Masterblend Tomato formula (NPK)
10g Calcium Nitrate (CN)
5g Epsom Salt (Magnesium Sulfate)
5 gallons water
Thank you for this! I just built my first one, waiting on the pump. If you like to cut out the bottom of the bucket, use tin snips, it cut like butter! Thank you! ✌❤✌❤
@@coryd2993 Love to hear it and thank you for sharing your tips! 🌱💜All the best! Happy Gardening!
If you start with a full reservoir bucket, how often do you add water/nutrients? Put another way, how long does a 5 gallon bucket of water/nutrients last? Also, are you living in a dry environment, wet or middle type of environment? Thanks! I love this video. Good job!
Do we need 40w or 20w pump for this?
How are the buckets free? They cost 10 bucks each here
Tradie's tip: run the hole saw backwards for the final cut to stop the plastic from getting stuck inside the hole saw.
Also, why not use a standard drill! Looks so much more difficult to use a hole saw with the one she used.
Interesting and ty for sharing I don't have any experience with power tools
Wow! Thanks for the great tip, I always struggled getting the pieces out of the hole saw
Thanks for sharing these tips!
Keep up the great work! 💖
Great video, Ty. Enjoyed your thorough it was and I always love a good cheap diy project and up cycling stuff that would end up in the landfill.
Bravo
I dig this build. There are some suggestions I have from other builds. When you go to cut the holes in the side of your buckets try cutting a slit about 2"-3" long and at each level stagger where you place the cuts. Then heat the slits using a heat gun and use a 2" pipe with an angle cut at one end to push into the the slits while they're hot, Angle the pipe out at about 45% to the wall of the bucket. Also, burry the reservoir at the bottom. You may want to either paint the buckets or use more of the insulation on each level of the buckets. Add a hole with a cap above the reservoir. Put in a filter at the pump. Here's why I suggest this.
1. Staggering where the holes are placed will naturally redirect the water flow from each slit inside bucket to the next slit down.
2. staggering the slits allow for more light to reach each level of produce, so you can grow leafy greens and have more space you can utilize.
3. cutting a slit and creating an angled hole allows the plants to sprout in a more normal direction and is less stressful for the plants.
4. angled slits are easier to transplant into and you can use less of the funnoodle in making the pods.
5. you'll be able to use the first sprayer method rather than tapping the pressure line in the middle at each level, the water will naturally follow the wall of the bucket instead. and the roots will have more contact.
6. Burying the reservoir at the bottom will cool the water, which in turn keeps the buckets at a cooler temperature so they won't deform, and you get less sapping of the plastic into the water/nutrients
7. Using paint or more of the insulation will cause there to be less light in the buckets, this reduces root rot, fungus, and other diseases.
8. You'll often get debris in the tank, filtering at the pump with a broad filter base will remove the damage debris can cause to your pump. Debris is inevitable, but with a little effort you can maintain the equipment better.
9. The hole with a cap like a 2" pipe at the top or above your reservoir will allow you to easily refill the reservoir and allow less debris, critters and contaminants into the reservoir. This protects the plants and the pump while allowing easy refill access and measuring for your water level.
These simple changes will help the build be more efficient, easier to use, help maintain the equipment, and just all around provide a better experience. Either way, I really like your build for the cost effectiveness, better space utilization and as an easy step into getting into hydroponics. I have more suggestions, but I think I've added my 2 cents for now. =)
Thank you for sharing all these tips and information! I appreciate it! 🌱💜 Suggestions are always welcome. Please feel free to keep it coming this will help others for an easy build. Happy Gardening!🌱🙂
Have you got your own video or maybe a diagram on your setup please? Sounds perfect and well researched! Thanks!
@@jordy46682 Nope, LOL! I have a face for radio and a voice for print. I don't have a video I can point out or anything.
@@healinghobbies can you make a nutrient solution of micronutrients
@@christophersextonsr8788 😆😆😆👌
You did an excellent job on your bucket system you go girl 😊❤
love the sprinkler idea
Wow! You’re truly remarkable! Thanks so mucin for sharing this!
Fab video. I live in the Philippines and this space saving tower is just what I am looking for to grow exotic bell peppers for a niche business. Thank you.
If you’re finding that the flow at the top is less (the plants were smaller), you can reduce the diameter of the pex pipe halfway up to increase the flow pressure to the top. Well done. Without a doubt, your videos are so informative and I love your creativity as you try new things.
And how do you do that?
Love your style :) Thanks for posting.
your videos are so much more fun to watch than any of the other hydroponics videos!! thank you !!
nice diy, love to see more hydroponic type of videos
Wow i like it so much your ideas! Thank you for sharing mate❤
This is seriously one of the coolest things I have ever seen on the internet! The video itself was great. And the tower is EPIC!!
Thank you for the thorough explanation - I seriously CAN NOT WAIT to make this! :)
🎉 thank you so much, very inspirational
Great job!
What a nice and super-smart idea. Hat off!!! I will try and let you know it turn out. 🎉🎉🎉🎉❤
thanks for the tiny hole tips! been hard for me to search for the product for the same features! ~_~
Pretty cool!
Just got subscribed to your channel cause I think u are great...blessings from Cholula Mexico 🇲🇽
Thank you!🌱🙂
nice solution to the sprinkler head problem and save a few bucks as well from not having to buy it for each set up
Nice Job!👍
Brilliant
Thank you for sharing great work amazing idea peace and love to you.
Thank you!🌱💜
You did a good job thank you
Interesting and impressive
Great idea, thanks for sharing. Please reduce the background music volume to 50% or 40%.
awesome
Nice job. Its better to bury the reservoir when you have that option as it keeps the nutrient temperature more stable. The majority of the heat is picked up by the water as it runs down the tower. Insulating the outside of the reservoir can make things worse in some cases as the insulation also stops heat escaping :) Drilling holes in the pex to act as sprayers works great in a horizontal loop of pipe but its not as easy to get an even flow from all the holes in a vertical pipe.
I missed to demonstrate on the video that there is a sprayer/sprinkler like or pattern created in the pipe in each layer of the bucket to get an even flow/mist for all the holes. So, there are 6 of them in total vertically 🌱🙂
@@healinghobbies
It was good you went for a pump with a 10ft head (4.4 psi), you must have known you were going to need it :) I have some home made aeroponic towers that run on mist which makes it easy to get even coverage. czcams.com/video/8mxZiA_eQ24/video.html
@@atomizer2665 what sprinklers do you use to get this mist effect?
@@shillswebservices
They are just hollow cone misting nozzles
Ty u are awesome
Awesome tutorial girl.!! I always wanted to do this but had no clue. I'll definitely do it now. This tutorial was well explained and easy to follow, Congrats on this amazing job!!
Thank you! LET’S GROW!🌱💜
Hi, you can pick up demurring tool for a reasonable price this is great for removing the plastic fluff left after using the hole saw.
You can also use the plastic pipe that workes use to lay water pipes inside before sealing floor/street 😉
thank you for sharing , this methodolgy is really great , do you put the pump on a timer ?
Should attach misting-spray nozzles in the pex-tube where you drilled small holes.
Have you tried this? Misting spray heads need a lot more pressure to work correctly and the minerals in the nutrients will clog the heads pretty quickly.
on it !!
Great job! Best one by far. I plan to copy this but use a solar pump
A solar pump? 😮 Please, where can I find something like that? 🙏🙏🙏
Okay, I found one. Great idea, thanks.
@@kapushthethird Please let us know how it turns out
Thanks for sharing! Great job at showing the progression of modifications. I would think you could also use a small solar panel and 12 volt pump to avoid plugging into a wall for outside use.
You're welcome! Happy to share. A solar panel would be a great option too!🌱🙂
What size solar panel? How many watts?
@@kiddos6538 depends on the size of your pump but it should alwsyd be more than you need which allows for extra during times of inefficiency like when it's cloudy or gets old and dusty.
Very nice video. I like that you gave reference to Mike Vanduzee. He’s been very helpful to the community. Do you have a way of knowing the nutrient level in the bottom bucket? Must you lift the bottom lid to add nutrients? Thank You 🙏
Thank you!🌱💜. Yes, Mike is a great guy and has been very helpful to me. No, it would be a bit of a challenge to lift the bottom lid and refill. I use one of the growing cell to add the nutrient solution. A DIY water level gauge would be a good idea to install in this set up. Thank you for support and Happy Gardening!🌱🙂
Que sacada torre modular e o uso do espaguete é o primeiro video que vejo neste formato, bem acessível locais onde encontrar baldes: obras geralmente são descartados, cozinhas industriais...
Brother Hobbies, I like your style.
Looks like a good potential for electrical shock. Nice how you did all the work. Thank you.
AWESOME!! I love how you show the various considerations during your build and how you were able to adapt it to make it work! I absolutely love this! I just put three buckets together this past weekend and I have 11 sweet pepper plants growing out of it. One question about your build, how do you know when you need to add more water to prevent your pump from going dry? My biggest concern with my current setup is the place where I left holes to add water however with mine it will be easy to tell when the water level has dropped and needs more. Just curious how you are monitoring it on yours? Absolutely LOVE what you’ve done and really enjoyed your video, my only one critique would be to slow the video down a little so we can read all the helpful info that you have embedded. I think it’s an amazing video and I’m going to subscribe and look forward to many more! Congratulations on your success!!🥰❤️🙏🏻🇨🇦
Thanks again as always I appreciate your feedback!💜🙂 I completely understand the challenge of how to monitor the water level for this set up. Currently, I do the same I use one hole to peek and refill except I use all growing cells and just pull one plant from the bottom each time of refill. I find that as the plant matures with 48 plants in this tower they take up a lot of nutrients plus this set up is growing outdoor. From 1x every two weeks I am now down to refilling once a week. With the summer time approaching the evaporation increased too. Not complaining though, 🙂 this tower is producing a massive amount of different vegetables for our needs. ( Bok Choy, Kale, Tomatoes, Strawberries, Mustard, Lettuce) I love this set up and I plan to make another one but a twin tower with a much larger reservoir. 15-20gallons tote/ container would be a great option to avoid frequent refill. To answer your question, currently just peek and refill but I have an idea in mind to experiment with the new twin tower to make a DIY water level gauge and hopefully it will work. (PVC, Clear tube shot & Straw) I welcome and will appreciate all suggestions/thoughts too. LET'S GROW!🌱🙂
@@healinghobbies we thought we could use a piece of pool noodle to float on the water and put a stick out the side hole and put markings on the skewer stick to show when it needs to be refilled the only challenge with this, the roots would get in the way however with your bottom section just being exclusively water it might work for you?
Pool noodle is a good idea too. Maybe I can integrate with what I have in mind. I will do some experiments and see what works. Thanks a lot Leanne for sharing your ideas. 🌱😊
@@healinghobbies Mike cuts a single 2" hole in the reservoir buck and plugs with noodle cover right under the lip for viewing water level. Also, he drills vent holes under the lip, as well. Can glue small venting material to small holes to keep pests out.
Wow, great job. How do you get into the bottom of the bucket to add water and more nutrients or to test the balance of the water? Do you just pop off the cover and move the whole tower off the bottom bucket with no problem?
Do your top buckets get algae or are you do you only need to blacken your reservoir? How often do you find yourself disassembling and cleaning?
thanks for the video, can you please let me know what is the timer settings?
Tqvm for your system knowladge😂😂😂😂
What about seed propagation? Did you start them in the pool noodle cutouts in a seed starter tray?
Nice... How long did you cut the pool noodle inserts? What were the plants you used? Do they have root hormone or just bare root?
awesome design! I think I will build one at my school
Yer bwo,
Gg on the tower, I hear u on the price..
When you can knock a bucket, PVC or barrel airoponic tower up for far less .
Love your video butto help you out have your drill turned in Rev while cutting out your holes
Thank you for the tip.🌱😊
Looks great! How do you refill the main reservoir and are you still using the sprinkler cap at the very top or did you close the end off completely?
I use one of the growing cell of the first bucket and use it to refill. A big funnel or a handheld siphon pump would be handy to use. I did not use the sprinkler anymore. I close the end completely and just drill similar holes to have a sprinkler like mist on each bucket. I hope this helps!🌱🙂
Do you have time do anything additional to prevent algae growth? I heard about that issue in other people’s experiences
That is exactly what I was looking for❣️ the best, affordable, easy to set up project I found! Can you let me know please how often you fill up the lower bucket and how?
Thank you! Happy to share and I appreciate your feedback!💜. It varies depending on the growth stages of the plants and the weather conditions. In Spring time, refilling typically at least once every two weeks while in Summer months with the high heat and a lot evaporation, it may be necessary to refill at least 1-2x a week. This also applies with the growth stages of the plants. During the initial two weeks they have lower nutrient uptake, but as they grow, their nutrient requirements increases. With regards on how to refill the reservoir, I use one of the lower growing cell to add the nutrient solution. A funnel or a handheld battery siphon pump would be helpful. I hope this helps!🌱🙂
I'm sure with a little creativity you could figure out an easy way to manage top ups.
What comes to mind for me is having another pail with a soft pcv tub at the bottom near by. Either the main res is below ground at least a bit or the pail is raised up a bit. You fill that pail with water, mix your nutes and adjust your Ph and then open the tube to drain into the main res.
A EZStor bucket at the bottom, something with a flap you can open and close would be nice too to just pour into.
Otherwise using a transfer pump or even just a regular submersible (since they are cheapest) would work too.
How often do you feed them? or also how often do you change the water?
Can you please let me know how many hours per day should the motor that pumps up water be running ?
It’s kinda hard to read your commentary, the color of font on the green background is not easy to read.
Very interested in what you’re doing! Looks awesome! Really LOVE the In video material list!!
Can you add Miracle Grow or some similar to fertilize?
Do you run the pump continuously or periodically and if so, how often?
How do you keep it from falling over, it looks precarious?
How often do you run the pump and for how long?
i am using the same pumpand holes bvuyt my pump cannot push the water all the wayt up, the pump is on max troo!
Very beautiful done 👍🏻😊. Only thing i have to ask you is, how often pump should start pumping solution? And for how long when it starts?
Thank you!💜 I run it 15mins ON and 30-45mins OFF. If you can find a timer that can be set 3-5mins ON and 15mins OFF it'll work best specially growing outdoor in Summer as evaporations go quickly🌱🙂
@@healinghobbies Try an Intermatic DT620 Digital Timer. It has 28 separate events.
How much electricity is used by the water pump ?
And is there any intervals for watering ?
How did you put the plant into the pool noodles?
thank you for this video! can i use the same water pump for multiple towers?
So far I only tried them with two towers, you may need a stronger one if you are considering more than two towers or it may vary too depending on your set up.🌱🙂
I'm digging the styrofoam net cups. How should we score them without a Soldering iron
I tried using a cutter but its takes a lot of time. Another option is a tie wire or a metal bbq skewer.🌱🙂
what is in the water? is there any fertilizer or salt mixed into it?
What is that sheet called for the lid of the system ?
This is great! Any idea about NPK 19:19:19 ? How to use that ?
I haven't tried that formula yet but that would be an interesting to try and experiment.🌱🙂
can anyone recommend a solar water pump to run this?
How often you water? Or is it continuous?
Do you run the pump continuously?
do you put the water in the tank?
The video is great. The background music, an annoyance.
What if I put soil in the Pvc
How did you add the 1st bottom lid to not squish the cord for the pump? Good job! Thank you!
I missed to make a footage on this, I made slit/cut on the rim of the bucket just enough to fit the cord. This makes easier to lock the lid.🌱☺
@@healinghobbies Thank you.
Jow mamy times do use Water pump ?
Hi can you say what should I do for nutrition or what solution should I need to add in water
I use masterblend here is how to mix it. czcams.com/video/JBvGJ1E2Jbk/video.html
do you run the pump 24/7 ?
And how do you combat the leeching from the materials into the water supply?
If you are using a form of plastic, the only thing you can do is use a food safe plastic (no bpe)
Can this be kept indoors?
Thanks for the video, wich plants are them? Do i need such huge buckets
These were Bok choy, I've tried multiple plants in this set up too (celery, strawberry, lettuce, kale dwarf tomatoes etc.) The bigger the reservoir/bucket would help to reduce in refilling nutrients.🌱🙂
Which ones grew well?
Would it be possible to use some kind of mist spray nozzles found in Amazon?
Yes absolutely! I was trying to do this project on a budget but mist spray is a great choice too.🌱🙂
Would it be better with mister tip's ?
maybe a potplant mover thing on wheels to help rotate it every other day?
That would be a great idea!🌱🙂
@healinghobbies what brand of submersible pump are you using?
Vivosun, link in the description🌱🙂
well-done
Just a question... does the cost of running the pumps all day long not make this a costly affair?
The pumps barely take much energy at all. Probably workout to be $10 for the year
I'm just wondering about the electricity cost. Kratky method does not use electricity. Same setup but no holes on the bottom of the bucket. Just fill up the bucket with nutrient water and stack up the same way.
Big plus, in a power failure Krakty still keeps the plants alive as the roots are continuously in nutrient and don’t rely in a pump.
It’s why I like DWC with only an Air pump coming on 15 minutes every hour, power failure o problem, plants still have nutrient in the bucket.
A 25w pump has 7 feet of lift, so let's say 40w to be safe and enough pressure to account for the holes.
Probably need 15m every hour, (smaller intervals best).
That's 6 hours a day, 240w.
For a month, x30, let's round to 7.5kw. Power ranges from 10c-40c through Canada and the USA, so that means 75 cents to $3.00 a month. Not much.
The advantage here over krakty is the vertical space utilized.
What is the nutrients you are using for growth?
I used masterblend 4-18-38, more details in the description including the ratio🌱🙂
Hi good day, do you have a name or a link for the sprinkler head that you were going to use?
I got from Lowes - try to look up Orbit master adjustable shrub sprinkler head 360. But I didn’t use it in the end since the tiny holes from the pipe in each bucket works better. 🌱😊
I have a much simpler idea that doesn't involve buckets and much easier to build.
Share it, please
Hello, if anyone can answer this.. DOES THE POOL NOODLE SERVE ANY OTHER PURPOSE OTHER THAN HOLDING THE PLANTS?. I'm guessing to help retain moisture
The pool noodle material is just blown plastic, can absorb nothing. Rockwool would absorb well but not pool noodle plastic. It is "springy" (which rock wool is not) so can grab and hold and support plants if you cut it properly
Do you have to disassemble the whole thing to top up the bottom bucket?
Yes, to disassemble start from top to the bottom buckets.🌱🙂
@@healinghobbies Thank you
what's the name of green sponge you put the plant into ?
It's a pool noodle🌱🙂
where did you get the timer, and what settings did you use?
🙏
I got it from a local hardware store but there are some similar type in amazon too. I run it 15mins ON and 30-45mins OFF. If you can find a timer that can be set 3-5mins ON and 15mins OFF it work best specially growing outdoor in Summer as evaporations go quickly🌱🙂
@@healinghobbies can you give the name and model number? I see many, but none give that information
It's from Intertek (4008598)I'm not sure if that's the model no. though. This probably from an old product line, found it on a bargain. This one from amazon has 15min interval amzn.to/3qr9MkE or if you prefer like a more presets option, the tower garden timer www.towergarden.com/shop/timer. a little expensive though. It's preset to Indoor Use (5 min on, 45 min off) Outdoor Use (3 min on, 12 min off). I will leave up to you🌱🙂
How about when you happen to stay in an area where there isn't a constant power supply to power the pump ?😢
You can still grow thru a Kratky method, this method do not use any pump or power. I've tried it using 2, 4 & 5 gallon buckets stack them up to 3-4 bucket high. Here is a short clip for ideas czcams.com/users/shortsze99iT0md6Y?feature=share except for the celery & leafy greens all of them are growing without pump or power. 🌱🙂