Video není dostupné.
Omlouváme se.
Complete Guide to Removing Blemishes in Photoshop
Vložit
- čas přidán 17. 06. 2017
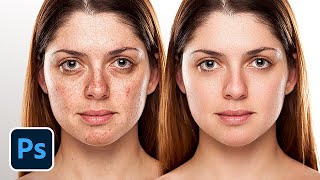
- Discover The Best Way to Remove Blemishes in Photoshop for "Your" Images. We'll go through various techniques and let you decide which one to use. Right from using the healing brush tool to clone stamp tool with blend modes, in this video, we'll cover everything you need to know about removing blemishes in Photoshop.
►IMAGE CREDITS AND DOWNLOAD:
© Jozef Zidarov, FindRetoucher.com
findretoucher.com/free-raw/
PiXimperfect is free, and will always be.
► Support the cause: / piximperfect
Every technique has its own pros and cons. Which one to use then? This is determined by the situation you face. For instance, if you are posting the image on Instagram, you don't need to use a sophisticated and time consuming method for the finest results. Just a few clicks with the spot healing brush will do the job for you. Because, in that size, the difference will barely be visible. Also, let's say the subject is standing close to the camera, i.e., it is a close up shot, then you might need to you advanced techniques for fine results as the face covers most of the frame. On the other hand, if it's a wide angle, group shot, more often than not, blemishes are hardly visible in the first place. It would be a waste of time to use regular healing brush for those situations.
In this tutorial, we are first going to look at the healing brush tool. Besides, we'll learn a trick to make the spots more visible and hence making it easy for us to spot the spots and easily remove them. Then, we are going to learn how to use the Patch tool. Now this will be fun as we will learn a trick to remove all blemishes at once using it. Then the spot healing brush tool followed by some advanced uses of the clone stamp tool.
We are also going to learn where does removing blemishes fit in the workflow of retouching a portrait. Hope this video helps you!
► SHARE: goo.gl/IUhnUl
►LET'S CONNECT:
Facebook: / piximperfect
Twitter: / piximperfect
Instagram: / piximperfect
Google+: plus.google.com/+UnmeshDinda


Finding your channel is like I hit the jackpot. I'm so grateful for your generosity
Thanks for sharing all your knowledge!!! Here´s my tip contribution:
To rotate the sample in clone stamp tool:
alt + shift + < or >
to resize:
alt + shift + [ or ]
Hope it helps!
Someone with your much in depth knowledge of PS and teaching skills your suppose to be an old man with gray hair, and many miles under your belt. Also not to mention your generosity of sharing your knowledge .. Simply put one of the best PS instructors on U tube and entertaining .. Thank you.. One question, who taught you, they have to be great also.
I've been enjoying all your videos for the last few weeks. Always educational and entertaing.
Thais is one of your most important vids about skin treatment.
Man... you are certainly different to a lot of PS presenters. There's something quite likable about you. Really like your tutorials and the fast pace. A great tutorial to do would be selections. Most tutorials are of subjects on relatively clean backgrounds. Let's get real... the time we want to extract a subject from a background is when the background is bad and usually quite bitty. Would love it if you'd do this and take time to explain the method.
Another great video! Fantastic instruction! I'll be practicing on the sample files to get my technique and workflow as efficient as possible
Thanks a lot for your work man. You deserve more visibility. You are a master in Photoshop!
Thank you so much for those tutos. So helpful ! I love the tips you give along the way. Thanks thanks thanks
best teacher out there
underrated channel. thank you for all the tips, so glad I bumped into this video as a beginner
Very nice tutorial for Removing Blemishes. This is by far the most interesting video i have come across. It uses different techniques and tips to remove Blemishes. The guy knows his stuff. Very intelligent. Keep up the Good Work...
Thank you for the little tips at the end, I'm still new to more advanced editing. I never thought of doing lighting, then blemishes, then more advanced things after. You made a very valid point! I was going to jump in with blemishes first, but adjusting the lighting first makes sense. Thank you!
This is a great channel. The info I get is very helpful. My Photoshop skills are always in need of improvement and this guy is easy to watch and understand. Thanks for the free and informative help.
So GRATEFUL for your videos. They are a true treasure to keep. Thanks a lot!.
Another fantastic lesson. I watch each one with notebook in hand.
I really appreciate you sharing your skill and knowledge.
Loved it. The analogy at the end with the cake and sugar really stuck in my mind. For those who didn't make it to the end of the video, the order of processing is: fix lighting in LR (or ACR), blemishes in PS followed by Frequency Separation for evening out skin color.
Another great video.. easy to digest. thanks bro
Thank you for your videos...your a great teacher and your knowledge is so impressive!
An outstanding channel with a treasure amount of knowledge. I simply can't do without it. Thank you a million time.
great video thanks. That explains why my image the other day was so faded after retouching then trying to adjust colors and lighting.
You have saved my Photography and Editing life!!! Thank you, Thank You, Thank you!! You are simply the best out there!!!!!
Thanks! im waching every single video of you. You are awesome teaching stuffs
fabulous tutorial. You have a great way of explaining things and the reasons why. very informative. My portraits are already looking much much better. thanks. Rotating clone stamp something i never tried.
Time passes so quickly while watching your channel and very much illustrative .. You have a GuD grasp over the innermost hidden circuits of Photoshop. GuD GoinG
I cant tell enoght how amazing your vids are because its too superior to anyother else. Impressive!
Brilliant tutorial!!! I learn alot and it mean alot to me. Cheers!
This was so good!!!
Great tutorial!
Love your Photoshop Channel. You are the Coolest Best Instructor. Thanks.
Thank you! Fantastic!
again great video
There is no reason why i love your smile,,god bless you icon😍
Another excellent video!!!!!
Man, you're awesome! Thank you!
you are great. I really enjoy this video. pls do a comprehensive tutorial on retouching and be sure that I am buying it fast. Thank you
Really great tutorial. You might have mentioned that you were going over moles and freckles in some of the cases and not 'blemishes'....but still, hooray. IMJ some people like to keep their moles as they define their face. Excellent video.
Thank you so much ❤❤
Super Bro your knowledge of PS and teaching skills
Inspired by you💕🙏
Thank you very much
very nice class
Yes I agreed , he answers all the why from us
you r really genuis!!!!
amazing keep it up
Thanks!
TALENT
GREAT!
the link isnt working please fix i want to learn it.
and thanks you are a great teacher i feel lucky to found your channel
Thank you... Pls make video how to remove shadow on face..
anti-clockwise :) ha ha you kill me. -you are my favorite...so funny and helpful at the same time.
ur the best
Hi, thanks for the video, I just have a question; when I circle the blemishes with the patch tool and then try to move them to the right they just snap back to where they came from, how can I make them stay? Cheers!
After fixing blemishes do you flatten image to go to frequency separation?
OMG! Thank you! 🙌🙏😲🙂
Hey, just a quick question... For making the blemishes visible which method is better? A B/W layer with reds and yellows reduced or sine curve method?
You’re quite specific to do blemish control before FS. But why not do the blemish control on the structure layer while doing FS ?
19:48 Dica de fluxo de trabalho
Tudo só vem depois de remover as manchas! Primeiro ajuste a iluminação, tonalidade e cor no LR ou Câmera Raw. Logo em seguida REMOVA AS MANCHAS. Só então a imagem está pronta para ir para SEPARAÇÃO DE FREQUENCIA, e tudo mais.
Por quê?
Porque quando você importa a imagem para o Photoshop para remover manchas, as qualidades cruas - do RAW - vão embora. O Raw é o que você precisa para ajustar a iluminação, as cores e tudo o que você desejar. Porque ao importar a foto para o Photoshop para remover manchas você perde a qualidade do RAW. Quando você tem as qualidades do RAW, tem mais profundidade de Bits, e informações de equilíbrio de branco que são essenciais para ajustarmos a iluminação, a cor, a exposição... Feito isso, só então você importa para o Photoshop, porque se você editar isso mais tarde irá perder os detalhes, profundidade de Bits... porque importou errado (no caso de ter que fazer ajustes básicos de balanço de branco, exposição...)
Por que a separação de frequências é após a REMOÇÃO DE MANCHAS?É como um modelo de argila. Primeiro é feito uma estrutura de arame, depois colocamos argila sobre a estrutura de arame e pintamos (ARAME>ARGILA>PINTURA)
1º Estrutura de arame > Seria ajustar a exposição, balanço de branco, etc, no LR ou Câmera Raw
2º Argila > Seria o equivalente a remover as manchas
3º Pintura > Separação de frequência, degradê, pesquisa de cores, filtros, todo o resto...Se você não seguir essas etapas e quiser fazer primeiro uma separação de frequência, aplicar filtros, efeitos e então você perceber que você deixou uma mancha, você perderá detalhes.
Basicamente só polvilhe açúcar no bolo quando o bolo já estiver assado.
Inage download link is not working . Please check and confirm. I think my wifi net has problem.
Download link doesn't work
💕
16:29
The link ►IMAGE CREDITS AND DOWNLOAD: not working
Patch tool doesnt work bro
This video is exactly 3 years old
hello, eventhough the tutorial is good, the interactivity of the youtuber or someone to help for enquiries is very poor. no body replies even if we ask important question. and most of the sample images links are not working. Where is the sample image here ? . i bet i dont get any reply for this. so we have to move on .
plz...give me...Photoshop cs6 download link..
Never use hard edge brush when using spot healing tool - it creates halo affect on all spots. Very undesirable.
Another great video.. easy to digest. thanks bro....
Thanks so much