Video není dostupné.
Omlouváme se.
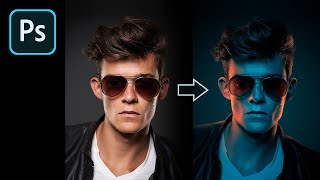
How To Paint Rim Lights For Composites In Adobe Photoshop

Vložit
- čas přidán 15. 08. 2024
- Hey creatives! Ever wondered how to easily paint rim lights for composites in Photoshop? In this video I cover the process I most often use to achieve a nice look for my composite work.
The next tutorial will be based on taking normal diffused rim lights and faking the look of gelled lighting and my process on spicing up a photo with color in post production. If you’re enjoying these videos please Like, Comment and SUBSCRIBE. Make sure to click the bell icon to get notified as I upload new content!
My IG/ @DustinValkema
Cosplayer IG/ @chaoticneutralcosplay
----------------------------------------------------------------------------------
💥FX Stock Packs used in this Tutorial:
🔥FLAME KIT 2🔥
Check them out here 👇
www.gumroad.co...
Link to my Background Removal / Subject Masking tutorial👇
• How To Remove A Backgr...
Please feel free to leave questions and feedback in the comments! I'd love to know how I can add value to everyone watching.
I've gotten quite a few questions regarding my gear and photo studio setup. Find that below
www.kit.com/du...


Hi Dustin, great tutorial. Can you clarify the bit at 1.40 in about clone stamping the edge of the cutout and the background as I didn't follow what you meant or signpost me to somewhere to read up on that technique, thanks
Hi Darcy! Thanks for checking it out! Of course I’ll clarify. So, this is similar to my tutorial on removing wrinkles from a backdrop. The reason I cut out my subject, and then cloned the bg behind her was so that when I painted the rim light effect it it wouldn’t compete between the masked version and the bg version. Often times your subject masks aren’t perfect so you can see the underlying image ghosting behind your selection if not careful. NOW, this is more the case for studio shots or very basic composites where you aren’t doing a FULL bg swap. Most cases you don’t have to worry about this when compositing but for the sake of the tutorial I wanted to fill everyone in on what I did in prep for the tutorial.
Hopefully that makes sense, let me know if it doesn’t. I enjoy your questions, thanks for being here!
@@DustinValkema Hi Dustin so is this right? you make a selection for the character/subject, copy it to a new layer then make a background with the original selection, where you clone stamp over part of the subject's outline to stop any issues when painting the rim light over those edges? Is that right? Thanks but wanted to be sure I'd got it, thanks
@@darcybrown7369 Basically. The biggest thing to remember is that when you have your layer for your subject cut out, the mask will rarely be 100% perfect. Often times you'll get some really funky edges with a "what seems to be clean mask" OR you'll get clear ghosting where you'll see bits of the original photo showing on the outside edges of the rim light painting. With that being said, the easiest way to proactively correct for issues is to "remove" or clone them out of the original "BG" layer.
I've got plans to do some videos on Clean plates, I'll make sure to include this process in those!
@@DustinValkema thanks Dustin will look out for them, I feel I'm improving in my comps but sometimes spend hours with tricky details so your tips will surely help speed things up. Latest example on my 500px profile: 500px.com/photo/310383139/pirate-queen-with-axe-by-darcy-brown?ctx_page=1&from=user&user_id=2138773
@@darcybrown7369 Nice! You're definitely improving, like the vibe of that one for sure!
Appreciate the tips my man 💪🏼. Trying to up my thumbnail game on CZcams
شكراا.. من مصر 🇪🇬
Underrated channel .. Keep it up ❤
Awesome tutorial man.
eugene kerekere thanks brother!
finally found a tutorial who speaks my language, absolutely brilliant mate, thank you for taking your time to show how to create rim painting or lighting. You have another subscriber
Dope. I can't believe I never thought of doing that! Your composites make me smile. I'm a fan.
Thanks Mike! It means a lot for you to say that, at the end of the day as an Artist... that's what it's all about :D
Thanks man, seriously. I've been trying to paint a rim light onto a character for hours and every experiment has wound up looking like hot garbage. You sir, have provided a solution. Take my like and my subscribe.
TetraCurse thanks so much! I’m glad this worked for you! There have been plenty of times that I’ve found myself in that position as well and it feels good to help you out ☺️
Great job Dustin! I much prefer this method vs many of the others I have watched.
Thank for this detailed tutorial. Great content btw.
No problem, thanks!!
Great video Dustin! Thanks!
thanks a lot for this video and creating this CZcams channel. i just found you here and i have not money for workshops you are helping me in bad times tysm
Makes me glad to hear that, Thanks!! I know it gets tough at times, really happy I can help :D
super really thank you mate
Very clean as always! I'm loving seeing your channel evolve from its beginnings! Keep it up!
Thank you so much, man! Really appreciate the support!
Wow gorgeous
Thanks Emma!
@@DustinValkema ❤
You DA man.
T-City no... you da man!
Great tutorial - thanks!
Kerry Dawson thanks so much! I’m glad you found it helpful!
Thanks for this dude. Great tutorial and I like your image too
Thank you!! 🙂
Good job bro
Why is this channel so underrated? The content is so helpful and professional. Youll be big one day trust me man.
Thanks so much! We’ll get there! 🙌
Incredible! Definitely going to use this technique. Subbed.
Thanks!
Great! You got me subscribe!!!
🙌 thank you!!
Thanks alot man i was legit looking for a tutorial like this, however i still one of my biggest questions i have is what are some good blend modes for a very drastic rim light. I am working on turning a day light photo inside a car into a cyber punk look i am happy with the way it looks so far, everyone i showed it really think its nice but i am stil too 100 on the rim light with it since its a dramatic change from day light to neon tones
cool
GreAt. Similar to Tttvid
Hi bro please download link brush Pack
Great tutorial! James @wickedsensationphotography
James Bailey thank you!!!
So, when are we going to see some cool stuff from you....