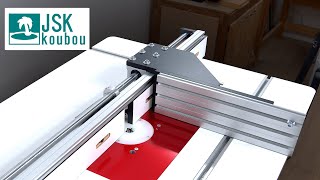
Add a Fence to your Router Table or Table Saw

Vložit
- čas přidán 25. 08. 2024
- I picked up a job site table saw a few years ago and decided to combine it with a router table that would slot into the extension arm of the saw. On top of that I wanted a multipurpose fence that would function for the saw as well as the router table. The whole unit can be folded up and wheeled into a corner when not in use. The router table and fence also get a dust collection system. Part one features the router table and part two covers building the fence. I hope you like the video, if you do or don’t, let me know in the comments! Speak yo' mind!
Like and subscribe because I know you like my bad jokes!
ATTENTION! This is not a video or channel that intends to show you how to use tools properly or safely! You use tools at your your own risk.
TOOLS USED:
Delta 36-6022 Table Saw
Dewalt 618 Router amzn.to/3HRM9a3
PARTS LIST
Materials:
.5" HDPE (the white cutting board material)
.625" Phenolic Sheet (reddish material used for the router inserts)
.5" MDF
Adhesive backed wood veneer (Oak on the table top)
.75" and .25" Baltic Birch Plywood
PETG Filament (3D printed parts)
Extrusions and Hardware:
1.5" x 4.5" x 36" Main Extrusion (8020 brand) amzn.to/3H4XfXB
1.25" x .5" T-Track (see plans for exact dimensions) Generic Brand
2x Angle Brackets for 1.5" Extrusions (8020 brand) www.grainger.c...
If you want 10 angle brackets, here is the link amzn.to/3k4sR93
T-Nuts for Track (fits 8020) amzn.to/3H51ceY
Dust ports came from Rockler
Handle for Fence www.mcmaster.c...
Fasteners:
8-32 x 7/8" www.mcmaster.c...
8-32 x 5/8" www.mcmaster.c...
8-32 x 1.25" www.mcmaster.c...
8-32 Rivet Nut www.mcmaster.c...
1/4-20 Rivet Nut www.mcmaster.c...
1/4-20 Wide Head Bolt (for router enclosure) www.mcmaster.c...
1/4-20 x 2.75" Bolt (for T-Track) www.mcmaster.c...
1/4-20 x .75" Bolt (for fence attachments) www.mcmaster.c...
1/4-20 x 5/8" Bolt (for fence extrusions) www.mcmaster.c...
Thumb Screw (for Fence Dust Collector) www.mcmaster.c...
PLANS and PARTS:
This is not a heavily tested product. Remember that you build anything here at your won risk!
Plans:
the3dhandyman....
3D Printed Parts:
Dust Collector Port: www.thingivers...
If anyone wants the other parts featured in this video let me now in the comments.
I'm now on Patreon!!! The reward levels are very basic for the time being but I promise to bring merch and other perks in the near future.
/ the3dhandyman


Drawings and 3D Printed Part Files are in the description!
Hi, Can i use 1/4" plexiglass instead of HDPE?
To help minimize chip out, don't let the tool explode out of the back. Slap a scrap of wood and finish the cut into it.
Thanks for the tip!
The best shop video i've seen in awhile. 3D Handyman saved the day for me. An answer to my problem. Thank you, 3D Handyman.
So... AWESOME work. You really put a lot of detail in your work, and in the video. Secondly, I like your dry style of just calling it like it is. You're no carny -- great work and great vid!
That is quite a complement. Thank you.
I have ended up doing projects in fields which I know next to nothing about for most of my career. The learn fast fail fast method seems to work well for getting the best results in a short amount of time. Failures can often be better learning experiences than the successes. So, for these videos to be as valuable as possible to other makers, I feel that they should show all aspects of the creative process... the good and the bad.
Loved the animation - sweet build with minimal tools used - thumbs up! Subbed.
Thanks and thanks for the comment!
about tearing up, place sacrificial board on good side, clamp it. holes will be buttery smooth
So true!
I've been considering something similar in my shop - Well done man, great video!
Thanks! 👍
My Triton accessories use MDF for the sacrificial backing board & I haven’t experienced the blowout / chip out that you have.
MDF does seem like a better option for the sacrificial board. Thanks for the comment!
Good stuff
Beautiful work my friend with brilliant design & functionality! This build (both videos) were the 1st I've seen of your's but won't be the last... Subscribed and begun some binge watching lol.
Must also commend you on the overall video presentation. 👌 Pure overall quality my friend IMO! Great visuals. Perfect audio. Great format... I prefer your method - voice over with while work is happening. Thank you for not having annoying background music! 🙏
Haha! Thanks for subscribing. Good to hear you like the format. I think there is just too much to say about a given build to be quite about it.
Only one video so far has background music it (the desk build). I tried to find a few tracks that weren't annoying. What do you think of the music selection?
There goes all my spare time 😉
Just casually waitIng for this channel to blow up
Thanks John! You and me both
Use Dove soap as a lubricant when working the aluminum
Thanks for the idea!
I always see people cutting their t-slot.
What I did was use the 2"×2" (10 series. 2020, but not the metric 2020) for my fence. I used one 40" and two 16". I put two 16 on bottom, and the one 40" on top. (It made 2" thick, 4" tall fence.) And it allowed me to use the 2 bottom 2x2 extrusion for as dust collection by attaching hose on the ends. Now i didn't need an under, or rear dust collection.
In your case, I'd have just capped the circ saw side of the 2020 and pulled dust from one side.
The nice thing about the 2020 is the weight and stability.
As far as the slide/drop in nut issue...
I'd drill through the track to put nut on other side of extrusion. But even better is to tap the track on the other side.
I wish I could do 3d printing... I've had too many concussions to absorb that type of thing.
I love t-slot extrusion ... I've used it for years, and it's just amazing for everything.
But good 10-32 and ¼-20 tap, and aluminum tap magic goes a long way.
That's a great idea. Cutting them can be a real pain if you don't have a mill. Thanks for the ideas! I'll keep this in mind next time I do something similar.
3D printing is extremely useful. Even if you don't design your own parts it's pretty easy to download them and print them yourself. I wouldn't rule it out completely 👍
@@The3DHandyman yeah... I've tried so many times to learn programs for 3D, my brain has just been beaten into mush for that type of thing to absorb. I spent 2 weeks trying to figure out how to use Sketchup and I'm now bald. 🤣 🤣 🤣
Cutting extrusion is easy... it's the mess that I hate. I ended up buying a refurbished 10" POS Ryobi Miter saw for $50, just for aluminum. I use it outside in a corner of my yard that I ended up turning into a paint booth. Buy it traps the aluminum in there, and I hope in 10,000 years some miner with think they hit it big 😆.
@@carterscustomrods Fair enough! You can always pay me to design parts for you 😄
Lol! There may be a corner of my yard that has a nice vein of aluminum for future explorers...
Good call on the saw just for cutting metal. It's work $50 for sure.
Let the drinking game begin. Maybe benifitial to tape the extrusion ends at the router cutout. Not sure if using the extrusion as dust collection channel is viable.
Bottoms up! I thought about making the dust collection at one end but was concerned that it would create too much of an overhung weight that would effect the sliding motion of the fence. When the dust collector is running, it seems to keep the holes in the fence clear of debris.
@@The3DHandyman not sure if the ends of extrusion at the router but cutout is leaking dust collection power. That’s what I meant by taping them.
@@What_Other_Hobbies Ah, got yah. Yes, they likely do to an extent. Good thought!
2:14 your step-up from Drill A to B was too large, had no lube and too high of RPM for that size drill. That is why that didn't work to plan.
Good point! In the end that press isn't designed for drilling that sort of hole. The RPMs don't go that low and flooding the table with coolant would have been a real mess. I actually got a mini mill to replace this press a few months ago for this reason.
Your video animation is really cool, and also your router table fence is fantastic, what program did you edit this animation with? thanks
Thanks! I use 3Ds Max and Redshift for rendering.
Here's a video on it czcams.com/video/C9wcICxJQLQ/video.html
Hi, thank you for the great video. The link you gave for the '2 x Angle Brackets for 1.5" Extrusions (8020 brand)' is incorrect (it links to some other part). Could you please furnish me with the link to the brackets?
Any time! Thanks for the heads up on that. Here is a link to where you can buy the 2 needed for this fence www.grainger.com/product/5JRV7
If you want 10 for some reason, here is the amazon link... amzn.to/3k4sR93
Let me know if you have any other questions!
What software are you using to animate the beginning? This video is a very well put together.
Thanks! I use 3ds Max for my animations. It was a long time ago that I learned how to do this and now a days Blender is very powerful and free. If you are interested in picking up animation, that's what I would recommend.
If you would just like to know more about the process, I made a video about it... czcams.com/video/C9wcICxJQLQ/video.html
Why didn’t you use your router to machine the aluminium? Those tungsten router bits are fine for ali.
That's a good point. I have not hand routed something that thick tho. I could have just chucked the router bit into the drill press to do it but I'd need to check the feeds and speeds for sure. It's easy to burn up a bit if things aren't right on the mark
nice video bro
thanks brah
What would you say was approximate cost for all the materials used to build this? Great job btw. I love the industrial look of it too.
Thank you! It was a few hundred to build for the table and the fence. Cant remember the exact amount but maybe $200 for the fence alone? I probably could have bought a router table for the cost on putting this together. The upside is the portability and the face that the fence works for the saw as well as the router. Making the backstop thinner would help bring down the cost. The HDPE was also cost increasing as was the phenolic sheet used for the router inserts.
@@The3DHandyman Thank you for replying. Anything under $4-500 I’d consider still a reasonable price. For what it is and how well it turned out.
@@pf5658 Any time! I felt the same way after it was all wrapped up. It still works great to this day.
in which program do you make animations please?
I use 3Ds Max because I'm old. Blender does a fine job and is free to use. Here's a video on how I make the animations czcams.com/video/C9wcICxJQLQ/video.html
Very nice work. A table saw has been on my shopping list for some time and your solution ticks a lot of boxes - I might follow suit. Did you lower the speed or change the blade on your bandsaw to cut the aluminium?
ps. for 8:00, would a sacrificial piece of wood between the jig and the cutter for that first cut not prevent the blowout?
Yes. My bandsaw has 2 speeds 1500ft/min and 3000ft/min. I keep it at 1500ft/min for aluminum and use a 1/2" bi-metal blade with 10tpi. In the video the cutting footage is sped up quite a bit but it tends to cut large pieces fairly quickly in real time. I let it run for a while in between cuts on thick parts so it has a chance to cool down.
Good note on the sacrificial piece of wood on top. Good thing I keep just about every piece of scrap wood I make. I knew those would come in handy one day. Haha.
Do you have any link for all these products?
Yes, have a look in the description
Do you have any link goal all these products?
Yes, have a look in the description
If you put a scrap piece in front it wont tare out the good piece...
Is any particular type of wood best for the task or is everything just about the same?
@@The3DHandyman any piece of wood that is large enough to support the entire size of the router cut will work if you hold it tightly against the face being routed.
@@ericbuente3260 Thanks for the info Eric
nahhh
Your video animation is really cool, and also your router table fence is fantastic, what program did you edit this animation with? thanks
Do you have any link for all these products?
Yes, have a look in the description