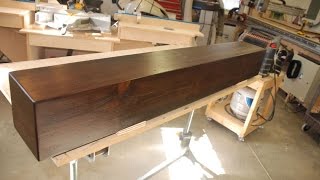
How to Build a Shaker Fireplace Surround | DIY Project | Woodworking Project

Vložit
- čas přidán 14. 02. 2019
- In this video I will show you how to build and assemble a shaker style fireplace surround. This is an update woodworking project for the "How to Build a Shaker Fireplace Surround and Mantel DIY Project video. • How to Build a Shaker ...
📄 DOWNLOAD THE PLANS 👉🏻. bit.ly/4chAnnc
-------- SHOPPING LIST --------
Most of the materials can be found at your local hardware store and on Amazon. The full and complete list can be found on my website.
• Poplar Wood 1x3 = 36ft
• Poplar Wood 1x4 = 6ft
• Poplar Wood 1x6 = 24ft
• Poplar Cove 9/16x3-1/2 - goo.gl/uZ2kS6
• Poplar Mantel 1x5x60 - goo.gl/uZ2kS6
• ¼ in MDF = 2”x4” sheet = 2
• Pine 1x6 = 6ft
• Pine 2x4 = 8ft
• Kreg Jig pocket hole screws for 3/4in wood. amzn.to/2L0U1cJ
• Kreg Jig Pocket Hole Kit - amzn.to/35GyU7n
➡️ PURCHASE the KIT | Shake Fireplace Surround Build Kit | etsy.me/2X8Q7Tg
➡️ DOWNLOAD the INSTRUCTIONS | etsy.me/2Gtew0X
-------- FOLLOW --------
Subscribe - bit.ly/2FRGV11
Instagram - bit.ly/2FRK0y7
Facebook - bit.ly/2FVJLSU
Twitter - bit.ly/2FV5H0i
Pinterest - bit.ly/2FWv6a1
-------- Tools That I Use To Build And Make Things --------
Miter saw | amzn.to/2RuG4oD
Table saw | amzn.to/2U1BLCV
DeWalt 20V Drill Set | amzn.to/2rfO94X
Bosh Router Kit | amzn.to/2rpH8ih
Nail Gun Kit | amzn.to/2UdKYIq
Air Compressor | amzn.to/2QBvEq8
-------- Cameras and Gear Used To Shoot My Videos --------
Main Camera | amzn.to/2QDh8y9
Main Lens | amzn.to/2KOf3Kg
Secondary Lens | amzn.to/2QdsgSY
Audio Camera Mic | amzn.to/2SkY5pg
Voice Over Mic | amzn.to/2rjjtjs
Lights | amzn.to/2Eacl1e
Laptop | amzn.to/2Q57cxL
Editing Software | amzn.to/2QygbH9
#woodworking #DIY #Fireplace #Homeimprovement
DISCLAIMERS | Some of these links have an affiliate code, if you purchase tools or gear with these links I will receive a small commission at no additional cost to you. This helps cover my build materials. Thank you! - Jak na to + styl


Looks fantastic .. two thumbs up .. It’s been unusually cold here in California as well , it was freezing today at 59 degrees .. my favorite build that I’ve seen so far is your play structures ... so gorgeous ..
Thank you
That’s awesome that you actually sale your kits. Looks beautiful.
Thank you! 😊 You are so kind.
I'm going to give this video a thumbs UP simply because you sanded the pocket holes.
Thanks
It turned out nice Phillip. Hopefully by now you have built an extension for your tablesaw. They really make it a lot safer. Woodsmith magazine made one that folds up when not in use and detaches easily. I made one and it makes it much safer when cutting longer pieces.
Keep building and doing videos!
Ron
Thanks for the resource. Glad you like the videos.
What’s the price of the kit?
$395
ty so much great video.
Thanks glad to help
Great design and product. I don't have space for a table saw. so don't own one, but I used a router to cut the rabbets and it worked fine.
Thanks
New subscriber! Now I have a new project!
awesome. happy building
I bought the kit and everything is very straightforward. The only thing I haven’t figured out is how to install the center. I know there are two included pieces that attach to the side columns once they are installed; is the center piece nailed to those from underneath or through the face front?
It is nail straight from the front and depending on where you place it you could also nail it from the bottom too. Hope that helps
HI Phillip, I love the design it looks beautiful, I want to ask you what type of nailer did you use to attach the shaker frame to the MDF panel and the shaker inserts to the MDF pannel? Is that 1/2 in brad nails?
For the MDF I used 3/4in brad nails you could also use 1/2in. The nailer is from a kit I purchased a few years back it is very affordable. Here is the link amzn.to/3h8WoI9 if you however are going to be using a brand nailer all the time I would recommend investing in a nicer cordless version. This is the one I am going to get for myself here soon. cordless version here. amzn.to/3ja3k9o
@@HowYouCanMakeIt I purchased your blueprint and I couldn't be happier... I've never ever done wood working before, but following your blue print I was able to adjust the size to my own fireplace. Here is the pix of final work, I'd be happy to post some review for you. photos.app.goo.gl/iBYcG8HTfQrDdg1v6
looks great thanks for sharing
Hi Philip. Do you do custom kits if I can provide the measurements?
Yes Here is a link to my shop www.etsy.com/shop/millerfurniture
I love this! ❤ how big is the fireplace insert u put inside?
the largest size that it can fit is 36 wide by 32" tall. I make custom kits so if you need a larger one let me know.
Hi cool fireplace surround, I have a question, I just purchased the plans, is the material list correct ? Ie. 1"×3"×6", 1"x4"×6", should they be 6 feet not 6 inch, and is the quantity correct then , I have not had time to refigure the list.
Thank, keep up the good work
Yes it is six feet long not 6in sorry about that the number should be listed on pages 6-10
How wide did you cut the boards for the front? Also how wide are your columns?
all the information can be found in the blueprints.
Any pics of clients that bought the kit. Would like to see some that were finished !
I have not yet received any
photos.app.goo.gl/iBYcG8HTfQrDdg1v6 the blueprint was flexible enough that lets me modify to my own preferred sizing.
I’m wondering if I purchase these materials will Home Depot cut all the boards me since I don’t have a saw?
Maybe however you need a table saw to create a groove and make a board narrower. I know my homedepot would do it.
Hi Phil, new subscriber. Do you also provide the top "Mantel"for the surround? Or do you have a kit for it?
I don’t provide the top mantel just the bottom part as a kit. The kit comes with plans for the entire fireplace
Thank you 😊
Glad to help
Hello! I have a problem with my fireplace, it's too high! Is there a way we can trim it and make it low a little bit so we can put a big size TV on top? Thank you
I am sure you can you have to be careful about fire codes and the distance you need from the firebox
Can I also purchase the mantle board and cove molding (uncut) as part of the kit?
I currently don’t have any in stock
How much did just the supplies cost you? Not any tools. My husband and I are trying to budget when we can do this!
Laura Smith $100-$150 depending on where you purchase your material and or location in the country.
Do you still sell the kit. I'm in Illinois too .
Yes
Hi, do you still sell the kits and if so, can you please give me the info. Thanks
Yes it is on my stage shop. Link should be in the description
How do I get the blueprints?
there is a link in the description
Where can i order the Kit? I can't find the Link?
Shaker Fireplace Surround Build Kit - FREE SHIPPING etsy.me/3yuApq5
Can you make different measurements. ?
I need this to be little taller .
Yes I provide custom kits just message me on ETSY
@@HowYouCanMakeIt is great to work with. I purchased a customized kit as well.
Thanks for the wonderful comment.
Did you prime before painting ?
No I didn’t
@@HowYouCanMakeIt just did mine with your plans and I love it
👍🏻
leaving screws on work table (min 201 video) will scratch your project someday rick
that is true. good catch.