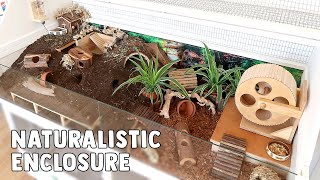
I Built ANOTHER DIY Hamster Cage?!

Vložit
- čas přidán 17. 12. 2021
- ANOTHER???? You can never have tooooo many DIY enclosures! Later this week I'll explain more about why I made another DIY enclosure and of course setting it up :D
Here is all the supplies I used:
PureBond Aspen Plywood cut into 4 pieces-
Bottom: 24" x 48"
Back: 24"-1/2" x 48"
Sides: 24"-1/2" x 24"
www.homedepot.ca/product/pure...
Varnish: shop.naturalearthpaint.ca/pro...
Caster wheels: www.canadiantire.ca/en/pdp/tp...
Glass: www.speedyglass.ca/en/car-acc...
Framing lumber: www.homedepot.ca/product/hdg-...
1/4" hardware cloth www.homedepot.ca/product/fenc...
hinges: www.homedepot.ca/product/ever...
locks: www.homedepot.ca/product/ever...
Hamster Care Playlist 🐹 • HAMSTER CARE 🐹
Find me on:
Instagram: / victoriaraechel
Twitter: / victoriaraechel
What I use in my videos 📸
Music: player.epidemicsound.com
Cameras: Lumix GH5, Canon 70D & Canon G7X Mark II
Editor: Final Cut Pro X
Email for BUSINESS ENQUIRIES only
victoria.raechel@yahoo.com
Want to support us more?
/ @victoriaraechel


My hamster died last night and his name was teddy and he was my first hamster. When i saw him dead in his cage i thought about how much you have helped me. Because when I got Teddy he was in one of those pet smart cages, but then I did some research and found you. You told me about bin cages so I made him one and i just wanted to say thank you.
im so sorry to hear about that, he'll forever be in our hearts!
I’m sorry for your loss. I also lost a hamster named Teddy. He was great. You definitely gave your Teddy a good life and he will never forget that.
rip Teddy I've had 5 🐹 thus far and they do become a part of u their deaths are devastating 💔 i have a tattoo for mines as well sorry 4 your lost 😢
I'm sorry for your loss I hope he is happy in heaven R.I.P🐹
R.I.P Teddy❤
“It’s definitely not perfect, but things don’t have to be perfect to be useable, and anytime I’m able to do something on my own regardless if there’s a flaw, I’m still pretty proud of myself” love that energy ✨
I literally read this comment at the EXACT moment that she said that and it kinda freaked me out lol
7:25 I choked laughing, it's way too relatable! 😂 love seeing you do more DIY videos, especially more cages you can really never have enough of them 😝
Erinnn
it's you! I love when youtubers comment on other youtubers videos :)
Hi I love ur channel as well as I love victoria raechels channel 💗
i hate CZcams they’ve deleted my response 4 times now, basically thank u for ur diys u are my inspiration qween
I swear if this is the comment they choose to leave up
@@VictoriaRaechel Heart touching
I love how friendly this cage looks. My own hamster cage which is a mix of homemade and 2 fishtanks looks like a prison...
This had me howling 😂
This comment was so bad for my bronchial tubes. I think I just grew more bronchial tubes.
Any dad would be so proud seeing his daughter being so skilled when using a drill-driver or however it is called😅
Thank you!!!
I'm forever grateful for this tutorial! I would be so lost on what to do when building a diy enclosure. I'm not that handy tbh but you make it so simple to follow along. Excited to see what's coming next :)
I'm happy to hear that! I'm not as great as tutorials as others but knowing someone finds it's simple to follow along makes me feel better!
@@VictoriaRaechel hi
After searching through an uncomfortable amount of cage videos, this one is really a GIFT. Simply explained & demonstrated! Thank you!
Glad it was helpful!
I didn't know that using real glass is cheaper than using plexi glass. I wanted to add a big window to my hammy's enclosure since it doesn't have one, but plexi glasses are so expensive that I always kept delaying this plan. Thank you so much for the advice Victoria!
i’m actually building this cage for my female syrian hamster lily right now! she is currently in the ferplast maxi duna cage which i have realized caused her a lot of stress and she will climb on the bars on the top of the cage. so i took this into notice and knew i had to make her a new cage! and i knew you were the right place to look for a suitable cage for her! thank you.
Victoria is the reason both my hamsters lived a long happy and healthy life, keep doing what you’re doing! ❤️🐹
I love this style and the fact that there is wood on the bottom! ☺
I think this is my fave cage u've done so far 🤩The white and wood combo looks so good and modern! The wood will blend in so well with natural themes as well. 10/10 🥰👌🏽
Thanks!! It's too bad bedding covers the wood showing haha
This is beautiful! It's also worth noting that you should use silicone in a well ventilated area. 🥰
Thanks!
aww so excited to see which lucky hammy will be joining your family!, i recently got my first hamster cupcake in her 900 square inch cage of unbroken floor space with 10+ inch of bedding!, she’s a Russian dwarf i love her so much! tonight she climbed on my hand and ate the treats off it willingly and it’s such a magical thing i’m so happy even tho it might seem silly i was so over joyed she came to me and sat on my hand! i have only had her a month and she was so scared at first but she has really blossomed ! 💕🐹 with out your channel i wouldn’t have know proper hamster care!!! thank you so so much for helping me give cupcake the best life possible!!!!! 💕🐹🎀✨
Haha 3 is enough hammies for me! It sounds like Cupcake has a great life!
Attaching two pieces of wood at a 90 degree angle is sooo much easier if you have corner clamps. They are a great investment for people who like to DIY and are not expensive. I really recommend them! They are fantastic! ❤
Also to prevent the wood from splitting you can use your pilot holes to to guide you to predrill the other piece of wood as well, so that the screw would go in easier. There is also a variety of screws, some of which are thin but still long and are less likely to cause splitting. Maybe you used different screws this time so that caused the problem. Sorry for unsolicited advice.
I'll have to look into the clamps! My dad has all the clamps but alas I have none! I actually used the exact same supplies so that was not what caused it 😊
Exactly what I've been looking for to upgrade our enclosure this holidays, thanks for posting and keeping it simple!
Recently found out my hamsters cage was to small when I redid the measurements, I feel so bad she's been living like that for a whole 2 months but as my step dads a builders he's going to be building me a new one for her! I can't wait to show him this tutorial! tysm for helping me with my hamsters!
How small was the cage? Like dimensions? Did you build a new one yet?😃
That’s great I would definitely have a go at that for my next hamster so I can make the biggest cage possible for the space I have, custom made is a brilliant idea. You did an excellent job thanks for the demo.
Super excited to move from a 600 square inch cage to this ! I've been wanting to get a bigger cage and was about to get the pawhut until I came across this ! Thank you so much for the great tutorial ! :)
I'm really proud of you Victoria! I love seeing you do it yourself. Exemplary!
Thank you!!
I love this so much Tori, it's such a beautiful cage! Setting up all the bedding and stuff is going to be so fun!!
I agree!
@@scarlettkarwoski2383 Hey!! :)
Thank you!!! 😁❤️
That enclosure is beautiful! It looks so clean and also is an amazing sized enclosure! 💛💛💛
Thank you!
WTG "Ickle Miss DIY" Hint - pilot hole both materials. Love your Can-do attitude.......
haha I will do that next time! I just didn't last time and didn't have one split 😝 Guess that's what happens when you build in different seasons
You did so great job with the enclouser! 😍
Thanks so much, Victoria!! I am building my cage very soon! I already got the wood but I had to use birch plywood because there wasn’t any aspen but I made sure I got the right measurements.
Awesome!! I built a DIY cage several months back and we actually found some purebond plywood, so yay lol. I based the design roughly off of your diy cage you made to replace the melamine one. 🙂 it's 4 feet by 2 feet and my hamster has not shown any signs of stress so far!
Looks great! I love watching your DIY Builds as it always gets my creative juices flowing lol. I love your videos they help so much. Wishing you a safe and happy Christmas and looking forward to the new year content ☺️
Thank you!! Happy to help someone else get more creative 😂 I also wish the same to you Peter!!
I love it! I can’t believe that u made this cage about 2 years ago you’ve come so far!
I love doing DIYs, admittedly I'm not that great at them either, but you're right that there is always that sense of accomplishment afterwards, plus you learn a lot :)
I've been here since your old channel name, back when peach was still here, it's so nice to see how much you've grown and how far you've come. I wish you the absolute best
it looks amazing victoria! so big and spacious! the tutorial is so helpful for people who are looking on building a new cage for their hamster! cant wait to see the new cage setup i love it when you do them!❤️❤️
Thank you!! 😄💗
These are always so helpful, love this!
Hello. I am new to your channel. I am in the process of getting myself a little hamster and I've been preparing myself with your videos. It's helping me a lot.
Let’s just say how much Victoria loves her hamster, that she does this hard work
I loved how you did all of this for your hamster..I've had my hamster for a few months now we've still be trying to make a DIY cage and some non-toxic paint to paint it so it looks better so this helped me and my brother a lot.
I really like how this cage turned out! Probably my favorite one yet! It'll look great with any theme you pick! ;)
Super cool! I’ve only eat he’d like 2 videos and I’ve learned SO much about hamsters already!!! It’s crazy how to industry pushes those tiny cages on the public and takes advantage of our ignorance. Glad I’m learning. Thank you. I’m gonna try to build a cage for my niece who got a hamster.
You always make me so happy when I watch your channel❤❤
I’m so thankful that I found your channel! Thanks to you, I got my hamsters bigger bin cages. You taught me a lot so thank you for creating this channel! You earned my sub!
I love your cage and look at your cages for inspiration and it also’ s works great! Thank you love the videos! ❤❤
wow! thats cool:) it kinda reminds me of my one that i made with my dad! it was also 2 ft by 4ft
So grateful for your videos love this so much!!!❤️
Our ham has a large cage, isn’t being too active and is fairly happy and young, he seems straight up BORED with his enclosure, I cannot wait to upgrade him to this beautiful new home. Thank you so much for being you, and helping us ham parents be the best ham parents there could be
Nice work! You have something to be proud of!
Thank you for making these helpful videos!
Glad you like them!
For those who aren't so handy: Ikea's PAX or PLATSA base elements also make for great enclosures.
thank u sm
halcyon ! ♡ ° i highly suggest an ikea detolf ! it has around 1K square inches of floor space. people who used IKEA to make hamster enclosures never had a problem with it, but a detolf is a great option if you’re worried :)
halcyon ! ♡ ° also it is around 80$ i believe, while a tank its size is 800$. so this will save you a lot of money !
@halcyon ! ♡ ° The hamster won't be able to chew the edges of the cabinet, so it should be safe. While the ikea detolf is also a good alternative, it's glass so it won't be as sturdy as the wooden base elements. The Platsa or Pax elements allow you to add wheels, and you can stack them if you have more than 1 hamster.
@@KimHmrswill the pax be okay if i add varnish for when the hamster pees
all of ur hamsters are adorable. Im so grateful for all of your videos. without them i wouldnt be able. to provide the are I now can xx
You teach me and others so much, thank you for helping me (and others) give their hamsters the right proper care ❤️🥲
I'm happy I can help!
This makes building an enclosure seem soooo much less daunting!! Thank you :))
OMG I absolutely love your videos I find them SOO helpful THANKS! ❤️
Thank you for the support!
I love how you did the entire thing without any help. Go Girl Go ❤️❤️❤️❤️❤️
Thank you!!! Asking for help isn't a bad thing but there's something about doing it yourself that gives you a great feeling 😝
Love your enclosure!!! Awesome vid!!!
It looks amazing! My hamster is currently in a home made bin cage k made with my dad and I am so glad she is in a better environment then my past hamsters 🥰
I love that you are giving a variety of cages for our Hammy's! The one I built (Wich was one of yours) I loved so much! I might adopt another hamster and make another cage. Thanks, Love you 💘
Wow this is so nice and you are so kind on your pets . Your pets are so lucky 🤞. And I love your channel ☺️💞
Thank you !!! 💕
This is such a great video. Really inspiring. You’re skills are amazing. Wow!!!
This cage looks awesome!! I’m not sure but my guess is that Dipper will be going in it as he is on the cover of the video 🐹
Can’t wait to know next Saturday 😊.
I also hope you will do a cage set up video as they always inspire me so much 🥰
Thank you!!! There will be a video during the week talking about the enclosure and setting it up ❤️
:)) I honestly lost track of how many cages you have
Thankful for your videos! I grew up with hamsters in the 90's in Hartz plastic cages and when I googled cages for my son to get his first hamster, I realized we did nearly everything wrong back then! So I converted a free old entertainment console with a 750 sq ft floor and painted it with beige interior semi-gloss we had around... then I realized your contact paper idea, so I'll cover the bottom with that. The paint can off-gas two months until Christmas. I had my husband chop the sides to 28", as any deeper and I wouldn't be able to reach the bottom, and any shallower I may regret not having enough depth of bedding. 🤩
AMAZING!!!!! Idk if I'm as skilled as you, but I can definitely try. Thank you for the video, friend.
Usually to prevent wood splitting from my experience you'll need smaller screw or nail. Sometimes you just need thin nail rather then thicker screw. It varies on the thickness of your plywood as well
I’ve been wanting to make a diy hamster cage for so long! Thank you! 🪴
Me and my dad are planning to make this. Thank you for the tutorial!
Your cages are always amazing!
Thank you!
me and my dad built an enclosure exactly like this a few years back. I love it and I find it's a great size for providing all the enrichment that hamsters and mice need.
I love that!!
This is such a great enclosure, I'll definitely need to have a look to see if I can find some similar plywood in the UK, that'd be great for my gerbil enclosure if I could find it!
Also, I think your thumbnail is great! It really shows off the enclosure in all its glory ☺️
Hi! I don’t recommend a wooden enclosure for a gerbil because they chew everything.
@@imme3958 yes I know, I mean for the topper platform ☺️ but thanks for your concern 🙂
Thank you!!!! I hope you can find something similar 😄
@@VictoriaRaechel I may have found something, fingers crossed it isn't too expensive 🤞😅
I love your videos Victoria I always take ur advice for giving a hamster enrichment and things they need! Keep on being you and don’t let haters beat you down! ❤️❤️
So love, the babies are all so adorable
U should do more building vids cos u are so good at it
This summer in august I watched your last video and I bought the supplies my dad helped me build a cage like this I’m glad I didn’t get the wood you used last time luckily I didn’t have enough money for it so I went witch cheaper wood to which i coated with wood protector I forgot what it was called and then I painted it white but building taht cage was rlly fun and my new hamster loves it I still need to get him a sand bath but I’ll get him one once I get money! Because after all I’m the one paying for him I don’t even have a paying job I just sometimes go to work with my dad I’m only 14 so I think this a big accomplishment:)
i didn't know where to put this other than in your most recent video. i wanted to say that i finally got a hamster!!! I've been watching your videos for over a month and its honestly amazing how much i learned and how amazing it feels to be giving a proper care to your first pet ever :) thanks for all the good content you make.
This is beautiful!!
omg it looks so good! im getting my first hamster next week, and ur videos have helped me so much!
How exciting!!! Do you have any names planned?
@@VictoriaRaechel i want to name her after a character from squid game or any anime that ive watched!
Thank you for this tutorial!, very helpful 🐹🐹
I'm so impressed on your skills. I hope I can help you with that so that it will be easier to build an enclosure for your hamster💕
Another great video Victoria 🤗💕
If you want to avoid the ply-wood splitting You can actualy use a drill to create a hole before putting the screw in :)
is there a reason why not just use nails instead of screws?
You inspire me to start building more of my hamster things by myself instead of just relying on my boyfriend or dad to help me!
Gorgeous cage!
awe, id be so proud of this! you did great. And now im inspired to build one for my ham :3
Thank you!!!! Making your own stuff always feels so good!
Love this tutorial! This is amazing! And also that enclosure is such an amazing size, when I first saw this, I thought u will get a new hamster, but is it an upgrade for one of your current hamsters?? 💛💛💛xx
Thank you for the kind comment!
Hello me and my younger sister made this cage we are 13 and 11 years old we had a hamster named Chubbs he sadly passed away before we could make him his cage now we have a Syrian hamster named napoleon dynamite and we convinced our parents to help us build this cage and we have a lot bedding and enrichment and we are so happy to have found your channel or else we would have still had a small PetSmart cage for our pets and on accident we didn’t get the 1/2 thick wood and if you do mess that up we used angles and 100% pure silicone for the glass and next week he is getting a new sand bath hide outs sprays and herbs and some new food and we are so happy I hope you see this comment to know how much you helped us and how kids can own hamsters at least kids who are old enough
wow very detailed! 😁
the reason why your plywood split was likely because you're not meat to screw into it parallel to the sheet; if you were to drill into into it diagonally it wouldn't be as likely to split! This is really cute, also, thanks for sharing it!
Are you fostering hams? Or possibly upgrading waddles or dipper? Love ur content as always!
Oh my gosh! Last night I was browsing your DIY cages and look at what notification I got! I love when you make new enclosures! I wonder who will be the next addition! 😯
Edit: Where did you get the wheels from?🤔
The wheels are from Canadian tire 😊 everything is linked
i made this today!! it was very difficult but i love it so much!! and it’s very very big 😍
That is an amazing DIY enclosure
I love it
Thank you Daniele!
im probably so late for this BUT a good way to make sure wood does not split while drilling into it is if you have a drill bit slightly thinner than the screws you are about to drill in it is always good to pre-drill the holes it just helps take tension off the wood when you introduce the screws :)
Hi Victoria. I just subscribed to your channel because you really have some in-depth information about our little critter friends. You are doing a great job at this and I am enjoying your vids very much! I'll certainly be staying in touch. Thanks, Jim
Cant wait to watch:) love your channel 💕
Hello Victoria. Thank you for creating this tutorial. I have now purchased all of the materials to attempt to do this myself as I want something larger than a 40 gallon breeder tank for my Syrian hamster. The dimensions of this new enclosure will be 60”x23.5”. I do have a question regarding the floor of the interior. Can you use contact paper in place of the natural varnish? Or can contact paper be placed on top of the varnish? Thank you for your help in advance.
Great video! Thanks for showing the hamster safe plant based varnish. I just recently asked what I can use to protect my hamster’s wood hideouts. Are you going to get another hamster then? And also, I have wanted to make my own diy hamster enclosure for a while now. Do you know on average how much this cost? You can round.❤️🐹
Hi there, so I’m buying all the supplies atm. I added everything up excluding the tools used to built the enclosure. You’re looking to spending no more than around $300. Maybe less than that but definitely not more. I hope this helps.
Cool - another DIY enclosure!
This is my dream cage I want to build. I have to wait till I own my own place but that will be soon. Thank you for sharing an updated version of the enclosure c:
That's really exciting, I can't wait until you're able to build one!
I love the csge I’m saving up to make a diy cage fior my hamster Bella
This looks great! I got a 55 gallon tank for my hamster but I’m having a hard time with the lid. I want a mesh lid and don’t know how to find it
You could do something similar to what I did, or you could order one: www.amazon.ca/Exo-Terra-Screen-Hinged-55-Gallon/dp/B00LH0FF84
always be an inspiration to all of us, good friend
I love watching your videos, they have educated me so much thank you
I'm happy you enjoy the content! ❤️
Hi, Victoria! I have a question... I'm in a country where places like Petsmart doesn't exist. And things like the Kaytee Clean & Cozy and All Living Things bedding also doesn't exist, even online! The most popular bedding in my country is the Luxber bedding. Would be appreciated if you did a reveiw on it. Thank you! :))
Ive seen many people using it and apparently is good since its paper based
@@0000zz2 okay thx for the reply :)
According to some hamster forums it appears to be a cotton bedding which would be best to avoid. Where is it you live? There's likely a safe bedding for you to use!
@@VictoriaRaechel I actually live in Malaysia, so i need to stay up at 10 p.m for your videos (hehe love your videos) and also Amazon can't be accessed
@@VictoriaRaechel Mostly there is shredded paper and will collapse if hamsters burrow.