Vložit
- čas přidán 27. 08. 2024
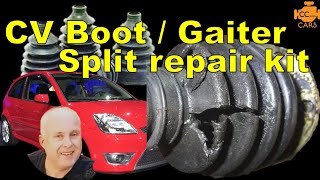
- Replacing the CV gaiter on a Mini Cooper drive shaft involves several steps, and it's important to follow these instructions carefully. Please note that this is a general overview, and you should consult your vehicle's service manual for specific details and torque specifications. Here's a step-by-step guide:
Tools and Materials You'll Need:
Car jack and jack stands
Lug wrench
Wheel chocks
Screwdrivers
Pliers
CV joint boot kit
CV joint grease
Zip ties
Rubber mallet
Torque wrench
Procedure:
Safety Precautions:
Park the car on a level surface, engage the parking brake, and place wheel chocks behind the rear wheels.
Raise the front of the car using a car jack and support it securely with jack stands.
Remove the Wheel:
Use a lug wrench to loosen the lug nuts on the wheel where you'll be replacing the CV gaiter.
Lift the car further with the jack and remove the wheel.
Access the CV Joint:
Locate the CV joint on the drive shaft. You'll need to remove any components that obstruct access to the CV gaiter.
Remove the Old Gaiter:
Using a screwdriver and pliers, remove any clips or clamps securing the old gaiter to the CV joint.
Slide the old gaiter off the CV joint, taking care not to damage the joint itself.
Clean and Inspect:
Clean the CV joint thoroughly to remove any old grease and debris.
Inspect the CV joint for any damage. If it's damaged, you may need to replace it.
Install the New Gaiter:
Grease the CV joint with CV joint grease that's provided in your CV joint boot kit.
Slide the new CV gaiter onto the CV joint. Ensure it's properly aligned.
Secure the Gaiter:
Use the new clips or clamps from your boot kit to secure the gaiter in place. Follow the manufacturer's instructions for proper installation.
Reassemble:
Reassemble any components you removed to access the CV joint.
Torque and Tighten:
Ensure all bolts and fasteners are properly torqued to the manufacturer's specifications.
Reinstall the Wheel:
Put the wheel back on and hand-tighten the lug nuts.
Lower the car and tighten the lug nuts in a star pattern using a torque wrench to the manufacturer's specifications.
Test Drive:
Take the car for a short test drive to ensure everything is functioning correctly.
This is a general guide, and the specific steps may vary based on your Mini Cooper's exact model and any additional components in the way. If you're not comfortable performing this repair yourself, it's advisable to seek assistance from a professional mechanic to ensure it's done correctly.