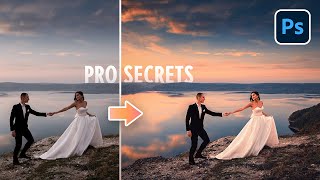
Clean Up Studio Backgrounds using AI in Photoshop

Vložit
- čas přidán 21. 11. 2023
- Learn how to clean up and extend studio backgrounds using AI in Photoshop.
Download the Sample Images and PSDs:
phlearn.com/tutorial/cleanup-...
Watch our in depth PRO tutorial The Ultimate Guide to AI in Photoshop: Generative Fill & More
phlearn.com/tutorial/ultimate...
Join PHLEARN PRO (Save 10%):
phlearn.com/youtube
Join this channel to get access to perks:
/ @phlearn
―
What is PHLEARN PRO?
◦ 200+ In-Depth Courses on Photoshop, Lightroom & Photography
◦ 600+ Actions, Brushes, Presets & LUTs
◦ Master Retouching, Compositing, Special Effects & More
◦ Monthly & Annual Subscription Options
SAVE 10%: www.phlearn.com/youtube
―
Follow us on social!
Instagram: / phlearn
Facebook: / phlearn
Twitter: / phlearn


Another great tutorial. So happy to see you posting regularly again.
Awesome and informative as always! Thank you so much Aaron, I was looking for such kind of lesson on cleaning backdrops! God bless and good luck!
Thanks Aaron! Always clear and easy to follow.
Thank you as always for your guidance. New to PS or experienced, your instructions are clean and easy to follow.
thanks so much for watching!
this was a very helpful exploration of this most powerful new tool,,,thank you!
Best additions to Photoshop EVER!! 🎉
Great tutorial, Aaron - thank you. I'm saving this as a reference video. This is such a quick (yet good) way to mod the backdrop. Cheers!
Great video, thank you!
Many thanks for this one. I had been struggling to figure how to deal with subject elements that extended off the background. So happy....!
Wow
It's just awesome tutorial ❤
Thanks for this...
Just great!
Thanks - great tutorial. It will save me hours !
Thank you, I learn a lot from you
it has been giving me the most outlandish results lol even replaced my model with a different one
love your videos!! so helpful
great tutorial, I've been a Phlearn member for years!
Generative Fill has been a game changer for my work. I can work so much faster than before.
Great tutorial. Easy to follow and you don't go so fast like a lot of the other tutorials. Thank you for all the great information.
I'm so glad I watched this. I haven't used the paint brush on the gen fill task bar. TY Mr. Nace!
Wow, amazing topic.
Great tutorial.
Thanks for the great video. I just did a photoshoot a few days ago and this was really helpful.
we're happy it was useful!
thank you so so much very these videos! This year i decided to give myself the "back to school" treatment since i've been out of college for a few years now and learn/polish up on some editing skills. I've watched your videos over the years in general but i've really been liking dedicating time to use these videos as a form of a class lecture
That's awesome to hear! Thanks so much for phlearning with us!
5:25 Those AI hands though
Top tier, straight to the point video!
Best video ever !!! Thankssss
He does a nice job explaining things, and he does it in clear English.
Hey Aaron, I'm curious if you've tried using something like Evoto. I'm pretty blown away at how it removed wrinkles (and dirt and smudges) from a background with the click of a button. There's sliders afterward that basically act as opacity, but they're better than generative fill because they're much more predictable (and remove the need for any selections). Their button for smoothing out wrinkles in clothing is pretty great as well.
Amazing
Thanku
Thanks!!
Yet another great video Aaron.....Thank you. Colin Devon UK
You are great guy..n nice information...thanks
Absolutely great tutorial! Amazing teacher and amazing AI technique!
thanks so much!
wow great tutorial and can understand very well as beginner 👌😁
Thanks for sharing instructions for someone who has ADHD. Repeating the instructions are super helpful! I tend to forget the name of some tools that I am practicing on Photoshop. You’ve gained a new subscriber!!!
welcome to the phamily!
Fantastic tutorial! I've only just stumbled across your channel.
welcome to the phamily!
Great tutorial. Tks. By the way, what’s the name of the loupe app that you use for zooming areas of the screen?
Nice, but the generated parts are limited to 1024 by 1024 pixels. So on a hi res photo, you will have parts that will be low res.
exactly, and in the video he mentions that you can use the photo in a magazine: no way you can print at such low resolution.
Check out @piximperfect high res trick for generative fill
Exactly - the generative expand and fill is all useless in large images. Works fine if you are removing small areas/items. Surprised he doesn't mention this at all.
who cares if the clean backdrop is 1024 by 1024 :)
@@altuno anyone who prints will care
Thanks for the info. Not what I did recently and I was struggling had kids on white cloth. Tons of dirt and wrinkles. Also, sometimes they were not in side backdrop, so there was repairs. If I lasso area and Gen fill. So so results. Ended up using marquee tool and stretching it ( since All white). Never got a good match with generative expand. Whites never matched. There was also hard line where original edge met new fill. Saw that too with your ballerina. Look at right side of pic. Any ideas? Thanks.
IDK why I didn't think of this for backdrops!
I would love to know how you are dealing with the low resolution for the generated output?
The background has no detail in this use case, I imagine you can completely obsufucate it by blurring the generated area slightly than adding some noise.
Another informative video, thanks Aaron. Using it with care, as it can introduce artefacts within the unselected areas , but does the heavy lifting for sure. However, I'm interested to know how to ensure consistency across a few images with the same messy background, so that the AI doesn't change the background too much across the images. Thoughts?
Hi Richard! You should check out the new "Image Reference" tool in Photoshop Beta. It will help you with that! We'll be releasing a tutorial on it soon. Stay tuned!
Thanks Aaron - excellent tutorial. Do you need to add noise to the backgrounds to match the original?
Hey there! That's completely up to you and your preferences 😊
How to add overlays, png in generative fill? give some ex prompt for that
This is really good. Can I batch process or automate this process on multiple images? I see that the lasso tool step is custom for each pic and that may be the hurdle to automate. Any thoughts?
Unfortunately, batch processing generative fill with selections is tricky, as the content AI creates is random. However, you can definitely try to get it as close as possible, by using the new Reference Image feature in Photoshop Beta
Here is a tutorial on how it works:
phlearn.com/tutorial/testing-out-photoshop-new-reference-image-ai-feature/
Love your tutorials, very simple and easy to follow. I do have a question. If AI generates a background that I like, how can I use it on multiple images.
Hey there! Unfortunately, you can't directly apply the same AI-generated background to multiple images. This is because AI background generation tools typically tailor the background to the specific image it's working with.
💯💯💯
Thanks for this - been struggling with inaccurate masking so this was timely. Incidentally, I wanted to ask - you're my go to for photoshop but do you have any recommendations for channels/resources to upskill on video editing? From bare bones basic.
Thanks for phlearning with us! Check out Premiere Gal on CZcams. She creates pretty amazing content :)
Genial
I have an eyedropper tool question
12:02 - remove stuff using lasso tool
Hi Do I have to have the Beta version for this to work? I have paid subscription to PS but the Contextual Task Bar is greyed out?
Hey there! All new Photoshop versions have a handy Contextual Task Bar. Just make a selection, and it should pop up automatically. If it doesn't, you can find it under Window > Contextual Task Bar.
Great tutorial, however, generative fill always produces blurry to slightly blurry add ons to the image. How to have same pixel sharpens of new generated fill in sync with the original image?
Adobe introduced a new enhance feature in Photoshop Beta that increases the quality of the results! Check out this tutorial
phlearn.com/tutorial/new-generative-fill-enhance-feature-explained/
@@phlearn Thanks Aaron.
9:00 look at the chopped shadows by her knee on the ground. A little clean up there will be needed.
indeed! we always recommend taking a closer look to the images to make sure everything looks good ☺
Is there a way to use AI to create the same backdrop for several images?
Hey there! There isn't a direct AI tool in Photoshop currently that can create the same backdrop for several images at once.
Is this hi res up to 1024 pixels only?
hey there! For now generative fill is up to 1024. But you can do incremental changes to the image to get better resolution :)
Does anyone know how can I make it so that the same AI generate backdrop is applaid to all the images? Since I select the subject, the mask on top is always on the same position. I wanna use this for a studio sesion with multiple photos and make sure they all look the same.
Hey there! Unfortunately, you can't directly apply the same AI-generated background to multiple images. This is because AI background generation tools typically tailor the background to the specific image it's working with.
great tutorial as usual but I'm finding that the subject selection tool doesn't perform well on hair
hey there! Selecting hair can definitely be a challenge. If you have time, we have a few tutorials we think you might find very useful!
phlearn.com/tutorial/selections-with-channels-photoshop/
phlearn.com/tutorial/advanced-cutouts-photoshop/
phlearn.com/tutorial/master-retouching-hair/
exceept the resolution and any noise will not match :(
These videos are helpful, but what I can’t figure out is how to edit multiple photos of a session. If I use AI in one photo, I need a comparable result in other photos or it’s obviously fake.
How do you clean up hair?
Hello! Here are some tutorials you will find useful:
phlearn.com/tutorial/selections-with-channels-photoshop/
phlearn.com/tutorial/how-to-retouch-hair-photoshop/
Also, if you have time we would encourage you to take a look at this in depth tutorial
phlearn.com/tutorial/master-retouching-hair/
I think that generative fill in Photoshop is amazing, but if I'm not mistaken the output is only 1024 pixels on the long end
Therefore it's usable only for web unless we're working on small parts of a photo instead of the whole background.
What I can remember from a other CZcamsr there does exist a script that allows you to expand the canvas to any size and then it will make selections of 1024 x 1024 in sequence until the frame is filled. It is really cool!
@@KrulKrulSprietSpriet but it's just not the same as using the tool as described in the video
Out of curiosity, since I had to drop my PHLEARN subscription for budgetary reasons earlier this year, has Aaron ever addressed the ethics of AI in any video? I'd be curious to hear his take. I know that the Adobe marketing/talking point is that they only train their AI models on Adobe Stock, public domain things, or stuff that they otherwise have the rights to use, but I'd love to hear more about this-particularly from Aaron, who I've come to trust over many, many years of watching his videos.
for some reason I couldn't had more to the selection or minus from selection.
Hey Andrew! if you send us an email to support, our team will do their best to guide you.
any tips if you got a series of the same images
Is this only featured in PS2024?
Correct! You need to have the latest PS version that includes Generative Fill and other AI tools
Is the resolution still 1024x1024?
Hi Andres! They actually just released a new Enhance feature in Photoshop Beta. The tutorial below explains how it works
phlearn.com/tutorial/new-generative-fill-enhance-feature-explained/
@@phlearn Thank you! I have seen your video but someone mentioned that sometimes it looked weird. The enhance feature is better than the free actions that go square by square with 1024x1024 or 500x500?
faces, arms etc... are getting distorted. how do you deal with that??
Hi Meghan! AI is still tool is still under development, and these situations can sometimes occur. While there's no one-size-fits-all solution, you can try refining the selection area around the affected body parts, or using reference images to guide the fill.
Tony Stark is it teaching us 😂
Helpful video. Inverse is not a verb, however. The verb is “invert”.
“More larger” is incorrect, also. Still, a helpful video.
Do these AI tools not exist in the windows version of PS? I can’t find them anywhere
It doesnt work that well when you want to patch just a piece of background. Photoshop AI mostly can't generate perfect background without visible line in place whete it connects with main backround. AI got problems with gradients too.
Hey!
This is a long way from using the Median Filter, a layer mask, and painting out the dirty spots on the background.
definitely!
Uhhhhh Ballerinas hands got messed up lol
did this but everytime PS added a new hairstyle to my head
Generative Fill shows great creative potential, even though its results can sometimes be unexpected 😅
Nice one but you obviously didn't look at the ballerina's hands when you changed the backdrop..
Be careful about using generative fill... because usually you have many images from a shoot, and your background won't match. The best way to deal with backgrounds is learn how to shoot and light properly, reducing your need to do much in post.
it works great with people and so bad with interior design products, Adobe AI needs to stop adding parts/components to the subject when this is a product, it always distorts/changes/multiplies my product image when I try to generate a background
Hi Fabio! Just a heads up that sometimes tweaking your selections can lead to even better results. On a different note, don't forget to check out the latest updates for Generative Fill! They've improved quite a bit!
I was trying this tools but for me it doesn’t work the same as the video . I don’t like the results at all it looks too fake, when I zoom the image I can see many imperfections
Hey there! Thanks for sharing your experience with Generative Expand in Photoshop. It's still under development, and the results can vary depending on the image and settings used.
If you don't like the results, you can always opt for more traditional methods. We have an amazing PRO tutorial that covers background cleanup
phlearn.com/tutorial/clean-up-studio-backgrounds-photoshop/
Odd that you never mention how low res the Gen fill is. That’s the critical flaw in this tutorial.
Hey there! Adobe made a new release this past week and they've upgraded the resolution for Generative Fill. 🤗
Oh... Content Aware Fill gets better...
Watch the fingers.....
Not worth it. Limited to 1024x1024 and using the work around is time consuming to output ratio is bad. Rather have something with higher quality that takes a bit more time.
Too bad generative fill doesn't work with pirated Photoshop
Getting serious for a minute. There is a very major drawback to generative fill! Going from a 4 k original file to adding 1k generative fill shows up like a smashed thumb. Nobody can publish those at 2048 resolution online, much less publish them. Usually they look OK on screen at 1080 resolution, but enlarge them to 2048 on your phone or screen and you will immediately see the difference between the original part of the photo and the expanded blurry 1080 parts.
Do it in sections.
A studio backdrop has no detail, just hit it with a blur, then add back noise to match your original photo, you won't be able to tell that it was a scaled image. I just tried with one of mine and at 100% zoom on a 4k display with a 48mp image I can't tell at all that it was a stretched AI image.
To invert as a verb. Inverse is an adjective. 😎
Invert the selection not inverse the selection. English?
Omg the tutorial is now worthless!!! 🙄
its not a skill anymore . Business can pay less as they wont need a skilled employee.