DIY Headstock Decals- How to Make Them! (Fast & Easy!)

Vložit
- čas přidán 18. 04. 2018
- Waterslide Decal Paper https:amzn.to/2U1btDF
True Oil finish https:amzn.to/2U1gxrH
Also please check out my Merchandise Store: diy-gene.creator-spring.com/
I am a Amazon Affiliate,
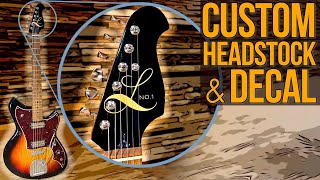
DIY Headstock Decal application is fast and easy by using waterslide decal paper for use with inkjet printers. If you are refinishing a guitar, you can visit google images and type in "Fender logo for head stock" and find factory replacement logos. I wanted to create my own design, so using Adobe Photoshop I altered the Fender logo to say Stratocaster. I also added my DIYGene logo as well. After you have prepared the neck by sanding, you can coat it with True Oil. I like this product because it coats easy and has low odor. I put about 4 coats on the neck allowing them to dry for about 24 hours between each coat. Then, printing the decals on a inkjet printer, I cut the decals out and then clear coated them with spray clear. After letting the clear coat dry, they can be placed in warm water. Allow the decals to sit until the backing starts to slide away from the decal. This takes about 3 minutes. Place the decal on the head stock and move it into position. With a clean cotton cloth dab the decal dry, lightly pushing out any bubbles. After you have let it dry, you can now clear coat over the decal for a smooth finish. I used a buffer to really give it a nice finish. - Jak na to + styl


waterslide stickers are used a lot in model locomotives. A good way to thin the decal so you don't even see it at all is with Micro Set and Micro Sol. These 2 solutions help the slide to completely be undetectable and it's easy to use.
That is a fantastic tip. Thank you so much!
You make it look so easy and effortless. Thanks for sharing that. Just have to figure out my own personal decal now
Cap, that’s the fun part. Thanks for watching.
Thank you, sir, for the helpful and practical tutorial! Just the kinda inspiration I've been looking for to put some finishing touches on several DIY projects.
I’m hope it helps. Thanks so much for watching.
Wonderful video !! I bought the decal paper and the tru oil. On one of my guitars I used the decal on top of a recent paint job I did. And on another i guitar i got rid of the old finish and used the tru oil and did your exact method. Works like a dream ! Super simple too!! Everyone should do this !
NrG , I’m glad it went well for you. I love tru-oil. Thanks for watching.
Great job with the guitar and the decals, thanks for posting.
Thanks for this in depth walk through. I'm building a butterscotch telecaster out of a mix of fender and squire parts for my sister and getting the decal to look just right made it turn out perfectly.
I’m so glad it worked well. Thanks so much for watching.
One of the best videos showing how to use the Truoil. The decals technique is pretty nice. Thanks for sharing these cool tips!
+Antonio Cavicchioni, You are very welcome, and thanks for watching.
Thank's a lot for sharing your experience with us. Great job :)
Thanks so much for the info. Great video!
This is Great!...i have a telecaster i built from scratch at school from 1981, and always wanted to put a logo on it, great videos, subbed! 👏🏻🌟🎼🎸
Martin Kilner, I hope this video gave you some good ideas. Thanks so much for watching.
Thank you, Gene! My name is Gene too. This is exactly what I was looking for. You've made ma a happy man.
Well thanks Gene. I hope it works well for you. Thanks so much for watching.
Thanks Gene
Watched you Strat and then had to watch the Telecaster
Loved your easy approach to the projects and the great results speak for themselves..
Got to check with the gun shop for some true oil
+Robert Johnston, Thanks, I actually found Tru-oil at Walmart and on Amazon. About $8 bottle will be more than enough for the body and neck. Thanks again for watching.
wow.. how this thing look so easy.. great job sir.
Great video Gene! Very helpful. Subscribed! I'm getting ready to apply something to my tele kit.
Excellent and complete tutorial, great job. Love the true oil idea
Thanks so much for watching.
Thank you man, for sharing your knowledge with us
Mauro Naviglio , Thanks so much for watching.
Great video because I use true oil also and this was the first one I saw using oil. Thanks so much
I don’t think a lot of people know about Tru-Oil. I love the stuff. Thanks for watching.
Thank you very helpful
Top vid Gene. Hats off. Thanks a million mate.
Matt, Thanks so much for watching.
Thx Gene! Your video helped me so much!
I’m so glad it helped. Thanks so much for watching.
This video will be helpful for my next guitar kit project. Thanks Gene.
I hope it helps. Thanks so much for watching.
Very nice video. That looks really easy to do. Thanks for showing how.
I hope you found it helpful. Thanks for checking it out.
Good instructional video. I may use this. Thanks !
Thanks Avery.
Nice tutorial - You don't have to print a whole sheet off. I do trial run of my printing on plain paper. I then cut a piece of the decal paper and tape it over the print, then reprint the image now onto the decal. This saves a lot of wasted decal paper, you can cut almost exactly what you need. I also do at least two coats of clear before placing in water.
Rick Bubier , That is a great suggestion. Thanks for sharing that!
Thank you very much! Very helpful for one just start learning to make one
Evan Xu, You know, I’m still learning too. It’s a lot of fun to build. Thanks so much for watching.
I recently built a similar "partscaster" using much the same techniques you used. The one thing I think needs a bit of clarity is mounting the neck to the guitar. Ideally, the screws should only thread into the neck itself, so after drilling the pilot hole through the body into the neck, I removed the neck and used a larger bit to enlarge the body holes. That way, when tightening the screws, it pulls the neck a bit tighter to the body, which is important to get the maximum sustain (making neck and body vibrate more in unison). If you don't do this, then maybe you need to clamp the neck to the body when inserting the screws. That's why they use the metal plate so that the body doesn't interfere with getting the neck mounted as tightly as possible. Thanks for the video - I learned about the Tru-Oil.
I have never thought of that, but it makes sense. I have seen Dan Thompson from Guns and Guitars put 2 additional screws at a 45% angle behind the mounting plate to give a tighter fit. I’m building a Jazz bass and I may use both methods. Thanks so much for watching.
Thank you..I needed to know that
Terrific video. Thanks!
Thank you! And thanks so much for watching.
This guy needs more subs
Thanks for the great info. Im getting ready to finish my guitar now Im using true oil as well.
I have really enjoyed Tru-Oil. I think the company that makes it is missing the boat with marketing it as a gun stock refinish. Thanks so much for watching.
Thanks for sharing this. I was watching another video where they took 1200 grit wet sand paper to the surface after the decal was on and that process worked to smooth it but this process seemed to work just as good and there wasn't any wet sanding with sandpaper after the decal was positioned.
Thanks Gene very cool.
Thanks for watching.
You da man Gene, tnx a bunch.
Thank you for watching!
This is awesome and really helped me out. Thank you!
I am really glad it helps. Thanks so much for watching.
Brilliant! Nice job, again!
Thank you!
Thanks DIY Gene! I appreciate the way you explain things. You make these things look simple....but they're not! You have inspired me to make my own original guitar like you have done. Thanks again. Keep pushing out these videos! I'm all in!!
Scott, that is fantastic, I really hope you will build one. I had a ball building it and I learned a lot along the way. I can’t wait to build another. Thanks again for watching.
Great video bud! I make my own decals for my model cars, Never thought of putting custom decals on my guitars!! Thx. man!!
Whiteys Workshop , isn’t that funny? I thought the same thing, I remembered these on car models as a kid. Thanks so much for watching.
Another great video, thanks
Derrick Bentham , Thanks for watching!
thx for the awesome video
This is great, thanks!!!!!!
IWE, Thank you!
That was very cool good video
Very nice video ! I will do that when i receive the kit :D !
Well done amigo!! Great video!
Thanks for watching.
Wow excellent!! Subscribed
FansSports,Thank you so much! And thanks for watching.
Thanks alot for the nice infromative video DIY Gene! -KK.
I hope it helps. Thanks so much for watching.
@@DIYGene YW: and - it does :)
excellent!
Mr. X thanks so much. And thanks for subscribing! Please let me know if you have any ideas you might want to see built.
I agree
Nice job!!
Thanks for watching.
Yet another excellent video. I have been using Tru-Oil on all my instruments.
Several dollars for a small bottle and that will finish a couple of guitars. I
have used Tru-Oil over shellac (a high-priced acoustic with hardware store
Zerung Bullseye shellac). Grain can be enhanced with a suitable color (I use
a dark tobacco, alcohol-based analine dye), sanded very lightly with 320. The
dye accents the grain, and the shellac gives a rich, amber color. Tru-Oil over
the shellac gives a durable gloss finish that is acoustically transparent.
Maxwell Speedwell, I love Tru-Oil. A great product. I will have to try Tru-Oil over shellac. Thanks for the great suggestions.
I need to keep everything you said in mind for whenever I get to making my own gitter. Thanks ahead of time, both of you!
So sick. I love it. This was exactly what I was looking for!
1KDC FILM, Thank so much for watching.
Hey Gene I just came across your channel I don't play, wish I did but I am a DIY fan so i want to support your channel by subscribing! Looking forward to checking out more of your videos! Keep rocking it! 😀👊
Bob Brown , Thanks so much for subscribing and for watching. If you have any good DIY project ideas, I would love to hear.
I used this method and the same decal paper and did not have the greatest of luck. It worked, but not without problems It is a cheap and easy solution, but I think using a silkscreen or masking stencil would work better.
THANK YOU.
Thanks so much for watching.
thank you boss
Thank you for watching.
I was fixing to make a sticker and put clear polyurethane over it and started to worry that maybe there was a better way and I'm glad I found your channel and this video.
Sean Stephens , Thanks so much for watching.
I didn't know that decal paper existed, I'm making my own bass and I didn't think about that little detail. That looks so beautiful with the true oil finish
I really hope it helps and inspires. Thanks so much for watching.
@@DIYGene thanks to you for your work sir 👌
Great tips! Thanks. Did you like the tru-oil above decal result? I was thinking if this was going to work for years, but never tested, and now it seems to be OK, right? Best regards.
Nice vid Gene - liked and subscribed
Thanks so much for watching
That is super cool😎 I’ve built model airplanes for several years. All the way up until about 19 7475 model airplanes have decals in them like those you were using. I learn how to put them on you have to be real careful about not tearing them. But I don’t fly model airplanes anymore in 1974. I traded model airplane flying for guitar plane. I’m 70 years old and still play guitar. Love it dearly. Now I know what to do if something goes wrong with one of my logos on my guitars at least I’ll know how to fix it. Thanks for the video. I appreciate it very much. Have a great day.😁😁👍🏼👍🏼🎸☮️
That is so cool. Thanks so much for the great reply and for watching.
Hey Gene, would you consider uploading your custom strat logo? Or maybe make a video on how you made yours.
very cool...
bullitt foruu, Thanks so much for watching.
My pleasure...you did a great job...and taught me some tricks.
Thanks so much for watching.
Cool video !
Thanks so much for watching.
Wow great job! That looks great! I would put The Japanese Navigator logo! Or Greco maybe!
Thanks so much for watching.
Great & very helpful Video!!! I 've painted the Headstock with a Sprayfoil 6 want to know, if there is an alternative for the oil, when I want to put a waterslide decal on it? Sorry for my english ;-)
Thanks for the video! I’m going to do this soon. Did you just use a dry buffing pad at the end?
Did you use any kind of polishing compound for the final shine with your buffer?
We want more, we want more, ETC!!!!!
Thank you again. I have a Jazz bass to build and a simi-homemade custom to build. Any ideas?
So what makes the paper stick, the water or the oil or what?
And will glossy sheets for printing or vinyl stickers be good alternatives?
I would like to know who does that sort of thing and how much would they charge to do a couple for me
Killer build and logo! Didn’t see this exact question in the comments, but did you buy the clear or white paper? When going to the link you provided (thank you), there’s those two options and not sure how that would impact the outcome. Thanks!
Any purpose of clear coating frals in step 2 copy guess it was?.I'm interested,as ive done waterslides since 60,s. Rat fink n hotroad window decals, never clear coated so wondering the plus if is one..thnx for sharing your Methods..
Do you need to do anything different if you want to do a white decal on a painted black headstock?
2:00 just use an exacto knife (razor blade) and cut exactly around the logo if it is not TOO involved. That will remove any visible edges. Even the "stratocaster" word could be done if you take your time and don't rush. nice vid!!
5:52, you can tell but it's not anything someone is going to notice without examining it reaaaally closely. You can tell in the vid but it's still going to look really good from anything 6" away. I am seriously going to try but can you put the decal on raw maple? does it need to be a hard smooth surface? I kind of assume it does and so I guess you'd need to have some finish down, then do the decal then add ANOTHER layer of finish over that like you did.
Thanks for the great tip on cutting the decals as close as possible. I would recommend some kind of sealer first then apply the water slide decal then another clear sealer over the top. Thanks so much for watching.
@@DIYGene thanks for the vid. I am def going to try this! haha I have a Glen Burton strat and I'm just giving it the works. I'm dressing the frets and getting them all level and recrowned and a new nut (i broke the other trying to remove it) and I'm going to sand the black paint from the body and figure out some new paint job then clear that with some proper hard clear coat. I'll prob scallop the fretboard too. Then see about the pickups and how they sound. The thing has a 16" radius fretboard so I know it's going to bend really well (the strings). thanks.
Then you will have a mess on your hands as it'll be too small to comfortably remove from the water and apply to the headstock. For me anyway !
@@malcolmhardwick4258 I finished the guitar but never put a decal on it. I think I'll leave it as is. Just paint and no name. thank ya! Oh, I play it in my recent singing vid. Kind of a yellow/green sparkle color. Took forever to paint and clear but oh well.... thx
Can't wait to see you use that guitar in your videos, you fucking rip at guitar and vocals!
Too good
Learned a lot....
Can you work on a project of acoustic bass guitar
Thanks for making this not so intimidating. I was scratching my head not knowing how I was going to approach this before watching your video.
I hope it helps. It is simple, otherwise I couldn’t do it LOL🤪
What buffing compound did you uses on the Tru-Oil?
nice tutorial, but can i apply tru-oil on painted surface?
Can you use a laserjet printer with clear laser jet paper?
+DIY Gene for the clearcoat spray step before you put the decal in the water, do you need to use a spray/aerosol, or would something like tru oil also work?
I am a long time scale modeler, who uses decals a lot. All you need is a very slick service, provided by....whatever. It doesn't matter if it's Tru-oil, clear lacquer, urethane, etc. But it shouldn't be be bare wood, no matter how smooth it might be. Bare wood will absorb water and the grain will swell.
QUÉ ACEITE ES ESE DE TRU-OIL que pueda encontrar en Madrid???
Thank you for this video! Would this method also work on the metal neck plate on the back of my Partscaster?
Yes it will. But i recommend you spray a clear coat over it to seal it in. That may dull the metal a bit. Thanks for watching
Thanks for sharing. Just noticed that there are two versions of the decal paper; for ink and laser printers. I do not know which one better suits this job
If you print waterslide decals on an inkjet printer you have to clear coat them first. The ink doesn't dry so without the clear coat your decal will disappear when you put it in water
Hi Gene, what exactly did you mean by "variation" of the Fender logo in Photoshop? Does Photoshop have the script or font like the fender logo. I'm talking about the gold font outlined in black. I've been having problems trying to find this font. Thanks man, my neck is finished all except my custom head-stock logo I wish to make. Oh yeah, I noticed this around the 1:04 mark in the video.
Hey gene, I can’t get the ink to set on the waterslide it stays wet and just smudges off?even after 12 hours.
Any ideas why??
I’ve searched online and can’t seem to see anyone else with this problem
It's tedious, but relatively easy, to feather edge the clear coat so you don't see the edges of the logo. It might take 3 or 4 coats but it can be done. It looks *spectacular* when you're done.
Good advice! Thanks for watching.
Gene, I have been clearcoating labels after applied and sanding down to get rid of bump. Many, many coats of clear coat and sanding. So you're saying the Tru Oil levels out the decal bump without all the other work?
Richard Shoultz, I kid you not. Tru-Oil is thicker so it levels out smoother. I usually do two coats. I love that stuff. Thanks so much for watching.
Yes, you CAN tell where the decal begins and ends. But you can on original Fenders as well, because they also used decals. Maybe not water slide, but decals.
I think the thicker the clear coat is over the decal can help make it less visible. Thanks for watching.
GENE!!! do you have to do logo with transparent background or can it be done over white????? and do u know roughly what size the logo is
They also do make waterslide decal in white. If you go to the link in the description, I think you can choose clear or white. I printed the logo about 2.5” long, but I would print it on paper first to size it up. I hope that helps. Thanks for watching.
Will a color laser printer work as well? Thanks for this great video!
craigsellingmine , yes it will work. I tried that as well. Thanks for watching.
Thanks for sharing :)
How do you produce the metallic gold colour for the decals?
I doubt that this can be reached with regular inkjet printer inks...
I did this with a regular ink jet printer, but it’s not metallic gold. It is actually a mustard color. I’m not sure how I would approach doing a real metallic. Thanks for watching.
Try writing over the logo with metallic gold ink pen.
Super helpful! Can this same process be done to metal, like on a neck plate for example?
I really think it can. Thanks so much for watching.
Wish I found tour video first. I used Scotch tape. Worked well. The decal stock works better I'll bet.
Well there is always next time. I bet that will not be your last project you do! Thanks so much for watching.
Hi, Gene the tru-oil can't? be an oil how does it mix with paint and water it seems a strange brew I must say I am not familiar with it, can you give an explanation? cheers and thanks Terry
Hi Terry, Tru-Oil is an unusual product. It is oil based so it can’t be cleaned or thinned with water. It feels like a thick oil when you apply it, but it levels out so smooth and dries to a hard glassy finish with no oily residue. A little bottle goes a long way. I hope that helps. Thanks so much for watching.
I stripped of the poly lacquer from a guitar neck and put 8 coats of Truoil on. Just for experiment to see how it is. And after buffing and polishing it looked exactly the same as the original finish. After 2 years the neck now has a beautiful golden hue that the original finish would never have got to.
If I were using a painted and finished headstock with no logo, would I have to unfinish the headstock, repaint it, apply the custom logo and refinish it? Or could I just slap it on and add new coats of finish?
Dauminator63, You should be able to just place the logo on the finished head stock and place a couple of coat after. I hope that helps. Thanks so much for watching.
This was very informative. I want to put my signature on my headstock. True it can be removed but not very quickly if someone were to try and walk off with the guitar, that signature might stand out enough to possibly deter anyone from trying. It's not something that is happening a lot but honestly it only takes once, also this will add a personal touch to the guitar as well.
If you clear coat over it, it would be very difficult to get off. Thanks so much for watching.
@@DIYGene Thank you for the suggestion, I think that's just what I will do!
Hey Gene, great video! the paper you selected is for laser printers and the Edson XP 640 is an inkjet. Please confirm that’s what you recommend?
Yes, In its description it says it is for inkjet and laser.
Waterslide Decal Paper https:@t
I hope that helps. Thanks for watching.
hi great video thank you , how do i size the logo for printing?
Thanks, when I am sizing it up, I print it on plane paper then cut it out to see how it fits on the head stock. I hope that helps. Thanks again for watching.
Nice video!
Great info. I’ve used tru oil before and a big fan. I was mostly curious about the use of waterslide printable transfer. Seems to look great. The buffing sure brings it all together at the end!
What kind of compound did you use while buffing the tru oil?
Also - how long do you typically let your coats of tru oil dry and set between coats?
Thanks!
I try to let the tru-oil dry overnight. I have found that just automotive polishing compound works great. I hope that helps. Thanks so much for watching.
@@DIYGene that’s what I was going to use! So yes. That confirms it.
Keep up the great work and nice job on letting the negative comments roll on by.
+DIY Gene Do you need a special kind of printer to print the decals? Is it necessary to spray the decal with clear before applying it? Great video as always
+Anthony Sclafani, Any inkjet printer will work. And you want to spray the clear over them to protect the ink from running when you soak them in water. Thanks.
Hey Gene, thanks so much for the demonstration. Would the same technique work on the fretboard?
You are so welcome. I"m sure it would work fine on the fret board. But I would be concerned about the strings being pressed against it and wearing it out. I hope that helps. Thanks for watching.
@@DIYGene hmm that's a good point, perhaps a decal with a thick coat of transparent Varnish might do the trick. Thank you so much