The clarity with which you deliver your presentations is second to none! Reminds me of my best professor at Uni - who simplified things to a level that made everything easy to understand and raised our functional levels several hundredfold because we understood "how and why" - thank you for your precision, composition, explanation and rendition - superb!
I already had 'wonderfull Sunday morning entertainment' from Andreas, you know, the Swiss guy. Bill made sure my afternoon continued in this most pleasant way. Well done Bill !
Your channel is amazing. All the videos you make are well documented, explained and recorded in a very pleasant way to watch and with very prepared content. It is also a pleasure to enjoy technical information and such interesting montages. Congratulations.
Excellent show! I have been ignoring IoT but you have piqued my interest. The RTC with date is a gem. I have wondered for ages how that could work. Many thanks!
Once again you publish a video about the very same new component I have just purchased. It seems like you know what I'm going to be working on before I know! Thanks for all you do.
So Bill is back with a bang😀. Bill, u gotta maintain continuity. Pl appreciate that there r guys like me waiting for ur uploads to maintain the pace of learning at my ripe age of 55😎
THANK YOU for moving to 4k! For those of us who have upgraded the monitors on our computers to 4k it's a very noticeable difference. I wish more youtubers would make the move. Really, youtube should stop classifying 1080p as High Definition - 4k has been around since 2001, and 8k is becoming commonplace.
First time watching your video and just Wow! I was having a hard time understanding how a lot of this works as I wanted to get into this but you sure help to make it a bit clearer. Thanks so much!
First of all I must say I really love your Channel! I use your channel a lot with my students to explain new projects and how you combine hardware and software. Regarding photography I really love the way you used the two cameras full body it really makes people see and feel like you're talking to them. Your graphic explanation was always inspiring and a lot of my presentations include photos from your website (if that's OK.. 😊)
The lighting seems great, tip for the glasses, angle up and tilt down the softbox a bit to reduce reflections :) you can also try adding a rim light to further define yourself on the shot. Great video nevertheless, learned alot about the Arduino Nano!
Thanks for the good video. I am wondering how the board measures up to an ESP32 board, and when and why one would prefer to use this board over an ESP32?
Pradeep, Both microcontroler use advanced cores :M0 from ARM for the Nano and Xtensa LX6 for the ESP32 From the datasheet, you can easily figure out that the ESP 32 can run faster 240Mhz vs 48Mhz The ESP32 has an FPU while the Cortex M0 does not, this can make a big difference if you need to make a lot of calculation The ESP32 has 2 cores, this can look awsome, but in real embedded application I have not seen any real time embedded application using this king of architecture (it is already difficult to debug a single core...). Now if you have exemple, please share with us. One last word, I do not believe this can be used in the arduino environment. It looks to me like something that a real RTOS can manage, with multiple process and inter process communication. Power consuption in many cases is also important, the faster you run the more power you consume ! A last point, in embedded application resources are scarce. You can favor one or the other based on your requirements. Take care and happy development !
Hi Bill. From the bottom of my heart I would like to thank you for this video. I had a few problems with my Adafruit tech, so I took a look around and found this video and bought a Nano 33 IoT to check it wasn't my PC or something. An hour or so later, it's installed and running the blink and wifi monitor. Next step is to try and get the Adafruit Smart Neopixels running! Tim
this gets better and better ... u know tech can really make u want to live forever and ever ;) But anyways , the package is incredible , now u can make a small wireless balancing robot without including 2 or more extra boards , and that is a big thing !!!
How exciting! This Nano is my very first Arduino, got it this month, and I'm thrilled to see this detailed tutorial just in time for my first project. Can't wait to get to the point where I can get another one and have an even "smarter" home. Oh and the HD format is perfect for the new haircuts :-p
Thanks for introducing Nano 33 IoT in this video! This really helped me a lot. There is a new board which really like this board but with some new features, called Arduino Nicla Sense ME. Could you kindly evaluate whether a video from you is possible for it?
I love your channel!! Your timezone adjustment is wrong though. You can't just adjust the hours component of the date. The day will be wrong for 5 hours a day in your example.
Hi you shouldn't apologize, we appreciate your hard work, effort, motivation and sharing. I'm a FPV_drone_pilot getting into arduino to develope myself further upcycling inventions. Inventions laying around, take them to pieces & inventing something new, useful & helpful to everyone, coz I have a stomach to feed, bills to pay, survive, secure my existence make money out of it too. Money don't don't grow on trees & nothing is for free. Free your mind and work hard for a better future.
Hi everyone - It's come to my attention that there has been someone masquerading as myself, responding to some comments here with a link to a Telegram chat to win a prize from me. THIS IS A SCAM, I am not holding a contest, nor do I have a Telegram account. PLEASE DO NOT RESPOND TO THESE MESSAGES!! It's happening on a lot of my videos, I'm taking steps to remove them manually, but as I have 162 videos, it will take some time. If you do run across a suspicious comment, I would appreciate you letting me know at info@dronebotworkshop.com. Thanks! Bill (The real one!)
I get big butterfly’s from the excitement of watching your informational videos. The excitement comes from the vast possibilities of the different things possible from the information you disseminate. Thank you very much for your help in designing my automatic gate opener for my residence. I know I can use my phone, a hand held remote, or a push button code on an outside controller (of the gate for visitors). Knowing this code may be changed as often as I wish makes the security I feel living behind a secured, locked gate wonderful! Now I haven’t built everything yet but I have welded up a strong steel box that will hold the motor and all the components. You have really inspired me to “go for it”. So for penny’s on the dollar, I will be able to build a VERY nice, secure entry point that will display the time at every opening or closing of the gate. Possibly face recognition for entry of friends. Definitely recorded video that can be monitored by my phone. Permission to open the gate from my phone which means anywhere I am at, I can open or close it. I’m still designing the system at this point, but I now have the confidence to attempt this monumental undertaking. Of corse I will be asking you for information when necessary. But I promise not to overburden you with the trivial bits. So for someone (me) that did not finish my proper education this will be a great task. Once again thank you for all of your information.
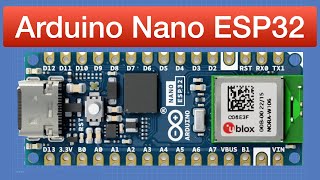
Note: The Nano Every is not part of the 33 family of new Nanos. 33 stands for 3.3 Volts, but the Every is actually a 5V device. Hence it doesn't have the 33 in its name and thus isn't part of the Nano 33 family.
Watched this video a week ago and was fascinated by the possibilities. Getting my hands on Nano 33 IoTs proved difficult but I have ESP32s in hand. Have not had any luck getting ESP_NOW running between two ESP32s. Would love to see a version of this video focused on ESP32 and ESP_NOW.
In my experience ESP32 support using Arduino or Platformio is excellent nowdays, with a decent community too. Most problems you come across are reasonably easy to find good solutions.The dual-core is really handy too as you can leave one core to handle wifi and you have a fast core for your own stuff.
Like the new presentation and good information on the Nano 33 IOT, quite a lot more expensive than the other units but I guess it does a lot more for you.
New gear for the shop is always cool and watching videos from studio shops is good time spent. I bought a $60 soldering station and it has served me well. I'm not going to buy a $900 plastic printer to make 20 Cent fittings and ugly enclosures. Please keep it real. Just remember that I tuned in to get the dope on a Nano and not your new Beryllium Screwdriver set. You have my attention, I like your "Show". You get to make Videos and play with Trons. how cool is that? Nice!
To avoid the complication of BLE does the 33 IOT support something simple to use classic BT like BTSerial on the ESP32 to communicate with standard BT devices ? Using BTSerial all you need is 3 lines of code and you are in business
I'm really curious to see your thoughts on the new Arduino Nano RP2040 and how it compares to this. I was about to use the Nano 33 IoT for my next project but if I can use micropython with the RP2040 and still access the same hardware features, I think I prefer that route just for more flexible programming capabilities.
sir , can u help me with this project. Low cost pulse oximeter which can store previous data ( reading)& that data can be shared via bluetooth to mobile. And making an ML model to predict if there is any problem in the user lungs with these readings.
You always give us such highly informative video's. You teach us quite a bit about the products you demonstrate. I'm just little curious as to why you do not use the little magnifying glass icon, in the upper right corner, to open the serial monitor in the Arduino IDE? It seems to me, that would be the easiest way to perform that function.
You are doing fine :-) With respect to the reflections in your glasses you could try a polarizing filter. It is a quick, easy and relatively cheap fix. You just turn it until the reflections disappear.
i enjoyed your video. Nicely explained and with tutorial info covering most of the conveniences of arduino ble.thumbs up for your current video explanation. What i would like to also have discussed in the video is powering options for it. that would have completed the subject. Do you have any other content that reers to that matter? i.e. powering the arduino 3.3v nano ble?
I have an issue with your use of the term "Dropping Resistor". It is anything but that. It's a current limiting resistor. The voltage across the LED is essentially constant, so the only way to control the LED brightness is by altering the current flowing through it. Hence, it's a current limit resistor. It's not dropping anything. Keep up the great work you are performing.
Nice tutorial , but I’m having a bit of trouble with mine , I followed your downloading procedure step by step for the board manager and libraries but my port selection is greyed out , I can’t choose anything ?
I like the way you join various "modules" together - I'm terrible at finding places that sell them though - but I'd be really interested if you could go to the "next level" and building your own custom module or circuit. I guess KiCad or something would be involved.
Is there anywhere, where I can first learn about what all the abbreviations is abd what they stand for and a short descriptions about their function purpose and where it fits in the arduino capabilities.
Thank you for this very nice video, very informative, very easy to understand. Do you have a video connecting the Arduino Nano 33 IoT to ARDUINO NANO MOTOR DRIVE SHIELD 2 AMPERE. Also, what other NANO MOTOR SHIELDS would work with the Arduino Nano 33?
I love your channel. Your sketch with the RTC works fine until I insert it into a sketch using the Arduino Cloud. Then I get an error message saying double RTC declaration. I have tried the sketch alone bit as soon as I add the iCloud function, it stops working. Any ideas.
Your statement at 20:48 is misleading. While the SSID and password are not readily visible in the compiled object/executable, the strings are still present in the file and are in no way encrypted. Such things as the Linux strings utility will readily display the hard-coded strings.
Do we have to combine the codes of the different functions (for example: switching on and off lights by text message and by mobile application, sipmple alarm, ...) of a smart home in a single code? or we upload each code according to what we want to do?


I'm completely new to Arduinos, bought a NAN0 33 IoT and nowhere could I find better information on how to get started than here. Thankyou very much.
The clarity with which you deliver your presentations is second to none! Reminds me of my best professor at Uni - who simplified things to a level that made everything easy to understand and raised our functional levels several hundredfold because we understood "how and why" - thank you for your precision, composition, explanation and rendition - superb!
Same here. Your technique reminds me of a video series instructor (from the 90's) that helped me learn Calculus. Thank you.
I already had 'wonderfull Sunday morning entertainment' from Andreas, you know, the Swiss guy. Bill made sure my afternoon continued in this most pleasant way. Well done Bill !
DroneBot Workshop - Bob Ross of electronics...your voice cures.
OUTSTANDING!!!
Great explanation, good learning pace for those of us who are new to these types of controllers. Looking forward to more content.
Your channel is amazing. All the videos you make are well documented, explained and recorded in a very pleasant way to watch and with very prepared content. It is also a pleasure to enjoy technical information and such interesting montages. Congratulations.
Wow, I really like the on-board capabilities of the new Nano iot 33. Thanks for the great getting started video.
Robert
Your production quality has always been excellent. Well done.
We've missed you, perfect like always.
Thanks a lot ☺
Excellent show! I have been ignoring IoT but you have piqued my interest. The RTC with date is a gem. I have wondered for ages how that could work. Many thanks!
Great to see you again! And in such great definition, no less. Great work, as always! Thanks, Bill.
Once again you publish a video about the very same new component I have just purchased. It seems like you know what I'm going to be working on before I know! Thanks for all you do.
After a long time, I am finally watching a new video!
What I really want to see is a video about how you organised your workshop: what tools you have, how you organise them, where they all live, ...etc.
He has actually made a video for that ... really he is a wonder!
Here is the the link to that -- czcams.com/video/n838ifEFGTk/video.html
So Bill is back with a bang😀. Bill, u gotta maintain continuity. Pl appreciate that there r guys like me waiting for ur uploads to maintain the pace of learning at my ripe age of 55😎
Just a baby.
I get the feeling there are many of us in this age group here! Why didn't this hobby exist when we could still see the pins LOL
THANK YOU for moving to 4k! For those of us who have upgraded the monitors on our computers to 4k it's a very noticeable difference. I wish more youtubers would make the move. Really, youtube should stop classifying 1080p as High Definition - 4k has been around since 2001, and 8k is becoming commonplace.
Wow, the consistency in the videos are so neat! Great Work!
First time watching your video and just Wow! I was having a hard time understanding how a lot of this works as I wanted to get into this but you sure help to make it a bit clearer. Thanks so much!
I used this controller to connect a lego "factory" to Microsoft IOT services, very powerful.
Vid plzkthx!
First of all I must say I really love your Channel!
I use your channel a lot with my students to explain new projects and how you combine hardware and software.
Regarding photography I really love the way you used the two cameras full body it really makes people see and feel like you're talking to them.
Your graphic explanation was always inspiring and a lot of my presentations include photos from your website (if that's OK.. 😊)
Thank You.
The lighting seems great, tip for the glasses, angle up and tilt down the softbox a bit to reduce reflections :) you can also try adding a rim light to further define yourself on the shot. Great video nevertheless, learned alot about the Arduino Nano!
Good video. I used tinyml features on the Arduino 33 sense to create a cough recognition project.
Thanks for the good video. I am wondering how the board measures up to an ESP32 board, and when and why one would prefer to use this board over an ESP32?
I came in here to ask the same question as you, but I see he hasn't answered you in over 3 weeks.
Pradeep,
Both microcontroler use advanced cores :M0 from ARM for the Nano and Xtensa LX6 for the ESP32
From the datasheet, you can easily figure out that the ESP 32 can run faster 240Mhz vs 48Mhz
The ESP32 has an FPU while the Cortex M0 does not, this can make a big difference if you need to make a lot of calculation
The ESP32 has 2 cores, this can look awsome, but in real embedded application I have not seen any real time embedded application using this king of architecture (it is already difficult to debug a single core...). Now if you have exemple, please share with us.
One last word, I do not believe this can be used in the arduino environment. It looks to me like something that a real RTOS can manage, with multiple process and inter process communication.
Power consuption in many cases is also important, the faster you run the more power you consume !
A last point, in embedded application resources are scarce. You can favor one or the other based on your requirements.
Take care and happy development !
Basically the same i think but I would get it from Arduino because you’d be supporting a good company and quality is guaranteed
Hi Bill. From the bottom of my heart I would like to thank you for this video. I had a few problems with my Adafruit tech, so I took a look around and found this video and bought a Nano 33 IoT to check it wasn't my PC or something. An hour or so later, it's installed and running the blink and wifi monitor. Next step is to try and get the Adafruit Smart Neopixels running!
Tim
this gets better and better ... u know tech can really make u want to live forever and ever ;) But anyways , the package is incredible , now u can make a small wireless balancing robot without including 2 or more extra boards , and that is a big thing !!!
I really like the pace and details with this guy...... Thanks for taking the time to do this 👌
How exciting! This Nano is my very first Arduino, got it this month, and I'm thrilled to see this detailed tutorial just in time for my first project. Can't wait to get to the point where I can get another one and have an even "smarter" home. Oh and the HD format is perfect for the new haircuts :-p
My new favourite teacher on YT.
Very nice!👍👍👍 As an undergrad, I'm looking forward to getting into iot!
You are an amazing teacher. Every video you make is well worth watching.
As always, an excellent tutorial, thank you!
Thank you for introducing me to this amazing device.
Thanks for introducing Nano 33 IoT in this video! This really helped me a lot. There is a new board which really like this board but with some new features, called Arduino Nicla Sense ME. Could you kindly evaluate whether a video from you is possible for it?
Once again, another great video. Thank you, sir.
I love your channel!! Your timezone adjustment is wrong though. You can't just adjust the hours component of the date. The day will be wrong for 5 hours a day in your example.
Some day these will be aired on TV
U sir, are amazing at what you do
🙏🏼
Thank you. Good learning opportunity
Hi you shouldn't apologize, we appreciate your hard work, effort, motivation and sharing. I'm a FPV_drone_pilot getting into arduino to develope myself further upcycling inventions. Inventions laying around, take them to pieces & inventing something new, useful & helpful to everyone, coz I have a stomach to feed, bills to pay, survive, secure my existence make money out of it too. Money don't don't grow on trees & nothing is for free. Free your mind and work hard for a better future.
Hi everyone - It's come to my attention that there has been someone masquerading as myself, responding to some comments here with a link to a Telegram chat to win a prize from me. THIS IS A SCAM, I am not holding a contest, nor do I have a Telegram account. PLEASE DO NOT RESPOND TO THESE MESSAGES!!
It's happening on a lot of my videos, I'm taking steps to remove them manually, but as I have 162 videos, it will take some time. If you do run across a suspicious comment, I would appreciate you letting me know at info@dronebotworkshop.com.
Thanks!
Bill (The real one!)
I get big butterfly’s from the excitement of watching your informational videos. The excitement comes from the vast possibilities of the different things possible from the information you disseminate. Thank you very much for your help in designing my automatic gate opener for my residence. I know I can use my phone, a hand held remote, or a push button code on an outside controller (of the gate for visitors). Knowing this code may be changed as often as I wish makes the security I feel living behind a secured, locked gate wonderful! Now I haven’t built everything yet but I have welded up a strong steel box that will hold the motor and all the components. You have really inspired me to “go for it”.
So for penny’s on the dollar, I will be able to build a VERY nice, secure entry point that will display the time at every opening or closing of the gate. Possibly face recognition for entry of friends. Definitely recorded video that can be monitored by my phone. Permission to open the gate from my phone which means anywhere I am at, I can open or close it. I’m still designing the system at this point, but I now have the confidence to attempt this monumental undertaking. Of corse I will be asking you for information when necessary. But I promise not to overburden you with the trivial bits. So for someone (me) that did not finish my proper education this will be a great task. Once again thank you for all of your information.
Note: The Nano Every is not part of the 33 family of new Nanos. 33 stands for 3.3 Volts, but the Every is actually a 5V device. Hence it doesn't have the 33 in its name and thus isn't part of the Nano 33 family.
this is sooo exciting... time for a popcorn video, my covid escape theater... 🤣 thanks...:)
Watched this video a week ago and was fascinated by the possibilities. Getting my hands on Nano 33 IoTs proved difficult but I have ESP32s in hand. Have not had any luck getting ESP_NOW running between two ESP32s. Would love to see a version of this video focused on ESP32 and ESP_NOW.
Great quality videos! Thanks for your dedication
I love 💕 to watch
The question a lot of people have is this vs. ESP32? I'm guessing ESP32 is cheaper but this may have better support in Arduino IDE?
In my experience ESP32 support using Arduino or Platformio is excellent nowdays, with a decent community too. Most problems you come across are reasonably easy to find good solutions.The dual-core is really handy too as you can leave one core to handle wifi and you have a fast core for your own stuff.
Cheap vs very expensive
Watching from kerala India, please continue the good work
Video quality was perfect...as usual
Thank you so much for this video!! Please do a similar one for the Nano 33 BLE Sense! It is the ultimate Nano board as it is the most powerful!
Great tutorial, thanks
Like the new presentation and good information on the Nano 33 IOT, quite a lot more expensive than the other units but I guess it does a lot more for you.
Honestly I don't know how to say it but I watch this video in 144 but great job your videos are very useful
Very Interesting as usual thanks a lot for sharing your knowledge, I appreciate it
Very comprehensive, Thank you!
Well done. Improved video quality is noticeable.
New gear for the shop is always cool and watching videos from studio shops is good time spent. I bought a $60 soldering station and it has served me well. I'm not going to buy a $900 plastic printer to make 20 Cent fittings and ugly enclosures. Please keep it real. Just remember that I tuned in to get the dope on a Nano and not your new Beryllium Screwdriver set. You have my attention, I like your "Show". You get to make Videos and play with Trons. how cool is that? Nice!
It was a great tutorial 👍 thanks for your detailed explanation 🙏
Bill, love your videos! Could you do a tutorial on the Nano 33 Sense? Having trouble making any use of the on-board microphone...
What a fantastic video, thank you.
To avoid the complication of BLE does the 33 IOT support something simple to use classic BT like BTSerial on the ESP32 to communicate with standard BT devices ? Using BTSerial all you need is 3 lines of code and you are in business
I'm really curious to see your thoughts on the new Arduino Nano RP2040 and how it compares to this. I was about to use the Nano 33 IoT for my next project but if I can use micropython with the RP2040 and still access the same hardware features, I think I prefer that route just for more flexible programming capabilities.
sir , can u help me with this project. Low cost pulse oximeter which can store previous data ( reading)& that data can be shared via bluetooth to mobile.
And making an ML model to predict if there is any problem in the user lungs with these readings.
Oh boy!! .. Got my coffee and puttin' on my MDR-7506 cans.
Thanks for this great video.
Expecting a similar detailed video about Nextion HMI and Arduino.
You always give us such highly informative video's. You teach us quite a bit about the products you demonstrate. I'm just little curious as to why you do not use the little magnifying glass icon, in the upper right corner, to open the serial monitor in the Arduino IDE? It seems to me, that would be the easiest way to perform that function.
You are doing fine :-) With respect to the reflections in your glasses you could try a polarizing filter. It is a quick, easy and relatively cheap fix.
You just turn it until the reflections disappear.
I actually meant that you are doing very good :-)
Thanks for the tutorial Bill !
Love it, but adjust the volume levels - your voice is peaking the levels. 😇
great start and good video quality
Thanks! Wow, these are expensive in Canada.
good that I found this channel - can you please do some tutorials on the new VPUs
i enjoyed your video. Nicely explained and with tutorial info covering most of the conveniences of arduino ble.thumbs up for your current video explanation. What i would like to also have discussed in the video is powering options for it. that would have completed the subject. Do you have any other content that reers to that matter? i.e. powering the arduino 3.3v nano ble?
I have an issue with your use of the term "Dropping Resistor". It is anything but that. It's a current limiting resistor. The voltage across the LED is essentially constant, so the only way to control the LED brightness is by altering the current flowing through it. Hence, it's a current limit resistor. It's not dropping anything.
Keep up the great work you are performing.
Nice tutorial , but I’m having a bit of trouble with mine , I followed your downloading procedure step by step for the board manager and libraries but my port selection is greyed out , I can’t choose anything ?
I like the way you join various "modules" together - I'm terrible at finding places that sell them though - but I'd be really interested if you could go to the "next level" and building your own custom module or circuit. I guess KiCad or something would be involved.
Excellent! 👌 Thanks for sharing!
really interesting video! I can't wait to get one of those arduino boards
Please continue building a real robot series
Good on you for pushing the envelope.
Great video but I would have liked to have more information about how you go about powering this device.
Thank you for great video! 🙂
Hi, are both the programs ArduinoBLE Central and Peripheral running simultaneously on a single PC?
Nice succinct explanation. Thanks
Is there anywhere, where I can first learn about what all the abbreviations is abd what they stand for and a short descriptions about their function purpose and where it fits in the arduino capabilities.
Very Interesting thing. Great explanation
Thank you for this very nice video, very informative, very easy to understand. Do you have a video connecting the Arduino Nano 33 IoT to ARDUINO NANO MOTOR DRIVE SHIELD 2 AMPERE. Also, what other NANO MOTOR SHIELDS would work with the Arduino Nano 33?
Awesomeness… thank you
Very clear and helpful, thank you.
I love your channel. Your sketch with the RTC works fine until I insert it into a sketch using the Arduino Cloud. Then I get an error message saying double RTC declaration. I have tried the sketch alone bit as soon as I add the iCloud function, it stops working. Any ideas.
Wow! It's gonna be amazing!!😀
Your statement at 20:48 is misleading. While the SSID and password are not readily visible in the compiled object/executable, the strings are still present in the file and are in no way encrypted. Such things as the Linux strings utility will readily display the hard-coded strings.
I noticed on your website many things are not working now, no videos, comments newest to mention a few
Whoa You Look different after so much time.....😁
Sir, Are there any videos from you of Arduino connections with SIM7600A LTE Module ? That would be great help and learning
Cool video.
Do we have to combine the codes of the different functions (for example: switching on and off lights by text message and by mobile application, sipmple alarm, ...) of a smart home in a single code? or we upload each code according to what we want to do?
I think it's too costly when you can just buy ESP32 for around 3.3$
Is it possible to use some sort of button to connect to a router via its WPS button so it isn't hard coded to your network?