How To: Low Buck Cylinder Head Rebuild

Vložit
- čas přidán 23. 07. 2024
- I'm building a junkyard LS/LQ9 for a magazine story and thought I'd pass along some tricks I've learned from different engine builders over the years on rebuilding a set of cylinder heads on the cheap. These tips will also work for Chevrolet small block/big block, Ford and Mopar engines. We'll touch on pulling valve stem seals, removing valve springs, lapping valves, checking valve seat seal, cleaning aluminum heads and more! Thanks for watching.
Tools I used:
LS valvespring compressor: amzn.to/31IesC0
Valve stem seal remove/installer: amzn.to/2MZYakt
Valve lapping compound: amzn.to/2NdpnjZ
Suction cup valve lapping sticks: amzn.to/2KselFf
Carbide tipped gasket scraper: amzn.to/2KuFGq4
We're constantly uploading great new videos. Please subscribe so you won't miss out!
czcams.com/users/subscription_c...
MORE INTERNET GOODNESS:
Website: www.horsepowermonster.com/
Facebook: / horsepowermonster
Instagram: / horsepowermonster
▬▬▬▬▬▬▬▬▬▬ Contents of this video ▬▬▬▬▬▬▬▬▬▬
0:00 - Introduction
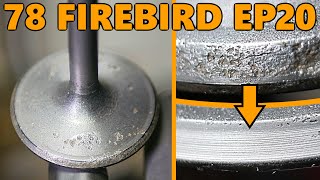
1:45 - How to check if the cylinder head valve seat seal is good
3:45 - Using LS valve spring compressor to remove springs
4:46 - Removing cylinder head valve stem seals
5:40 - How to check valve guide clearance quickly and easily
7:15 - How to clean carbon deposit off of valves
9:20 - Lapping in valves and seats
12:00 - Installing new valve stem seals
14:04 - Installing valves, retainers, locks, and valve springs on an LS cylinder head
The song "Hustle & Flow" provided courtesy Ample Tunes -- ampletunes.com/ - Auta a dopravní prostředky


![Save Money And Lap Your Own Valves! [Measured Results]](http://i.ytimg.com/vi/TPCrR-R7cTY/mqdefault.jpg)


Oh Brother....you just saved me alot of bucks ...This was perfect. Thanks man! and God Blees
Awesome! And thanks for watching
Now this is what you call a good low budget at home head diy. Nicely shot, step by step, knowledgeable and achieves a great end result. Nice job man!!!
Nice video, I know a lot of people benefitted from watching you show them “how-to”.....
Thanks!
Love the video big help man! I wish you had more ls rebuild tip videos. Im in the process now and this video helps a lot thanks!
Thank your for the knowledge and the time out of your life to pass it on . Wish you all the blessings in the world
That valve spring tool is slick as silk 👌🏻
Thanks for sharing this with me I'm replacing a burnt exhaust valve on my 4.0 jeep this was very helpful. Cheers from Jacksonville Florida
I'm doin a set of gt40p heads for a 93 bronco w/ 351w. I could not find any specific ford videos worth a while, and decided a generic search (no brands) and I found your video. So far its extremely informative. I am going to buy new springs and valves, and I dont trust my local machine shop to do my valve seats or anything else. they have destroyed 2 sets of brake calipers on me. So I am at a bit of a loss as to what to do, but keep searching around. I wish we SBF guys had a fancy valve spring compressor tool like for the LS lol
10/10 on video very well detailed on everything for DIY every other video I seen does not go into detail like this and this helps a lot
This is great, thank you! I have just about every bolt of a Dodge Magnum 5.9 and I plan to rebuild and tidy up the heads on the bench. I appreciate you explaining the lapping process. Cheers.
Hey thanks! And thanks for watching!
The method I was taught for checking valve sealing was to position the head with the ports facing up, dry the combustion chamber with acetone or brake cleaner and fill the port with gasoline. Look for wet spots to appear around the valve. flip it over and repeat for the other ports. It's very effective.
That is a good method
I love that valve compressor tool. I don't own anything GM, but if I did, that's an awesome tool!
Nice work and demonstration! 👍
This was perfect. Thanks man!
Very cool thank you for you know zooming in on the little things and I like to do stuff myself so I appreciate you showing how to do it without buying the tools
Thanks for the kind words, and thanks for watching!
Great job man, really nice work and thanks for sharing!
Nice , my 2015 6.2 silverado just dropped lifters on 4 and 7. Doing a afm delete , back with stock cam. 117k miles and I want to freshen up my heads , they seem fine , but while I got it down. These DI intake valves build carbon so figure I will clean them too ,and lap valves. I'm doing a oil/water separator too. A ton of black gunk in intake ports. Thanks for the video , helps a lot.👍👍🏁🏁
Love this video. I'm working on a Subaru.
Refurbishing the heads from a seized motor for my current motor that the timing belt broke on(interference engine, bent valves). I think it's great here how these concepts translate universally to pretty much any engine. Thank you so much for this video, it's given me all the confidence to tackle this project.
Thanks for watching! Good luck with your project!
Rebuilding a "Free". bike that only needed some carb work. This video sure is keeping closer to that free mark. Thanks
thanks for all your hard work and explanation! great show.
Thanks a lot!
Awesome video! I enjoyed watching it. Thanks for posting it!
(And, I have to admit, I never thought of reversing the valves to check the guides so I learned something too!)
Thanks a lot!
Great video! Just went through this with an LS1 I'm building for an El Camino. I used oven cleaner to get the bulk of the grunge off but I do like your technique for cleaning the valves.
It’s an ‘87 dealer badged SS.
Very good no nonsense video. Well done! Thx.
Thanks for the kind words! And thanks for watching!
I hadn't seen a set of head stands like that before, those are nice.
Great video, helping alot of people thanks
I think I'm going to pull the trigger on getting the valve guide seat and puller. I have a pair of pliers that I bought from Sears a good 20 to 25 years ago that seems to be perfect for pulling them off. I always used the deep socket method for putting them back on. I checked out the tools that you listed and found a full set like you were using for less than $20. So I just went ahead and bought it. I'm someone who is retired and was fortunately enough to do it at fairly a youngest age so I have tons of time on my hands. So in my garage since it is so large I have a habit of buying tools all the time. I'm a person that rather have it on hand then need it and then look for it to finish a job. I have things that I have bought years ago and never have used to this day then I have things that I bought many years ago that I need it this past summer and had it.
I'd like your trick with the water on the cylinder heads. I always do that but with alcohol and I never learned to do the air trick until you showed it in this video. It's almost making me putting this huge Miller bobcat generator / welder in the garage and start working on it. I know I have a problem with one of the heads. Since it's mine I just haven't gotten around to working on it but now I want to pull the heads off and check them the way you did.
I love that you use compound on each valve also. The only extra step I go and it's probably not needed but it was the way a friend of mine showed me. I have machine die and I put some either on the valve itself or on the seat of the valve. And I use the suction tool by hand not like some others I've seen on CZcams who hooks them up to cordless drills. like you were saying you can hear a difference when you get there and you won't hear that using a drill. I do the same thing that you do to clean them up except I use my drill press so that way I have two hands one to spray and one to clean.
I really enjoyed all your tips and cannot wait to try them out. Lucky enough here in Maryland it doesn't look like we're going to have winter so that leaves me more time in my garage before having to worry about getting some kerosene to heat it up.
Look forward to seeing more of your tips. For people out there like myself that are not Chevrolet people there is a lot to learn that goes for any type of engine. A lot of the stuff that was used in this video are the same things I use on generators welders anything with a gas engine and a cylinder head.
Great video man 👍
Great video! I also clean valves the same way, I would like to add I use the drill to spin the valves in the seats by the way with the grinding compound it's a little quicker. Then after wards I clean the seats and then use a Sharpie and put the valve into the seal and press down and turn it to make sure the sharpie rubs off from the valve onto the seat all the way around to ensure it's a perfect seal. As for the final initial cleaning I use a garden hose (or power washer) to blast the head and then I like to drown the ports with high pressure water to flush all of the grinding compound out.
It is not advisable to use a drill to grind in valves because all the movement is in one direction. A valve should be lapped using an oscillating motion. There is a special drill attachment that does this.
As for compressing valve springs, I use an old piece of flat steel bar in which I drilled two holes, one to bolt onto the cylinder head and the other to go over the valve stem. Press the bar down, remove the collet and the valve is free. Total cost - nuppence.
Great video, man! Loads of useful information! Just doing my iron heads and had to check I don't miss anything important! 😁
Thanks a ton!
Excellent work,
I am replacing a head gasket and somewhere I read that I need a valve spring compression tool.
I already removed the head and sent it to the shop! I am not tearing it apart like you are doing!: D
Thank you that was a very helpful video keep up the good work
Thanks a lot! And thanks for watching
Man what a great video!
thank you Great Video
I’ve done this process on my LS heads with a couple extra steps, turned out great and only cost me some new seals and time. 👍🏻
What else did you do out of interest? I'm looking at doing this soon
Trixnhoez, I have access to an industrial parts washer, so I used a bunch of oven cleaner to break the carbon loose, then a lot of time in the parts washer. I also cleaned the deck surfaces with a die grinder and scotchbrite pads, and removed all the casting flash I could find with a sand roll, and cleaned up a little above the seat. I also chucked my valves in a lathe and polished them with very fine grit sand paper.
@@shitbox7413 Scuff pad FTW. Under magnification, can't see any issues with a Scotch Brite on aluminum. Multiple cylinder heads cleaned this way - all still going strong.
El Marko, 👍🏻
Great video thank u for share
Great video!
Thanks! And thanks for watching!
I love it, The BFH but use it gently approach. Has been years since I used valve grind paste.
Subscribed. Good job man!
Thanks a lot! Much appreciated.
That was awesome
I build my own motors but have never done a head
Might try now, thanks :)
Cool! Good luck and thanks for watching!
Hey man thanks for reply!
Subbed!!
04 cts v saved will be using this as i don't have much in the way of money tools or room. thanks
Exact motor I am going to be working (2006 LQ9) on hopefully soon for an LS swap. Thanks.
Very cool! I hope yours started out in better shape than this one. Thanks for watching!
@@TheHorsepowerMonster Yep, mine is running and driving in my 2003 van, just got rusty, and it is the second motor in the van, lots of power! Going into 83 Camaro.
Nice job!!!
Thanks for watching!
I need to rebuild my 79’ 350 sbc sometime soon
nice camaro bro i got a 73 but gray with cowl induction hood one of them tall ones
When do you use the "wife's " dishwasher? :-)
Good video
Thanks! And thanks for watching!
the ls tip for valve seal intall is 1 water pump bolt,5/8th open end wrench,1 washer so the bolt head cant go threw the wrenchs head an a 12mm deep socket..you take the washer,slide the bolt threw that,then stick the bolt threw the closed end of the wrench..you then press the seal down with the 12mm under the wrench and over the seal..simple press till you feel it stop and you are good..this way makes it where you wont rip the seal like a hammer and socket can do if some one hits it to hard
ps lq9 aint that bad i get 500-600 n/a out them depending on setup..i got a lq9 sbe one now that im looking for 700 out of with stock port ls3 heads,hyd cam,102mm ls3 intake extremely worked by me..13.5-1 comp,heads are 47cc,pistons have .150 fly cuts..
Interesting, I'll have to give that a try next time. Thanks!
Question about the valve seat seal check: Why wouldn't you check the seal after you do the valve lapping procedure? Wouldn't the grime hinder the test before lapping? Would it be a good idea to do it before and after?
Thanks for your hard work mate.ove what you do. Wish you all the best moving and hopefully one day you'll make a good living off you tube. You deserve it
Thanks very much! And thanks for watching!
I'd love to see you do a sbc budget build using old double humps or vortec heads or even good power pack, those are the types of engines us broke people can build at home
Thanks! Definitely plan to do more with the old small blocks. Thanks for watching!
Super!
Good video brother
Thanks a lot! And thanks for watching.
A couple other low buck cleaning tricks for aluminum heads. To clean up the oil residue, you can spray oven cleaner on the entire head and put on a black plastic trash bag in sunlight for a couple of hours, rinse with water, & then wash good soapy water & a coarse scotch brite pad. the gasket surfaces then can be sanded with a hand auto body long board with 120 grit paper in a "x" pattern & thorough cleaning with brake cleaner & compressed air. This makes the surfaces ultra clean while helping to make sure they are flat & straight. The scratch patterns are almost the perfect RMS for multi layer coated stainless (MLS) head & exhaust gaskets, silicone embossed intake gaskets. The same treatment can be used for the block.
You can also back grind the valves
Nice! I subscribed! 😁
Thanks!
By just looking at the oily residue in the heads I say that this engine could greatly benefit with a catch can.
great video, i am getting ready to have to rebuild my wife's LQ4 and don't have a trustworthy machine shop around. what about soda blasting the heads to clean them up?
Glue some 1500 grit sand paper to a flat glass sheet and boom homemade resurface machine... hit the sandpaper with some wd40 and drag the head back n forth till the whole surface is even.. i do it weekly because i have a valve and seat grinder and valve guide removal/install tools.. that $30 paint can of berryman parts cleaner works wonders on the dirty parts with a plastic bristle brush and you can easily do 3-4 engines per gallon of berryman.. ballin on a budget man
We do similar at work to ensure flatness, a figure 8 pattern works really well
laurie agnew figure 8 is really the only way to do it.. usually what i do is figure 8’s for about a minute then i take a giant jumbo wide tip black sharpie and cover the whole bottom of the head with it and as im working it I’ll easily see where the low spots are.. once the marker is completely gone i know the head is perfectly flat.. then i switch to 2,000 grit paper for a final pass of about 90 seconds.. perfect every time
I like to fill a plastic tub with 50/50 purple or mean green water combo and soak the heads after removing the gasket, rinse with water and they look amazing....and for iron heads i spray engine degreaser and rinse with water then immediately spray with wd to prevent rust
Will have to try that. Thanks
does this remove all the sludge from the valves Bad Donkey?
@@rhcpdude019 yes but if i pull a head i always remove the valves, clean and relap, and replace the seals, always better safe than sorry
What about just throwing them in the parts cleaner I have in my garage? Like one from harbor freight?
First video of yours that I've watched. Subbed! awesome stuff!
Thank you! Hope to have lots more cool vids coming.
Great video. How do you check if the valve is bent?
Great video! exactly what I was looking for. Need to do the same to my 289 heads.Do you think the process of the spring removal is relatively the same for Ford?
Una pregunta se cambia el empaque de admisión de motor 5.7 chevi
Awesome videos man ! I love the extra knowledge, answered a lot of questions I’ve still had after messing with these Ls’s over the years and starting my ls1 build. I’m rebuilding my old 241 heads that were replaced by ported 243’s. Do LS rocker arms have to go back into the exact location because all of mine were mixed up in one box 😭 no one can seem to answer that question !
Thanks for the kinds words! And you should be fine. The lifters don’t mate to the tops of the valve stems like a cam lobe and flat tappet lifter. If you are building an LS3 just make sure to get the intakes on the intake valves and the exhaust on the exhaust. They have different offsets. Good luck!
When you do this do you have to keep track of what valves came out of where like you do with pistons?
I subscribe!!! Please tell me what is the torque that you used. Gr8 video, I look forward to watching more and more👨🔧
5:25 that's really important what you said here. If may I ask. I have an LT1 5.7 1996. What sort of valve seals does it have?
Is there anything you can soak the head and valves in to clean them. I've seen some other low buck options guys using brake fluid or that gunk stuff. Is there anyway to clean intake ports.
Awesome video. Where do you recommend to buy a new cylinder head for a 2015 ram 1500. I bought one from the dealership and it was warped. Returned it for another one and the second one is worse!
Hello I have a question about cast-iron 202 fully heads for small block Chevy how about that most of us hot rodders can’t afford aluminum heads. Why don’t you think about it and have a section on small block heads like the powerpack heads as well as stock heads how to add performance to these heads! A gearhead with a passion for old school performance!
What gasket remover spray did you use? Looked like it worked awesome
Awesome video but, how do keep the valve from opening to remove the retainers?
The way you flip that head around kills me lol, I'm currently working on a Ford 460 big block with cast iron heads. No Way In Hell can you just casually toss them around XD. Good video though, thanks!
Ha! Yes, onc you get used to working with aluminum heads, you never want to go back to cast iron! Thanks for watching
Where did u buy the cylinder head stand
Is that tool good on Vortec heads as well?
At the end you talk about taking the heads to your machine shop to check and make sure they're flat. Do you not trust a straight edge and feeler gauges?
seems like those rods on the work stand might dent the edges of the heads when pounding on the valves, maybe put some plastic tubing over them?
They do have thick, rubber sleeves over them. Probably were just hard to see. Thanks for watching!
Head valve seat blow hole problem wich effects please tell me
What about a diesel head with no chamber? Diesel down the port and see if valves seat yeah. Worth a mention I thought.
Might be a good idea to start the video with the key information of when disassembling, keep the valves and springs, and if possible, the push rods, organized so you know what cylinder they came from. Especially as these engines get older, you never know what someone has done to the heads / pushrods before you got them. With the torque down / non adjustable rockers, assembled valve stem height is critical. Other wise a valve that sealed without rockers bolted down, could leak because the rocker keeps it from closing, or it could have excessive clearance rocker tip to valve stem and you end up with an engine that sounds like it's got a collapsed lifter that will fail prematurely. Not being a wise guy, just thought it might save someone a head ache.
I started building engines in the mid 1970's, and the big block MOPARS (383 / 440's) had those torque down rocker shafts. Without the individually adjustable rockers like the Chevrolet's, you had to measure the valve stem lengths in the heads and either machine out the seats and replace them and make the seat depth all the same, or if they were not too bad, you could find the worst one, grind the valves and the seats, then make them all the same to that worst one, then measure to find the correct push rod length, then make up a set of push rods for that engine. They'd run great if you set them up right, but it took a lot of measuring, and work. Most hydraulic lifters had .060 of internal movement, so you'd want to shoot for right in the middle of the throw, so you'd have +/- .030 so they wouldn't be loud when cold, and wouldn't hang open when hot.
Here's a tip for you for keeping from gouging aluminum deck surfaces when cleaning off gaskets.
Make a scraper out of wood, and clean the cutting edge with a sharp knife to keep impurities from embedding in the wood.
Aluminum and oak are virtually the same hardness, but the wood will usually give first before damaging the aluminum.
Again, not criticizing, just thought I'd offer a few tips I've learned over the last 50 years from machining everything from race car / hot rod engines to submarines, to robotic articulating arms for the now decommissioned space shuttle.
I enjoy your videos. Take care.
All great tips. Always love hearing from old school engine builders. Thanks for sharing.
If replacing the valve stem seals, what difference does it make if you tear them up getting them off? They're going in the garbage anyway...
Thats exactly how we did it back in the day. Then ported the shit out of the old iron
Porting iron heads is work!
When you use lapping compound to polish the seats do you use the old guides or the new ones? Or does it matter ?
If you are replacing the valve guides, definitely wait to lap the valves until the new valve guides are in. Thanks for watching
Did you end up getting any machine work done to it?
You put enough lapping compound on one valve to do the whole head. Maybe even both of them.
Instead of water can i also use gasoline
I feel like everyone worries too much about getting every spec off the head gasket surface. It doesn't need to be shiny or anything. Even if there's a chunk or two of old gasket material stuck on there if it's not like 50 thou thick the chances of you having an issue are slim to none. Scrape it down until you don't feel anything significant with your finger, wipe it off and slap your gasket on. Trust me, save the energy for the other parts of the engine build. The heads gasket will seal. It's a pushrod engine, not a space shuttle. If you aren't making 700hp. Just get it back together and torqued to spec. Check the head warp with a true straight edge and feelers at home if you don't feel like going to the machine shop. If it's flat you're probably good. That's the true low buck way.
Only true friends tell eachother if they have a booger, I think you got one bud 😉
Just thinking out loud, couldn't you also clean the old gaskets off the deck surface by using a piece of wet/dry sandpaper on a piece of glass with some wd40 and work your way up the grits too?
Don't use anything abrasive unless you're getting the head resurfaced. You'll put low spots in the head gasket surface
How much for a set of those head stands?
I got 'em from Powerhouse Products (powerhouseproducts.com) several years ago. I just checked and they still have them. Look under "cylinder head tools" There are running right at fifty bucks, but they also have other styles. Thanks for watching!
Some people like to use acetone to test valve sealing because it is less viscous. Some brake cleaners are also a good choice.
6:16 It is worth having a dial bore gauge that can stick to the cylinder head. The factory specifies a certain amount of movement in the valve guide, and the number is so small that you need precision measuring tools to know if your valve guides are good. You could be out of spec and not be able to feel it.
7:39 You still need to measure the valve margin width and valve stem width, then compare to the service manual to know if you can reuse the valve.
where is the rest of the build
A large piece of glass and sandpaper glued to it. will resurface head!low budget
Yep. Some 250, 400, then 600 grit, wd40. Work in a figure 8 pattern and keep the paper wet. Most would be surprised how flat and true you can actually get heads doing this.
When you showed the valve after lapping it showed that the seat is very high up on the valve, this could cause problems in the future.
I think quilifies more in the broke category not the budget build
Is this the best junk yard head for the 6.0L. I was hearing rumors that the 706 casting was the hidden gem to swap onto the 6.0.
Taras zakordonskk 706 heads had a cracking problem. 862 is the same head but better cast. Also the 862 has a smaller combustion chamber than the 317s. If you want more compression.
I've heard the same things about the 862 heads. They came on the 4.8 and 5.3 liter engines and have a smaller combustion chamber (61 vs 71 cc's) to help with compression. However, the tradeoff is the smaller intake valve. The 6.0 heads have a 2 inch intake while the 5.3 heads have a 1.90 diameter intake. Good luck!
So the 5.3 heads are better than the 6.0s?
How come you never dropped that 427 small block into that Camaro
Too many projects. I still plan too, it just seems like there is always something more pressing that needs to get done. Thanks for the reminder, and thanks for watching!
Why would 12 people dislike this? Oh well, I bet an older 98-02 F body gapped them with full bolt ons and they are mad. I’m not even a huge LSX fanboy either....
If you want a little more power 799 heads or 821 heads will help you out
Why didn't you check the deck first?