How to Install a Wire Railing System (DIY Muzata Cable Railing Installation)

Vložit
- čas přidán 2. 12. 2022
- In this video, you'll learn How to Install a DIY Wire Railing System from start to finish! This installation is for the Muzata BlackCool System and I anchored the railing posts in concrete using anchor bolts.
Muzata's Free Design Service Team can be contacted here: bit.ly/3VoypJd
To install the Muzata Wire Railing, you will need the following tools and materials 🛠🧰:
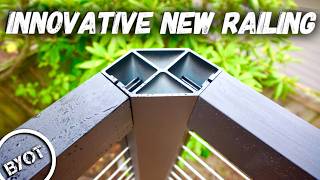
- Muzata BlackCool Railing System: bit.ly/3Fr6rr3
- Hammer Drill: amzn.to/3H6BYPW
- Carbide Tipped Masonry Bits: amzn.to/3B4FTJr
- Anchor Bolts: amzn.to/3EY3ywi
- Laser Level: amzn.to/3EZJr0x
- Shims: amzn.to/3B5gBLd
- Angle Finder: amzn.to/3VqPwKw
If you want to learn how to install a wire railing on a deck, you can check out my CZcams video linked here: • DIY Wire Railing Insta...
I also have a "How to install a cable railing on a concrete front porch" Blog Article Linked Here:
atimprovements.com/railing-on...
For even more information on how to install a wire railing, you can check out my Blog article linked here: atimprovements.com/cable-rail...
The Steps to Installing a Wire Railing System are listed below:
1. Plan out your Wire Railing Project and order materials.
2. Mark you Cable Railing Post Locations
3. Pre-Drill Railing Post Mounting Locations
4. Insert Concrete Expansion Anchors through railing posts and into concrete.
5. Level Railing Posts and Shim as Needed
6. Install the cable wire Railing System
7. Install Cable Wires
8. Tighten Cable Wires as needed for desired tension
9. Test Wire Railing to Ensure Durability and Safety
Be sure to subscribe and hit the notification bell so you don't miss any future videos that are part of the Basement Renovation Series!
Follow me on Instagram: / atimprovements
Check out my Blog: Atimprovements.com
Subscribe to my CZcams Channel ⬇️ czcams.com/users/AndrewThron...
Check out my Website for additional DIY Content: atimprovements.com
▬▬▬▬▬▬▬▬▬▬▬▬▬
🎥 MY CZcams GEAR
Camera (Iphone Max): amzn.to/3d5HxSo
Microphone (Maono Condenser Mic): amzn.to/3RCAb7N
Tripod: amzn.to/3Rz5Gj3
Mini Tripod: amzn.to/3Rvt2WM
Lighting: amzn.to/3d4QdZ5
▬▬▬▬▬▬▬▬▬▬▬▬▬
🛠🧰 TOOLS THAT I USE
Carbide Tipped Drill Bit: amzn.to/3S0hdIM
Tapcon Screws: amzn.to/3OxEWxh
Drill: amzn.to/3JICKkk
Tape Measure: amzn.to/3HaTWgE
Circular Saw: amzn.to/3BFotC4
Masonry Drill: amzn.to/36yP1JW
Level: amzn.to/3HowUDn
Hammer: amzn.to/35fIpiT
Chalk Line: amzn.to/3MwSDg8
Clamps: amzn.to/3HLqwpK
Drill: amzn.to/3JICKkk
Sawzall: amzn.to/3HcdeSI
Circular Saw: amzn.to/3BFotC4
Jig saw: amzn.to/3I6lcyd
Air Compressor: amzn.to/34TatJf
Framing Nailer: amzn.to/3JGpBYU
Roofing Nailer: amzn.to/3BEAuYF
Orbital Sander: amzn.to/34UwlUD
Bar Clamps: amzn.to/3JjFrJe
▬▬▬▬▬▬▬▬▬▬▬▬▬
Thank you so much for watching!
*All content on the Andrew Thron Improvements CZcams channel reflects my own opinions. Please seek out guidance of professionally trained and licensed individuals before making any decisions. Links in the description may be affiliate links.


Looks so clean and you make it look so easy! Can't wait to see the next project
I just wanna let you know and i know you have thousands and thousands of comments but you really helped me a lot with some of my DIY you are very informative
I love your work, and the new railing system.
I appreciate it, Sheree! Thanks for the support!
I remember when you did the back deck! LOVED the look then and love it now!
I appreciate it! Thanks for watching the cable chronicles!
Looks Wonderful
Railing looks good Andrew. Well done!
Appreciate it John! Thanks for watching!
Good
Gosh Andrew; we're all alone here! I really dig that from step set up. It's very contemporary and in sync with the backyard rail. Tremendous work. Can't wait for the basement series. Stay safe, get your inoculations against covid and flu and have a wonderful Christmas-New Year Season. If you go on air before Christmas, I'll be back sooner.
Hey Patrick! I appreciate it. I should hopefully have a few videos out before the holiday. Merry Christmas!
Awesome job. Just seems the Mozata railing needs to work on alot of kinks.
Ok bạn ❤
On my cable railing the very bottom cables touch the steps. I centered the post with the stairs but I see I should've just moved the posts forward.
How much did the railing system cost you?
Ill never understand why the posts are more than twice the cost of steel posts used in vinyl applications.
Did you have to tap the screw holes in the railing after drilling?
Can't tap sheet metal. Inner dia of threads on screws should match hole dia.
Looks like you started with the black wood screws (@ 6:48) that they sent but then (@ 6:54) looks like you used machine screws. I'm stuck here can you tell me what you did? What size drill did you use and did you tap the holes afterwards
Hey! I don’t honestly remember the exact thing I did, but I do remember being frustrated with the screws provided and having them not fit and tighten properly. This could have been because I drilled the holes a bit sloppy, but I’m not sure. I had to go to Home Depot and get slightly larger screws to make it work. Hope that helps!
preliminarily :)
Haha it’s the “word” of the video
Did you find your posts to be sturdy after installation? The posts I ordered from Muzata seemed of poor quality and had some real give at the base
I had the same problem
3k?
Nice video, subscribed! (Just a head up, the word you want there is "repetitive" not "redundant" :) )
I'm pretty sure you should be vacuuming the silica dust, and not blowing it away...LOL, at work, we have to put a mask on for every single hole we drill into cement.. Just saying..
Math (Finn voice)
The screws that come with railing do not work, why did you not mention that. You actually also did not use them. You started with them and then the next clip, you see they are not the ones that came with it. Muzata needs to get their stuff straight.