Perfect Fabric Donuts: Baby Stacking Rings

Vložit
- čas přidán 22. 07. 2024
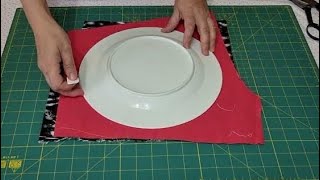
- Have you ever tried to sew a padded ring? Whether you want to make a set of stacking rings for a young child, a wrist pincushion, a hair bun accessory, or a larger version to make a wreath base or the sides of a cat bed, you’ll find our tutorial by Corinne Bradd one of the easiest and neatest way to do it. No wrinkles, no dodgy curves, no hassle - just a little bit of hand sewing at the end.
Corinne shows you just how much your ring will shrink as it’s stuffed so that you can cut your fabric just the right size for the perfect join.
We no longer provide a free pattern for the rings but there's a full template kit and instructions available now for you make your own complete baby stacking rings set over on sew-hq.myshopify.com/
Subscribe to The Crafts Channel for more! / thecraft. .
Like us on Facebook: / thecraftschannel
Follow us on Instagram: / thecraftschannel
Follow us on Twitter: / crafts_channel - Jak na to + styl


Made the first donut and yes I'm making the whole item from pattern, I'm left handed so had to adapt the sewing up of ring, fiddly! But pleased with end practice ring.Forgid g ahead with the real thing! Thank you😊
I'm left handed too. For some reason I forget which direction to start stitching, especially with blanket stitch, to make it easier. Been sewing since I was a kid, you'd think I'd know by now 😆c x
Genius! And excellent presentation. No unnecessary waffle. Thank you
Thank you so much for this darling pattern. I'm expecting my first grandbaby soon and I'm 65! I've waited a long time!
My granddaughter's 3rd birthday party is themed "Pink Sprinkle Donuts". I've been asked to make donut bean bags for a game. I've sewn for 50 years but had no idea how to make a donut! Thanks so much, you're tutorial is clear and complete! I'm a new subscriber now :-)
Glad to be of help, and thank you for subscribing! c x
Thank you so much for a wonderful, clear, easy to understand demo! This was exactly what I was searching for!
You are great at teaching. so calm & informative. Thank you so much
Hello and I hope you have had a joyful day. I'm still sick but I'm so grateful to have these videos to watch and get to listen to you chat. Thank you for posting and sharing your time and talent.
Sorry to hear you're not well, hope my endless babbling doesn't make you feel worse 😁 c x
What a great idea! thanks for sharing your time and talent!
Very helpful on making the perfect fabric donut! Thank you!
It’s like you read my mind. 🥰💗😉I have a new grand daughter coming in October 2022!!! What a fabulous idea for a gift 🎁 👼
Haha, that's a lucky coincidence! Glad you like it, c x
Very cute. This would be a great baby gift. Might make one for my grands
This is so cute. you did an awesome job at showing how to do this.
Thankyou for the template link it looks great
Love this. Thank you
Thanks so much,was so easy !
You are absolutely a ledgend👏🏻.
Very clear instructions for everyone. finally I found Doughnuts for my grandson. Thank you so much.
Will make it for my niece, beautiful and fun project. Thank you!❤
I'm so glad I watched this tutorial! Everything you did and said made sense! NOW, I'll start again...
Ha ha, this is what I'm here for, to make numerous mistakes first and *then* film the best way! c x
This is a great tutorial! I couldn't figure out how my rings kept turning into twists . Brilliant.
Adorable! What a great way to use up scraps. Thanks for the template link, too.
Yes, it's perfect for random fabrics, c x
Excellent tips on creating this! Thank You so much 💓 for this project- My new Great Granddaughter was born earlier this month so this is definitely something that that I will be making for her!
Congratulations, hope she loves it, c x
This was the most helpful tutorial ever. ❤ Thank you so much
I just love this idea and your video! Thank you so much!
THANK YOU! This is exactly what I've been needing to make cartoony rattles on the tail of a rattlesnake plush for a client
Glad we could help! c x
Just brilliant! I love your honesty :) great tutorial 🌸🌸🌼🌸🌼🌸
Beautiful ❤
Thank you for the tips, I didn't know that you should take out a wedge in order to make the circle. Very sweet project.
Awesome thank you so much for sharing this video
oh my gosh. I have been trying to find this pattern for a long time. Thank you so much. You even explain it so I can understand it. I'm a little slow. Again thank you.
Glad you found it and that it's helped, c x
Omg...I would do handstands if I could. This is is timely! I have been trying to make one for a greatgran and had yep it did not work out. Can not wait to do this. Thank you.
Me 2. I am expecting a new grand daughter in October 2022!!! Congratulations
Oh, so glad it's turned up in time for you! c x
Love The Crafts Channel😘
Thank you very much! c x
That's really cute. Thanks for doing that. I saw some doughnuts in a magazine but couldn't get it so glad to get an idea of how to do them.👍
Glad you like them! c x
Thank you this is an excellent and interesting video.
Had an idea for a sort of oversized chainmail fabric jacket. This helps greatly.
edit: the glue trick is bloody briliant
Haha, I use a glue stick all the time on gap openings. It really helps stop distortion and fraying when stuffing, c x
Excellent video easy to follow and very informative. These would be great as cushions for singing bowls. Many thanks for sharing.
Thanks for watching!
I have a small Christmas Wreath stuffie from Jellycat and I could NOT figure out how they did it. I did a quick search and came across your video on making fabric “donuts” and now I get it! Great tutorial! I may have to try this for making a donut Minnie Ears headband!
Me gusto mucho... gracias😍
Thank you SO MUCH! I was looking for a tutorial or template for making rings from scrap fabric for singing bowl and tongue drum pillows and having such a hard time - this was absolutely perfect, and your explanations were wonderful. Thank you!
Ah, glad we could help! c x
Same for me- a diy singing bowl cushion
Thank you!
Beyond happy that I found your tutorial and appreciate the pattern. Thank you so much. I've wanted to make fabric rings for several little ones... This is perfect; love your voice and getting to the point (no unnecessary "fluff")... thank you again for your time and sharing your talent. Look forward to more of your educational tutorials.
Thank you! Glad it was of some help to you. I rarely do fluff, who has the time for that when there's sewing to be done? 😉 c x
@@TheCraftsChannel Understood, but I do so love your projects as, I'm sure, so many others do.... thank you again; going to make a set for my great grandson and fill the rings with the poly/styrofoam beads so he can play with them in the pool / tub.
@@donnadailey5062 Great idea! c x
@@TheCraftsChannel carb ric ring templates
Très bel ouvrage et jouet sans danger pour les tous petits, très intéressant, j'aime beaucoup et vais le confectionner. Merci de partager. France Basse Normandie
Muy bonito muy buen trabajo
Muchas gracias, c x
ABSOLUTELY BRILLIANT!!! You are a wonderful teacher and I appreciate the details without it being too overwhelming! New Subbie! :)
Thank you very much! c x
❤supergut danke
❤❤❤❤❤❤❤❤
Great video love it.
howdo you make the stacking rod?
Sorry, been away for a while but here are the full instructions, c x
M&ST 13 - Baby Stacking rings
You need
Cotton print fabric
Fibre filling
Lightweight quilt wadding
Stiff card 15cm square
Buttons
Embroidery thread
Add 5mm seam allowance to pattern pieces unless stated.
Trace our circle template shapes onto the wrong side of right sides together fabric squares with pencil. Before cutting out, sew around both curves leaving the straight ends unsewn. Cut out the shapes with pinking shears to leave a 5mm seam allowance. Fold over 5mm at each open end and tack before turning the rings right sides out. Stuff the rings fairly firmly from both ends. Bring the hemmed ends together and oversew with tiny stitches to close up the ring. Add more stuffing if necessary before completely closing the seam.
Cut two pieces of 16cm square fabric and sew right sides together around three sides. Fold over and tack 5mm on the remaining side before turning right sides out. Slip a 15cm square of stiff card or plastic inside the pouch and add a firm layer of fibre filling on one side of the card. Pin and oversew the edges of the gap together to make a padded base.
Cut a cone piece from patterned fabric, fold in half right sides together and sew down the long seam. Fold up and tack 5mm around the base of the cone before turning out and stuffing firmly. Pin the base of the cone to the centre of the padded base and secure by oversewing the two pieces together. Add more fibre filling before completing the seam to ensure the cone stands upright.
Cut two head pieces from right sides together fabric. Stitch a dart in the top of each piece before matching up right sides together and sewing all round, leaving the straight edge at the bottom open. Clip curves and turn out. Firmly stuff the head, working well into the nose and top of the head but leaving the lower half of the head unfilled. Work your finger into the centre of the stuffing to make a well. Gather up the raw edge of the head with a small running stitch and secure. Push the gathered bottom up inside the well in the stuffing of the head so it can be slipped onto the top of the cone.
Cut two pairs of right sides together ear shapes and layer onto lightweight quilt wadding. Sew around the shapes leaving a small gap in a straight area. Turn out, fold in the raw edges of the gap and oversew closed. Stitch an ear to either side of the head, using the darts as a guide to placement. Add small buttons for eyes and stitch a triangle nose to the tip of the head with two strands of embroidery thread. Stack the rings onto the cone and top with the dog’s head to hold them in place.
Divina gracias mi mamá ya empezó a hacerla sms hacer juguetes p
I need to make a donut, as I have an ear liason. Need to take pressure off my ear when sleeping. I will hand sew the donut to my pillow, in hope it will help. I tried a travel pillow, but it wasn't right for me. So this looks perfect, for me to try. Thank you.😀
Hope it helps, or maybe make a slightly smaller one that you can add wide cotton straps to so you could tie it to your head somehow so it still works if you shift in the night? c x
Hi, Thank you for this. I want to make one for my grandson. How do you make the base? It’s not included in the pattern.
Sorry for the delay, here are the original instructions, hopefully your grandson isn't now too old...
M&ST 13 - Baby Stacking rings
You need
Cotton print fabric
Fibre filling
Lightweight quilt wadding
Stiff card 15cm square
Buttons
Embroidery thread
Add 5mm seam allowance to pattern pieces unless stated.
Trace our circle template shapes onto the wrong side of right sides together fabric squares with pencil. Before cutting out, sew around both curves leaving the straight ends unsewn. Cut out the shapes with pinking shears to leave a 5mm seam allowance. Fold over 5mm at each open end and tack before turning the rings right sides out. Stuff the rings fairly firmly from both ends. Bring the hemmed ends together and oversew with tiny stitches to close up the ring. Add more stuffing if necessary before completely closing the seam.
Cut two pieces of 16cm square fabric and sew right sides together around three sides. Fold over and tack 5mm on the remaining side before turning right sides out. Slip a 15cm square of stiff card or plastic inside the pouch and add a firm layer of fibre filling on one side of the card. Pin and oversew the edges of the gap together to make a padded base.
Cut a cone piece from patterned fabric, fold in half right sides together and sew down the long seam. Fold up and tack 5mm around the base of the cone before turning out and stuffing firmly. Pin the base of the cone to the centre of the padded base and secure by oversewing the two pieces together. Add more fibre filling before completing the seam to ensure the cone stands upright.
Cut two head pieces from right sides together fabric. Stitch a dart in the top of each piece before matching up right sides together and sewing all round, leaving the straight edge at the bottom open. Clip curves and turn out. Firmly stuff the head, working well into the nose and top of the head but leaving the lower half of the head unfilled. Work your finger into the centre of the stuffing to make a well. Gather up the raw edge of the head with a small running stitch and secure. Push the gathered bottom up inside the well in the stuffing of the head so it can be slipped onto the top of the cone.
Cut two pairs of right sides together ear shapes and layer onto lightweight quilt wadding. Sew around the shapes leaving a small gap in a straight area. Turn out, fold in the raw edges of the gap and oversew closed. Stitch an ear to either side of the head, using the darts as a guide to placement. Add small buttons for eyes and stitch a triangle nose to the tip of the head with two strands of embroidery thread. Stack the rings onto the cone and top with the dog’s head to hold them in place
Muchas gracias! Me ha servido mucho sus instrucciones. Tengo la duda de como hace la cabecita del perrito para que se pueda ensartar?
He traducido las instrucciones originales, espero que tengan sentido.
Agregue un margen de costura de 5 mm a las piezas del patrón, a menos que se indique lo contrario.
Trace las formas de nuestra plantilla circular en el revés del derecho y junte los cuadrados de tela con un lápiz. Antes de cortar, cosa alrededor de ambas curvas dejando los extremos rectos sin coser. Recorta las formas con unas tijeras dentadas para dejar un margen de costura de 5 mm. Doble 5 mm en cada extremo abierto y vire antes de girar los anillos hacia afuera. Rellena los anillos con bastante firmeza desde ambos extremos. Junte los extremos del dobladillo y cosa con pequeños puntos para cerrar el anillo. Agregue más relleno si es necesario antes de cerrar completamente la costura.
Corta dos trozos de tela cuadrada de 16 cm y cose los lados derechos alrededor de tres lados. Doble y vire 5 mm en el lado restante antes de girar hacia el derecho. Desliza un cuadrado de 15 cm de cartulina rígida o plástico dentro de la bolsa y agrega una capa firme de relleno de fibra en un lado de la tarjeta. Sujeta con alfileres y cose los bordes del espacio para formar una base acolchada.
Corta un trozo de cono de tela estampada, dobla por la mitad los lados derechos y cose la costura larga. Doble hacia arriba y pegue 5 mm alrededor de la base del cono antes de desmoldar y rellenar firmemente. Sujeta con alfileres la base del cono al centro de la base acolchada y asegúrala con
superponiendo las dos piezas juntas. Agregue más relleno de fibra antes de completar la costura para asegurarse de que el cono se mantenga en posición vertical.
Corta dos piezas de cabeza de la tela con los lados derechos juntos. Cose una pinza en la parte superior de cada pieza antes de unir los lados derechos y coser todo el contorno, dejando la regla en la parte inferior abierta. Recorta las curvas y da vuelta. Rellene firmemente la cabeza, trabajando bien en la nariz y la parte superior de la cabeza, pero dejando la mitad inferior de la cabeza sin llenar. Introduce el dedo en el centro del relleno para hacer un hueco. Reúna el borde sin rematar de la cabeza con una pequeña puntada y asegúrelo. Empuje la parte inferior recogida hacia arriba dentro del hueco en el relleno de la cabeza para que pueda deslizarse sobre la parte superior del cono.
Corte dos pares de formas de orejas con los lados derechos y colóquelas sobre una guata de colcha liviana. Cose alrededor de las formas dejando un pequeño espacio en un área recta. Voltear, doblar los bordes sin rematar del espacio y coser para cerrarlo. Cose una oreja a cada lado de la cabeza, usando los dardos como guía para la colocación. Agregue pequeños botones para los ojos y cosa una nariz triangular en la punta de la cabeza con dos hilos de hilo de bordar. Apila los anillos en el cono y cubre con la cabeza del perro para mantenerlos en su lugar.
c x
Love this so much. How do you make the stacking rod?
Here are the original instructions I wrote, c x
M&ST 13 - Baby Stacking rings
You need
Cotton print fabric
Fibre filling
Lightweight quilt wadding
Stiff card 15cm square
Buttons
Embroidery thread
Add 5mm seam allowance to pattern pieces unless stated.
Trace our circle template shapes onto the wrong side of right sides together fabric squares with pencil. Before cutting out, sew around both curves leaving the straight ends unsewn. Cut out the shapes with pinking shears to leave a 5mm seam allowance. Fold over 5mm at each open end and tack before turning the rings right sides out. Stuff the rings fairly firmly from both ends. Bring the hemmed ends together and oversew with tiny stitches to close up the ring. Add more stuffing if necessary before completely closing the seam.
Cut two pieces of 16cm square fabric and sew right sides together around three sides. Fold over and tack 5mm on the remaining side before turning right sides out. Slip a 15cm square of stiff card or plastic inside the pouch and add a firm layer of fibre filling on one side of the card. Pin and oversew the edges of the gap together to make a padded base.
Cut a cone piece from patterned fabric, fold in half right sides together and sew down the long seam. Fold up and tack 5mm around the base of the cone before turning out and stuffing firmly. Pin the base of the cone to the centre of the padded base and secure by oversewing the two pieces together. Add more fibre filling before completing the seam to ensure the cone stands upright.
Cut two head pieces from right sides together fabric. Stitch a dart in the top of each piece before matching up right sides together and sewing all round, leaving the straight edge at the bottom open. Clip curves and turn out. Firmly stuff the head, working well into the nose and top of the head but leaving the lower half of the head unfilled. Work your finger into the centre of the stuffing to make a well. Gather up the raw edge of the head with a small running stitch and secure. Push the gathered bottom up inside the well in the stuffing of the head so it can be slipped onto the top of the cone.
Cut two pairs of right sides together ear shapes and layer onto lightweight quilt wadding. Sew around the shapes leaving a small gap in a straight area. Turn out, fold in the raw edges of the gap and oversew closed. Stitch an ear to either side of the head, using the darts as a guide to placement. Add small buttons for eyes and stitch a triangle nose to the tip of the head with two strands of embroidery thread. Stack the rings onto the cone and top with the dog’s head to hold them in place
I love the intro! Sadly not donuts you can eat! 😂
Me ha gustado!!! .. Los títulos me gustaría q. Fueran más despacio no me da tiempo a leer el español... Gracias
Thanks for sharing! It's great! I've found the templates but can't find the additional explanations for sewing the backing. Where can I find them? Thanks again
They were in the magazine a few years back. Luckily, because I never throw anything away, here are my original instructions, hope they help,
M&ST 13 - Baby Stacking rings
You need
Cotton print fabric
Fibre filling
Lightweight quilt wadding
Stiff card 15cm square
Buttons
Embroidery thread
Add 5mm seam allowance to pattern pieces unless stated.
Trace our circle template shapes onto the wrong side of right sides together fabric squares with pencil. Before cutting out, sew around both curves leaving the straight ends unsewn. Cut out the shapes with pinking shears to leave a 5mm seam allowance. Fold over 5mm at each open end and tack before turning the rings right sides out. Stuff the rings fairly firmly from both ends. Bring the hemmed ends together and oversew with tiny stitches to close up the ring. Add more stuffing if necessary before completely closing the seam.
Cut two pieces of 16cm square fabric and sew right sides together around three sides. Fold over and tack 5mm on the remaining side before turning right sides out. Slip a 15cm square of stiff card or plastic inside the pouch and add a firm layer of fibre filling on one side of the card. Pin and oversew the edges of the gap together to make a padded base.
Cut a cone piece from patterned fabric, fold in half right sides together and sew down the long seam. Fold up and tack 5mm around the base of the cone before turning out and stuffing firmly. Pin the base of the cone to the centre of the padded base and secure by oversewing the two pieces together. Add more fibre filling before completing the seam to ensure the cone stands upright.
Cut two head pieces from right sides together fabric. Stitch a dart in the top of each piece before matching up right sides together and sewing all round, leaving the straight edge at the bottom open. Clip curves and turn out. Firmly stuff the head, working well into the nose and top of the head but leaving the lower half of the head unfilled. Work your finger into the centre of the stuffing to make a well. Gather up the raw edge of the head with a small running stitch and secure. Push the gathered bottom up inside the well in the stuffing of the head so it can be slipped onto the top of the cone.
Cut two pairs of right sides together ear shapes and layer onto lightweight quilt wadding. Sew around the shapes leaving a small gap in a straight area. Turn out, fold in the raw edges of the gap and oversew closed. Stitch an ear to either side of the head, using the darts as a guide to placement. Add small buttons for eyes and stitch a triangle nose to the tip of the head with two strands of embroidery thread. Stack the rings onto the cone and top with the dog’s head to hold them in place
😊
lovely
I love this tutorial and I have made the donuts and head but cannot figure out how to attach the spike to the base 😢
Can you suggest a tutorial to watch for a newbie at making toys please 🙏
We don't have a suitable video for this but the way I did it (from memory) was to cover the base board, stuff the spike fairly full, then turn under the edges of the spike and pin to the padded side of the board at the quarter marks to make sure it was central, and then at the eighth marks, spreading the fabric out a little to form a circle. I then oversewed the edges of the spike to the base with small hand stitches, c x
Thank you for your reply. I managed to figure something out by doing almost similar to what you have suggested. The finished project turned out perfectly and I have a request to make a few more for a local nursery and friends children 😁
Please please please show us how to sew the head on the top 😢
Hello, was looking for the link to the pattern for the baby stacking rings.
Hiya, I'm afraid the templates are no longer free, but the entire pattern, including the head, spike and base are available from
sew-hq.myshopify.com/products/baby-stacking-rings-toy-sewing-pattern?_pos=1&_sid=c81d5acb6&_ss=r
hope this helps, c x
Ama hacer juguetes para niños ❤❤❤❤🎉🎉🎉🎉🎉
How to make the head and spike is there a video for them
No, sorry. The pattern pieces for them are in the template link and are fairly easy to make, just remember to only half stuff the head and then push the very long neck back inside the head so it can sit on the spike, c x
@@TheCraftsChannel thank you
@@TheCraftsChannel what channel are you on
@@shirleyelkins4230 I'm only here on The Crafts Channel, c x
Signed in as a new member. But still can't get the templates. Error message received
Sorry, I know the site is undergoing some maintenance. Have you been able to access it now? c x
@@TheCraftsChannelyes, but I never saw instructions for making the stand base, post with little pups head. My donuts are complete and they turned out pretty nice, thanks to your instruction.
@@dianeharmon5536 Luckily, because I never bin anything, I have the original instructions that were in the magazine. They're a bit long winded but hopefully they'll help you x
M&ST 13 - Baby Stacking rings
You need
Cotton print fabric
Fibre filling
Lightweight quilt wadding
Stiff card 15cm square
Buttons
Embroidery thread
Add 5mm seam allowance to pattern pieces unless stated.
Trace our circle template shapes onto the wrong side of right sides together fabric squares with pencil. Before cutting out, sew around both curves leaving the straight ends unsewn. Cut out the shapes with pinking shears to leave a 5mm seam allowance. Fold over 5mm at each open end and tack before turning the rings right sides out. Stuff the rings fairly firmly from both ends. Bring the hemmed ends together and oversew with tiny stitches to close up the ring. Add more stuffing if necessary before completely closing the seam.
Cut two pieces of 16cm square fabric and sew right sides together around three sides. Fold over and tack 5mm on the remaining side before turning right sides out. Slip a 15cm square of stiff card or plastic inside the pouch and add a firm layer of fibre filling on one side of the card. Pin and oversew the edges of the gap together to make a padded base.
Cut a cone piece from patterned fabric, fold in half right sides together and sew down the long seam. Fold up and tack 5mm around the base of the cone before turning out and stuffing firmly. Pin the base of the cone to the centre of the padded base and secure by oversewing the two pieces together. Add more fibre filling before completing the seam to ensure the cone stands upright.
Cut two head pieces from right sides together fabric. Stitch a dart in the top of each piece before matching up right sides together and sewing all round, leaving the straight edge at the bottom open. Clip curves and turn out. Firmly stuff the head, working well into the nose and top of the head but leaving the lower half of the head unfilled. Work your finger into the centre of the stuffing to make a well. Gather up the raw edge of the head with a small running stitch and secure. Push the gathered bottom up inside the well in the stuffing of the head so it can be slipped onto the top of the cone.
Cut two pairs of right sides together ear shapes and layer onto lightweight quilt wadding. Sew around the shapes leaving a small gap in a straight area. Turn out, fold in the raw edges of the gap and oversew closed. Stitch an ear to either side of the head, using the darts as a guide to placement. Add small buttons for eyes and stitch a triangle nose to the tip of the head with two strands of embroidery thread. Stack the rings onto the cone and top with the dog’s head to hold them in place.
Is there a pattern with the different sizes?
Yes, there is a link in the description under the video, c x
Divina gracias mi mamá ya empezó a hacerla sms hacer juguetes p