Coffee/Tea dye paper: Mass-make stunning journal pages with stencils. WITHOUT plastic lace.

Vložit
- čas přidán 28. 06. 2024
- Tutorial: Coffee-tea-stained-papers! Plastic lace alternatives. Mass Make in Limited Space. How to get crisp fantastic results using multiple stencils in the layering way in a tray.
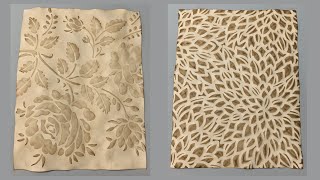
Welcome everyone and discover the secret of how to achieve these stunning decorative paper results. Get multiple impressions in limited space WITHOUT plastic lace.
**Please note this is an in-depth presentation. Time stamps are provided, please see below.
TIME STAMPS
0:00 to 44:13 In-depth information on the method and process and everything you need to know
2:24 to 4:28 flip through of papers showcasing the results
44:13 Tutorial begins
1:04:26 Bonus tutorial
**Additional points to mention for clarification: Australia measuring cups, I am told are different to American measuring cups. I use metric cups of water, so you may need to google for the conversation equivalency in your region. I am not sure if this is helpful nor how accurate this is but 1 metric cup is 237ml but this may vary. I suggest a cup that you use for measuring your cooking recipes and stick with that regardless of what country you reside in.
**the little spray bottle tinted with blue shown in the tutorial is watered down acrylic generic blue paint.
The tutorials shown were recorded on two different dates, the first on the 14 march 2024 the 2nd on the 9 March 2024 the flip through were recorded on the 17 March 2024
Thank you for joining me on my in-depth show and share tutorial, your kind support is much appreciated. Please subscribe; share this link with others to join us here and please link this video when using this method on your own channel, your help and support in this way is greatly valued. Thank you.
#junkjournalpages #coffeedye #massmaking #junkjournalsforbeginners
Helpful tutorials mentioned:
Coffee-tea staining in limited space with plastic lace.
• Coffee, Tea Dye Staini...
Plastic Lace alternatives
• Part 4: Plastic Lace i...
Introducing: Coffee/Tea dye staining in limited space, the fast track way, in a tray.
• Introducing: Coffee/Te...
Find me here...
www.etsy.com/au/shop/Medieval...
/ @medievalmirage
/ @medievalmirage
I am not sponsored for any of the items I am featuring, I am just sharing what I like to use.
I was unable to find links for all stencils, these were the only ones I could locate...
www.ebay.com.au/str/scrapmatts
www.ebay.com.au/itm/272631923...
www.ebay.com.au/itm/274377520...
www.ebay.com.au/itm/275399706...
www.ebay.com.au/itm/272631923...
www.ebay.com.au/itm/272691818...
While waiting for this video tutorial to load on YT I discovered that Juanette has done a great tutorial on using stencils but just one layer for those who do not want to do a lot of paper staining. Here is her link.
Juanette's crafting corner
How To Achieve The Best Coffee Stained Paper
• How To Achieve The Bes...
Beautiful music: by Alexander Nakarada
Music: Planning by Alexander Nakarada (www.creatorchords.com)
Licensed under Creative Commons BY Attribution 4.0 License
creativecommons.org/licenses/...
Patreon (/anakarada) or CZcams (@anakarada)
All videos and content are created by Jarf of ©Medieval Mirage and thus copyright law and ownership applies. The material and communication in this presentation is protected by Australian and International copyright laws. Reproduction and distribution in any form without written permission of ©Medieval Mirage is prohibited. Copyright © 2017-2024 Medieval Mirage: All Rights Reserved. - Jak na to + styl


Thank you for watching. Please note this is an in-depth presentation. Time stamps are provided, please see above in the show notes. Additional points to mention for clarification: I use metric cups of water, so you may need to google for the conversation equivalency in your region. I am not sure if this is helpful nor how accurate this is but 1 metric cup is 237ml but this may vary. I suggest a cup that you use for measuring your cooking recipes and stick with that regardless of what country you reside in.
Thank you so much for being the voice of grace and kindness amongst the vitriol. I don’t know how you do it but it is much appreciated 💕
46:20 the actual stenciling and technique begins for those who don’t have a long attention span.
Where is the rest of the stencil process shown?! Wet them with coffee… layer between many coffee wet sheets… bye guys thanks for watching!😂
Thanks for the reminder. I had meant to add Time Stamps but it slipped my mind.
Great video. Please ignore the negative comments. You spent alot of your valuable time giving us an in depth view. Everyone should know how to fast forward to where they want to be.
Hi Patty, what a darling you are! Thank you so much for your heart-warming support it means so much. I appreciate you! Many blessings for your kindness.
@@medievalmirage you're welcome 😊 🤗❤️
Ignore the negative nellies. They can’t be happy unless they’re putting someone else down. Loved the video and how you took the time to explain the process. 💕🥰💕 Hugs
Couldn't agree more about negative people. I also loved the video.
Thank you! For those who find the video too long are probably those who do things their own way... For those who are learning, and want to see the full process, this is excellent. I started with using your process, for coffee dying, and continue to use. I appreciate you sharing what stencils you use, how you store them, etc... very thorough, and much appreciated!
I love your digital kits, I don't know why I didn't think to look for a CZcams channel. I so enjoyed your video. I have used stencils during coffee dying but I was underwhelmed with the results for the effort. I can't wait to have go at your method. Thank you for sharing. Xxx
Thanks for a very informative video! Just to share a couple of ideas: I sometimes place the border stencils (tall and slim stencils) to the right or left of the pages to get a ' blank but colored' center writing area... I have also used this method to dye pages in other colors using diluted food dyes ( like easter egg dyes) - worked well, gote clear but soft colors. And, adding a dash of mica powder can also make some pretty softly blingy pabes... 😊
Beautiful papers!! People might not think about plastic placemats for the kitchen table. Before I finally found all of my plastic table cloths, I found gorgeous placemats. They’re usually out at Thanksgiving and Christmas. I have a LOT of gold, red and white ones. Some are large round ones and others are rectangular shaped. I love my place mats and use them all the time when dying papers. ❤❤
Thank you so much Amber. I am so happy you are nicely set up with plastic table cloths and pretty plastic placements, I am sure you have the most beautiful results. Thanks so much for watching and sharing.
This is the exact information I’ve been searching for. Thank you so much for your knowledge and tips. I’ve been wanting to create my own papers and you go into the depth I needed. Ignore the negative. You are so kind. ❤️❤️❤️
Your papers turned out so beautiful Jarf! It was fabulous to see your beautiful smiling face as well. I hope all is well with you. Hugs, Amy❤️
Oh Amy, hi gorgeous! Such a huge honour to have you here. You have made my day!! Thank you sooo much!! Hope you and your darling loved ones are well. I have been meaning to message you in Etsy Convo to see how you are doing and catch up. I will do my best to be in touch soon. Thanks again for your kind comments. It means so much. Huge hugs with tons of well wishes. Xx
Amazing tutorial - I learned so much and you're calming nature is easy on the soul- thank you much for such clear, well thought out , directions.. incredible !
Thank you so much for your most beautiful comments. I am so happy this was helpful. I appreciate your kindness and support so much. Best wishes with gratitude.
How happy am I to have come across a video by you. I have never forgotten you lovely lady. I love the idea of this video, after all these years I am still too frightened to try and coffee dye. I think I might give it a try now as I have a huge selection of stencils, especially since I found Temu!!!. Hope life is treating you well and thank you for sharing your knowledge. Rose.
I to have wanted to try this method for so long, She’s made it look so easy. also you mentioned Temu. 🙌🏼 ❤ lol not heading over to the site to buy stencils now. 😂 can’t wait for that rabbit hole, wonder where I’ll end up. Stencils, Stencils, Stencils, Stencils. 😭
Hi there lovely Rose, so great to hear from you and have you join me here. Thank you so much for your kind comments. I am so excited you are going to give this a go, with your huge selection of stencils. Yay! You are going to have the best time. Best wishes with hugs.
@@angeldust12 I wish you well in giving this a go. Thank you so much for watching.
Absolutely gorgeous! 🌹❤I can't dye for myself anymore - having CRPS & I'm also rheumatic - wont allow me to sit in my studio for more than 20 min - time has totally changed me from independent to almost needing help for everything. I miss this so much.
Hi Jarf - you are so sweet ! Loved your intro ! so happy to see you today.
Even more excited about this video.
I could have watched this video for hours. I so enjoy how you go through each “chapter “ if you will - even the serving trays were so helpful.
I do have so many of these larger stencils I love them .
I’ve used them when I do my gold water color dying . However , one at a time ! A true labor of love .
This is amazing !!
I love how every piece is so unique. No 2 are exactly alike . Thank you , so very much for your time in creating this video.
Wonderful visiting with you. I’m happy that I’ve not yet printed my latest kit of yours yet. These will make lovely additions to my journal. Thank you for the bonus video xx Enjoy your weekend happy crafting xx
Hi dear Cheryl, thank you so much for your darling comments and for always being so kind and encouraging. Your support is always deeply valued. I appreciate everything you said and shared. Thank you so much. It has warmed my heart greatly. Wishing you well and every happiness. Xx
Wonderful tutorial Jarf, thank you for sharing your knowledge! Your papers are delightful. 💖💖💖
I really appreciate your kind comments. Thank you so much.
Thank you for all the information and your video to showing how you achieved these gorgeous dyed results. There are so many ways to dye papers that I like to watch different videos to see their special tips and take from them what I find useful or what method I might want to give a try with. Your process looks like I could get good results with so I’m hoping to give it a try. I really like your mix of the coffee and tea together because I don’t like the deep brown from coffee but the tea can’t come out quite yellow. I’ve been thinking of mixing them too and now your video has confirmed my hunch to give that a try. I’m in the US and I’ve also seen where vinyl placemats or table runners with an open weave design can be used like the plastic lace as well. I appreciate all your explanations and video tutorial and now I have a few more tips to make my paper dyeing even more successful. Happy crafting! 😊
Absolutely beautiful, thank u for sharing. I can’t wait to try this out.
P.s the oxidation on those images were gorgeous. 😍❤️👌🏼
Thank you so much for your lovely, heart-warming comments. I wish you great joy trying this out. Best wishes.
Hello sweet friend, what a great surprise and it made my day. It’s been awhile. So happy to see you and share this time together. Be sure to watch my latest journal using one of my favorite digital of yours. It’s gorgeous and filled with lace. Hugs
Hello gorgeous Char, wow, thanks so much for being here and cheering me on. Your support means so much. I hope all is well for you and your loved ones. Thank you for letting me know about your latest journal, sounds wonderful. Thank you dearest. I am so looking forward to watching it and the magical things you created. Huge hugs coming your way. PS. Once I get to watch your DTP, shall chat with you over at Etsy.
Such a helpful and lovely way to coffee dye papers. Thank you so much for sharing this tip with us. Hugs to you Jarf. Also, thank you so much for adding the link to my coffee dying papers. I'm amazed that that is my most watched video of all time.
Hi gorgeous Juanette, what a pleasure to have your beautiful company. Thank you so much for your sweet support and kind words. Yes, I had to mention you....my upload for this video took so long, i opened up another window and scrolled through your tutorials and was thrilled to find and watch your coffee dying papers. It is brilliant and worth every view and so I had to share your talent with my dear subbies and viewers. You deserve the praise. Thanks again!! Huge hugs to you dear Juanette and of course Miss Fiona. Xx
Dear Jarf, I loved how you revealed the fruit of your labours in the beginning before going in to the process, that way we didn’t have to wait and see the beautiful results. Your small space techniques are greatly appreciated. I don’t have many stencils but I use the plastic lace method you showed us to tea dye my paper all the time, because even in winter on a sunny day I can sit the container out on the lawn and have perfect papers at the end of the day.👍🌏
Thank you for sharing this technique. I hadnt considered using stencils during the coffee/tea dyeing process. You had some beautiful images. ❤😊
Hello Jarf, beautiful coffee/tea stained patterned papers. So nice to see your smiling face. I pray that you are doing well. Thanks for sharing your time to show your inspirations. Take care and God bless you and yours. Sincerely Becky B from Arkansas
Hi dear Becky B, you are always cheering me on with your beautiful support. It means a lot. Thank you so much.
Hello Jarf, so happy to hear you! I absolutely love this idea,thank you so much for sharing! Hope you are doing well,have a wonderful day!🤗💜🌻💕
Hi dear Diana, so lovely to receive your heart-warming comments and sweet support. Hope you are well. Thank you so much. Warm wishes always.
@@medievalmirage 💜🌻💕
Hi Jaff so happy to see you today.
Even more excited about this video.
I could have watched this video for hours. I so enjoy how you go through each “chapter “ if you will - even the serving trays were so helpful.
I do have so many of these larger stencils I love them .
I’ve used them when I do my gold water color dying . However , one at a time ! A true labor of love .
This is amazing !!
I love how every piece is so unique. No 2 are exactly alike . Thank you , so very much for your time in creating this video.
Wonderful visiting with you. I’m happy that I’ve not yet printed my latest kit of yours yet. These will make lovely additions to my journal. Enjoy your weekend happy crafting xx
Hi dear Cheryl, thank you so much for your darling comments and for always being so kind and encouraging. Your support is always deeply valued. I appreciate everything you said and shared. Thank you so much. It has warmed my heart greatly. Wishing you well and every happiness. Xx
Hi Jarf ❤ thank you so much for this timely video with gorgeous results! I will be doing this right away 🎉 Lots of fun! 😊❤️🤗🎊👏🏻
Hi gorgeous, so lovely to receive your heart-warming and kind comments and beautiful support. I appreciate you. Enjoy dyeing your papers with stencils. Xx
Good morning Jarf. Thanks so much for this great video. I will be trying this method. ❤
Thanks so much Beverly. Most kind of you.
Too funny, I just put out a video of me coffee and avocado dying paper sharing how much I would LOVE to find some one that could teach me how to do all those wonderful designs and two days later, here you are! Yeah!!!! By the way, I purchased your two latest kits. So beautiful! Thanks so much for sharing! God bless you!
Oh wow, how amazing is that! Thank you so much for your wonderful comments. I am so thrilled that this fits what you were looking for. I hope you have the best time with this method. Thank you so much for your support and sweet words regarding my kits, you are most kind. Best wishes in all your endeavours.
@@medievalmirage Of course! Welks!
I loved it all ! Thank you for the details!❤❤
Thanks so much Brenda. I am so glad you enjoyed it so much. I really appreciate your kind support, with warm wishes.
How do you dry so many pages. Loved this tutorial, the pages look very medieval, Lovely.
Hi Debbie, thank you so much for your lovely comments and kind words. Regarding your question, the papers remain in the tray and they dry in the tray. It is true that drying time is slow this way, but in summer the tray can be left outside and brought in at night and in winter, safely place the tray in directional heat and as the top layers dry, they pull away from the rest of the papers in the tray, you peel those pieces off and stack those dry pieces on your craft table, and the same will happen to the next layers. So continue to follow that process until the air drying process is completed. Hope that helps. Thanks again for watching and for being so supportive. Best wishes.
They look stunning!
Thank you. I loved your video. It’s truly inspiring and creates beautiful results.
Hello there, thank you so much for your lovely comments. I appreciate so much your kind words and for watching. Wishing you well.
Wonderful method for getting amazing mass quantities. Thank you for all the detail. Be especially blessed for sharing your time and talent. ❤
Hi Jarf, thank you so much for this new version. I will try it and pop the trays in front of my heat pump. Winter is biting in New Zealand. 😊
😂 I was shocked when I read your post, then I had to remember the earth is large and I am in Texas and our seasons are opposite.
Hi there Marlene from NZ. Thank you so much. Love NZ, best place on the planet. Melbourne's weather gets pretty cold. Though I can imagine if you are from the South Island, it would certainly be extremely bitingly cold. Thank you so much for your lovely comments. Stay warm and enjoy your stencil dyed papers. Best wishes.
So so inspiring my mind is almost racing from the possibilities. I am going to try old book pages with stencils
Hello Jarf 💕
Such a beautiful share thank you for doing this I so appreciate it. Hope your week is going good, take care. 🤗Big hugs
Thank you. You are most kind. I appreciate your supportive comments. Wishing well with hugs in return.
Very helpful. Thank you.
Just beautiful. Love these
Hi Tammy, thank you so much for your kind comments. Wishing you well.
Thank you so much for your time and effort- great info❤
Thank you for your video.
Thank you for watching.
Thank you.
❤❤❤awesome - thank you❤️❤️❤️
Thank you so much for your wonderful comment. It means a lot.
Great to see you back. ❤❤❤❤❤
Thanks dear Lucy. Hope you are well. Thank you for your wonderful support. Xx
Thank you for taking the time to sharing great information it was very helpful enjoy your day .....
Guuurl! That is very cool.
Thank you so much.
These are beautiful 🎉
Hi Diane, thank you so much. Wishing you well.
Your papers are wonderful, thank you for the tutorial🥰
Thank you so much and thank you for watching.
Thank you for sharing and I truely appreciate the time and effort you put into this. 💕🌹. I can’t wait to try your method and see the results 🥰
Hey Jarf so glad to see you back, love this idea and will definitely give my stencil a try, next time I coffee dye my papers 😊😊 thank you so much for taking the time to share 😊😘😘❤️🇨🇦
PS. please don’t listen to the negative comments unfortunately we can’t fix broken people 🤦♀️🤦♀️
Love you and your videos 😘😘😘 see you at your next video 😘😘
Thanks so much for sharing your process. I needed this! Already experimenting with some index cards. 😂❤
Wow!! This is AWSOME. Thank you. i am going to try this. Wish me luck. I love your work❤
Wow Jarf, these are gorgeous.... reckon I will try this and cross my fingers... hahaha... thanks for sharing Lovely... Sas. 💜
Hi sweet Sass, thank you so much, you are such a delight! You always make me smile and laugh. Warmest of wishes Xx
beautiful. have you tried using lace fabric? i was wondering if that would work? thanks for sharing your talent and knowledge
Thanks so much for your sweet words and support. Yes, I have used lace for my coffee/tea staining but it was a while ago. Sometimes it works sometimes not, it depends on the design of the lace. Lace trims work best especially if they have defined perforation. The great thing is, you get aged vintage looking lace and coffee stained papers at the same time. Thanks again for your thoughts and suggestions. Best wishes with appreciation.
So happy to see you my friend! What a great video! I am now in such a small space, this is right up my alley! They turned out beautiful! hugs! xo Deb
Hi dear Deb, so lovely to have you join me here and for your kind comments and heart-warming support. I am glad this method will prove helpful in your new living arrangements. I wish you the very best in all endeavours. Huge hugs in return. Xx
What do you think about adding a little baking soda to the tea or coffee solution to mitigate the acid from the solution? Beautiful results! ❤
Hi there, thanks so much for your kind comments and your suggestion. I appreciate your input. It is true that some people do use baking soda, but I never have. I have been coffee/tea dying papers for more than ten years now with no baking soda and it has not harmed or hurt the papers in all that time. Thanks again with best wishes.
What beautiful results! I would have liked to see you unwrap the dyed paper stacks, however. How long did they take to dry?
Thank you, this how i do it with plastic lace. I don’t have any stencils large enough.
Hi Lucy, lovely to have you here. Yes, I too use this method also with plastic lace having done so for many years however since so many haven't been able to find plastic lace, it was time for an alternative. As mentioned in the video, little stencils can work well too. Take care dear Lucy.
How do you dry them? So many would seem to take a lot of space?
Hi there, thanks for your question. The papers remain in the tray and they dry in the tray. It is true that drying time is slow this way, but in summer the tray can be left outside and brought in at night and in winter, safely place the tray in directional heat and as the top layers dry, they pull away from the rest of the papers in the tray, you peel those pieces off and stack those dry pieces on your craft table, and the same will happen to the next layers. So continue to follow that process until the air drying process is completed. Hope that helps. Thank you.
It's me again Jarf, these would make another great digital for your Etsy shop. I'd buy the other tea/coffee etc background pages if I could. I'm sure these would be best sellers also. Just a thought for you. God bless. Becky B
Hi Becky, I really appreciate your kind input and suggestions. You are so encouraging. Regarding turning the papers into digitals for my Etsy shop, i like the idea, however, I have a feeling this could encroach on the copyrights of the stencil designers. Thank you anyway dear Becky. Best wishes with hugs.
Just ran across your very informative video. I am just wondering why you have coffee and tea together in your brew? TFS
Hi there, thank you for watching. With regards your question, I really love the colours of the two combined. It is a nice rich warm colour. Coffee on its own at times has a cool tone. Tea has a warm tone but the coffee adds depth and so the two work well together. Thanks again and best wishes.
@@medievalmirage Good to know I think I will give it a try.
So happy to see you Jarf. I really enjoyed watching your method. I am excited to try this. TFS🌴💕Many Blessing.
Hi Annette, you are always there with your generous support. I appreciate you so much. Hope all is well for you. Best wishes with hugs.
Ich ärgere mich über viele der Kommtare hier: Wenn ihr Euch an der Länge stört - warum schaut ihr das Video dann? Seid einfach froh, dass jemand sein Wissen mit Euch teilt und meckert nicht über die Form der Wissensvermittlung. Das finde ich absolut frech und respektlos.
Danke für diesen Wissensschatz 👍😍
Kind greetings to you! Thank you so much with deep appreciation for your beautiful support. Your kind comments give me strength. Many blessings for your kindness.
Ich denke genau so wie du !
Love your results. Please share what you added for blue coloring at approximately 1:06:00
Yes- I was wondering that as well!
Hi Sharon, thank you for your kind comments and for watching. I apologise for not being very clear, but the colour blue was just watered down acrylic blue paint, just a generic brand. Thanks again.
@@kathyanstine4472 Hi Kathy, I apologise for not being very clear, but the colour blue was just watered down acrylic blue paint, just a generic brand. Thanks for watching.
So with the stencils do you just wait 3 days for all the paper layers to dry out? Do you put them in a low oven (as I do for regular coffee dyed papers) for an hour?
Coffee stain papers… layer in some stencils…
What’s the NEXT few steps?!?
Can you show what happens from wet stencils stacked inside papers to the dry finished products?!
❤❤❤ EXACTLY !!!! FOR SURE !!!! I AGREE WITH YOU ❤❤❤
This was my very first video that was sooo boring ❤❤❤. I've watched countless videos. This was also my first time seeing, your video---- O M G LADY !!!!! TRUTH BE TOLD !!!!
Hi LegoStar. Thanks for your questions. The coffee/tea dyed papers remain in the tray to dry. In summer, I take the tray outside and bring it in at night, it can take one to two days to dry this way. In winter, inside a heated room, the papers in the tray can take up to 3 days to dry. I peel off the papers that are dry at the top of tray and continue that process, until they are all dry. I never use an oven. So yes, coffee stain the papers laying stencils in between and that is it. They sit in the tray until they air dry. I will keep your suggestion in mind for next time. Thank you.
👍
so, do you leave them in the trays untl they completely dry? How long does this typically take?
Wounderful your paper❤🎉😊how long must the paper stay in the Coffee?? Greatings from Nici
They stay there until they dry. Remember, she said don’t even check on them until they are dry.
Bonjour! I would love to try this process, but I am sadly allergic to coffee. Even the smell is nauseating to me. Have you tried dyeing the papers using alcohol inks?
Bonjour!! Lovely to have you join in watching this video. Thank you so much for your kind comments. I am sorry you are allergic to coffee. The good new is, that you do not have to use coffee at all! Use only tea and you can make a light brew or dark brew, or both. You can use the dark brew in the spray bottle and light brew in the dipping tray. You will still get great results or you can add a bit of re-inkers. The ones I like are “Coffee” by Ranger or Ranger's “Vintage Photo” to add an imitation coffee colour. But please be careful as the ink is highly saturated only add a single drop at a time, and build the colour to your preference slowly. Keep doing tests with strips of white paper to get the right colour and tone for you. Don't forget to write down the amount you put in, how many teabags, how much water and if using re-inkers how many drops. I hope that helps. Alcohol inks work in such a unique way and thus I haven't gone down that path...but maybe one day. Thanks again with best wishes.
Beautiful stained paper! I use stencils too! However, I dry halfway in my oven, with very low heat, with the oven door open, and for 5 min. I remove the stencil and let the paper finish drying and it works well. I also watch over my new stencils to make sure they can tolerate the heat. I'm sorry if you explain why, but I can't finish watching, is there a reason to dip the in-between pages other than just getting ghost-like prints? Would putting say baking paper in between prevent the need for 4-5 paper if someone didn't have that many to use? Thank you.
Question.... can you decoupage with these? Maybe have to seal them first? Just a thought?
Hi, why do you add just a little bit of coffee in your dipping tray rather than the whole pot at one time? And also, what is your blue dye? Is it just watering paint? First time watching your channel and I’m addicted. Thank you for making my day.
Hi Sandy, I am touched that my video made your day. You have made mine with your kindness. Thanks so much!! Regarding your question, where i was filming this video, I didn't have much bench space, also the tray I was using wasn't very deep and as I didn't want to make a mess and get liquid everywhere, I only added a bit of the brew in the dipping tray. The blue dye I used was actually watered downed acrylic paint. Thanks again for your encouragement. It means a lot. Best wishes.
Hi do the trays need to be plastic or can you use old cookie sheet
Thanks. Do you take them out to dry them or leaVe them in the tray?
I believe she said not to touch them, or rather not to even peek at them, but rather to let them be. The only way you can disturb them. She says, is to drain off excess coffee if you need.
Drying time will vary 😅 depends on your paper thickness, how much liquid is in the tray, and of course local air temperatures. If you have the patience to leave them in the tray they will get a better imprint... you can place them out in the sun (the whole tray) until they dry fully or partially ‐ your call as to the final effect you are going for... the earlier you ‐ very carefully - separate the pages, the lighter the imprint will be. You can also place the tray in an oven at very low temperature and check it back often Removing pages as they dry... This is not an exact science... ❤
Did you use instant coffee or regular coffee?
I've had good success with instant coffee. It was a bit expensive at the grocery store but found it at Dollar tree (in the US)
These are so very beautiful 😮 Wondering, how long does it take for you to dry your layered papers in the sun, or inside? Lovely! ❤
Also, with the utmost respect to you, I think it would have been good not to have so much talking, etc, before the tutorial actually begins. It was close to an hour of you literally repeating yourself. I mean no harm or disrespect. This is just an observation that I found myself very frustrated and finally speeding up the video. It could cause many people to abort the video before getting to the meat of it.
Thank you so much for your kindness in sharing this. ❤
Thank you so much for your kind words and for being very respectful. I appreciate your input because it is so constructive and I will keep your pointers in mind for next time. I have a lot to learn, so thank you. Regarding your question in the summer it can take one to two days. Inside in a heated room in winter, up to three days. Hope that answers your question. Best wishes.
What kinds of paper have some of you used? And which do you think gave the best results? Has anyone used a sealant? ModPodge? Spray? Polycrylic? And which worked well for you?
I use plain Copier paper. No need to seal it. You'll love the results
If you don't like it don't watch it. Your rudeness is offensive.
Thank you so much for looking out for me, Patty. It is true, such comments are disheartening but it is ones like you that help mitigate and dilute them. Thanks again for your sweet support. Best wishes to you.
You are a delight but you made this video too long. The how to should be straight to the point on a separate video. And all this 50 minutes of an intro should be a tips video. Way too long to get to the point.
Hi Maria, I acknowledge your point of view and shall keep your tips in mind for next time.
Maria, perhaps you don't realize that your tone comes out as complaining and insensitive in English? Many people who are new to this process DO like the detailed explanations. For you I suggest playing the video at higher speed (using the gear icon youtube offers at the upper left of the page).
How about fast forwarding???
@@831Miranda was this message for you? No. She posted and left comments open. Did I insult her artistic abilities? No. She’s amazing. People are allowed to comment good or bad. When I direct a comment to you, then you can complain. And of course I fast forward. How else would I know there was nearly 50 minutes of yap.
@@marlenegura1161 how about being original in your comment? You can see hours before you someone commented the same. But you just had to be noticed. Raised hand, look at me look at me.
How do you dry them 😂
They dry on their own in the tray... slowly... hope this helps.
@@sassyh154 Hi gorgeous Sas!!! What a delight to have you here, hun..you are spot on! Thanks heaps for clarifying and answering on my behalf. I appreciate you so much! Xx
Hi Lisa, hope Sass was able to help you out with your question. Now here is my longer explanation just in case you require it...
The papers remain in the tray and they dry in the tray. It is true that drying time is slow this way, but in summer the tray can be left outside and brought in at night and in winter, safely place the tray in directional heat and as the top layers dry, they pull away from the rest of the papers in the tray, you peel those pieces off and stack those dry pieces on your craft table, and the same will happen to the next layers. So continue to follow that process until the air drying process is completed. Hope that helps. Thank you.
your video keeps losing sound !!!!
Thanks so much for pointing this out. I was having issues for some strange reason. Thanks again.
Wow! Great technique! Could have been a 20 minute video, though. Really didn't know if you were ever going to get around to showing how to do the project. A hour's worth of just talking almost made me turn it off.
Thanks for appreciating the method and for sharing your point of view. I shall keep your points in mind for next time.
This video could have been cut in half..too much talking..just get to the tutorial
FYI the little red ball on the red line, at the bottom of all vids, can move you forward in the video to a place you may wish to watch. It isn't hard to do and you may even be able to master the technique so you don't have to complain.
You can even click on the time stamps which takes less then a few seconds to complete.
I disagree. I am glad that she has taken the time to explain each step and why she's suggested doing it.
Tried this yesterday did not work
Beware ladies American and Australian cups are not the same.
Thank you for the warning, Lucy. I have mentioned it in my pinned comments.
How to starts at 44:14. For anyone that wants to get straight on without the endless yap.
Die Idee einfach Vorzuspulen ist ja nicht schlecht, aber warum musst Du so beleidigen dabei sein? Den Begriff "Gejammer" finde ich ziemlich frech und respektlos. Anstatt das Du Dich darüber freust, dass sie Dich an ihrem Wissen teilhaben lässt.
@@ekiemunakit1470 eat a sausage
@@MariaRamirezSpainyou sound nice 🥴
@@shawnmurray9964 thank you beauty.
I can’t find your channel?
Please get on with showing how to do the staining…. To much talking !!!
Du bist echt unfreundlich. Wenn es Dich nervt - Warum schaust Du es? Ich verstehe Dich nicht und finde es auch ziemlich respektlos.
Es ist allein ihre Entscheidung wie sie ihre Videos gestaltet!
Es ist ihre eigene Art ihr Wissen zu vermitteln und ich bin sehr dankbar dafür. Danke 😍
Too much bla bla bla
Warum schaust Du es dann? Warum musst Du meckern? Sorry, ich verstehe es nicht und ich finde das ziemlich respektlos. Nur mal so zum Verständnis: Was bezweckst Du damit?
Please post your channel so we can see how it’s done?
1st time watching ur video. I like long videos. Except it took 25 minites to get to the point. 😢 had to fast forward thru most of video.
Your intro is 50 mins long....that's way too much yapping
Perhaps you should go watch something else instead 🤔
You can select a higher speed to play the video, use the gear icon that appears on the upper right!
I can’t find your channel?
@@reginaeid1568 if you're looking for janicemunn4123 it's not worth the effort imo... all she has is a shamefully long playlist of trashy music... can't imagine why she lingered on sweet Jarf's channel at all... maybe she just enjoys being critical
Thank you for this comment. I was already about 20 min. in, impatiently waiting for the process to begin. Once I saw your comment, I fast-forwarded to 50 minutes to skip the unnecessary blab.