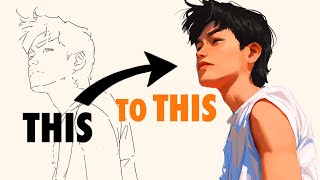
Quick Shading Tutorial for Beginners

Vložit
- čas přidán 8. 09. 2024
- Here's some quick tips for shading (shading skin) when doing digital art, aimed for beginners.
#Shorts #Art #arttips
I make digital art, mostly digital paintings. Follow me here:
Instagram: / ronillust
Twitter: / ronillust


If I had known that this would blow up I would have drawn the face better.
That's actually a great tutorial! Thank you.
No problem, it’s still great 🤧🤧🤧✨ thanks so much, it’s really help me alot!!
Ok
Pfft- no worries, it's still way better than my art. I always seem to forget that shading like this is an option
plss the face looks great!!
Quick tip:
If your light is warm, use cool shadows.
If your light is cool, use warm shadows.
Thank you ,it was very helpful
Edit:It is*
ah thank you so so much
sometimes yes however a lot of professionals actually go against this tip since it's not how light works.
it depends on the atmosphere you're trying to create. contrasting shadow colors tend to make things more dramatic looking. If you want a softer look you should consider having the same type of colors throughout.
just my experience. it doesn't mean you can't follow this rule even if you want a softer drawing- but you should always consider your overall tone too when making color choices.
Why did i think of light and shadows with sunglasses
“Shading for beginners”
*makes a masterpiece that does not look easy*
It isn’t about the drawing itself, it is about the shading. All though the drawing is good, the shading is what is important too.
pretty sure this shading technique is applicable no matter what you draw lol,,
but i get the joke
I can make something like that on paper but I don't think I am good enough to do it on digital yet
that's not masterpiece, that's just basic fundamental drawing
It does look easy tho.
No Long introduction
No Overly Described steps
No 10+ Minute video
Very short and instantly on point! Perfect!
thank you!!
exactly most tutorials out there are 90% talking and 10% demonstration which you already know
@@ronillust also, I love how you don't spend a huge amount of the time chilling out artists that they choose to do something different or don't follow your way. You were just giving the suggestion, which I love! There's too many artist gurus on the internet who like to act like they know everything about art, while you were just giving tips for those who are interested in changing how they shade!
A lot of the time, the 10+ minute videos are where you learn the most
@@aranyak1881 Yea, learn to filter "under 4 minutes"
This video in two steps:
1. Choose a brush
2. Everything will naturally color and shade it's self.
@@vivsiee r/woosh
The sad part is that some will actually believe thats how digital art is made
@@mikotheraskum2014 yeah especially when this video shows him just erasing the layer mask to reveal the colors he already put down lol
couldn't agree more. this video is pure shit. all the guy did was erase and show the shading that was already done
Guys check my art channel to❤❤
I love how this is basically a "how people think digital art is made" video with actual advice put over it
yeah
I mean, doesn't really help colors and layers pop in when there's no clear showing how it got there, but it is still helpful.
yeah, those people who think like that think that the art is already made and we just do a little bit of shading and whatnot😭
I see so many where they're just revealing what they drew instead of drawing it... It kinda pisses me off, though I understand the reasoning. It feels somehow deceitful.
@@KaizerHiwatari how is it deceitful? Lmao if you don't see the process do you assume its fake? Most artists who use traditional mediums don't exactly show their process either. Don't need to
When the shadow color also picks the eye color for you:
This is the most efficient shading tutorial ever
Yess
Love your pfp
Deku gei
I love how he said “I hope this was helpful” so kind
This 40 sec tutorial is much helpful than those 39 mins long tutorials
srsly all these popular artists just keep talking rubbish
even sam ...he's kinda one of most popular but his utube videos r useless
every1 is shifting 2 patreon🥺🥺
@@lepidussollertiaatheriusex7274 true :(
@@Suu.39 I MEAN WHO'S GOT THE HUGE MONEY FOR PATREON🥺🥺🥺🥺😭😭
ikr
@@izaabel sam.. ross ethan all of them have patreon now & none of them care about us people refering on utube😣😔
"Think of [the shadow] as another light source"
This is genuinely great advice to adopt an un-intuitive approach I would likely never have come up with on my own.
Bruh.... I didn’t expect a 42 second clip to explain it so nicely. Subbed.
Yes it was very nice indeed. He gave the main point and it was a quick explanation. Btw nice profile
Lmao you two have the same pfp just differently zoomed in
@@SBerrioww yeah they do xD
@@SBerrioww i was scrolling down the comment and gosh look what i found XD same profile
@@arviedark2881 ye I even thought he was replying to his own comment lol
Such simple instructions.... You are now my savior.
"If you draw on digital"
Me, a caveman who still draws on paper: *welp.*
*confused oonga boonga*
*stares at my 170 markers* i need more shades :') no but fr, most of these markers dont have a similar enough shade for me to shade with 😂 im suffering
I do both. I recommend following his steps but do it in reverse. I put the lightest shade down first and then slowly blend and darken the shadows. I don't add the other light source tho because I don't know how ;-;
@@miwrendi1457 i add the light first then figure put a decent color for shading and blend the best i can. But the problem is, i have 5 different brands of markers, so they dont blend well if at all
Me, a schyzoid painting on the wall:
I sort of understand but it doesn’t explain how to implement shading properly he legit colour a in a clip mask. 3 step to drawing an owl vibes
It was more about color choice than placement
This is very helpful!!!!! Thank you!!! OMG
I already subscribed after that "how people think digital art is made" and this just proves I made the right choice. Fantastic, to the point and uncluttered. Thank you brother. Resume.🔥
Wow!! So effectively explained ❤️❤️
agreed. he's the legend at creating short but super helpful videos.
Learning that shadow doesn't HAVE TO BE black/gray is lifechanging for an artist
For a newbie that is.
I suggest to use references.
Same object in different environments. Different lighting.
Once you can see and understand the hue and saturation change in light and shadow, it's makes a huge difference when you apply it to art.
Fr
This tip improved my digital art so much :)
my favourite part is when he erased the clipped layer over the shading instead of actually doing the shading on camera
Dude, I'm glad I'm not the only one that noticed it
Oh, I thought he was drawing the shading on a white layer with alpha locked
why would he tell/show you how to create his art, he gave you the tools not the blueprint, lord knows if he showed you his entire process you'd have your own copy of the same face and wont have learned how light works when rendering
@@jennywithaglock3916 this isnt how that works. If you copy it you get a feel for how to apply those ideas and how they act, you just cant learn if you continue copying/tracing. Please dont talk about things you know little of/dont understand well. (Theres a reason artists say to use references and occasionally break down photos into shapes by tracing over them to gain understanding you know)
@@sapphirepebbles8258 i do know, but this is a featureless face in stark lighting, the explaination could have used a sphere to demonstrate the exact same point, you can breakdown any image of a face and apply the teaching to your own drawing
More pls!!!!your tutorial are direct and easy to understand
The problem with the original drawing making it look muddy wasn't that it started from light and had shadows added. The problem was that the shadows were the same hue and saturation as the base color.
Its dont always need to be a different base color. But using different colors that fit the skin can improve the painting
Yup
You make it seem like he didn't talk about hue and saturation being part of the problem, but yeah I understand what you mean
he said that tho
Wooow really?????
PERFECT!!
Home boy has taught me more in under a minute than a 30 minute tutorial
Wow, This Is Very Smart, Well Done!
If CZcams had "Watch Everyday" tab, this would be it
You make it look soo easy
alternative title: drawing the most detailed Aang in 42 seconds
LMAO WHY DID THAT MAKE ME LAUGH AS HARD AS IT DID
Bro, that looks like someone that would burned someone's dog and then turned into a vampire
Dio if u don't get it
So helpful🔥🔥🔥thank you so much
I wish I could just erase layers and all the shading will be in the right place
same 😔
Yea i like how he took a pic from Instagram and make it his
@@TNY-dc7gt It's his drawing???
@@TNY-dc7gt the post on Instagram was under the same username, it’s his own drawing, just crossposted
@@jellii okay sorry i didn't see the name
This tip just helped me SO MUCH
It’s easier trying to figure out where the light would hit then it is try to figure out where the shadows would fall
Perfect tutorial. I hope all tutorials will become like this.
I also do this technique. I discovered it about a month ago while I was drawing a curtain and a house. Tip: using a gray or black color wont work well in shading. I prefer a darkish violet and set the opacity to like 70% or something. Im a newbie amd for other newbies out there you should def try this
Thanks!
I use it then blend out at the edges for the main shading. I also use more saturated versions of the base colors for more depth on hair and fur.
Dark violet. Got it 👍
Yeah I was wondering how he went over the eyes like that, it was the opacity lol
I mostly use pink for shading, but now that u mentioned dark violet I’ll try that now, thx!
underrated tutorial, i need this so much
It also work with traditional painting :)
Little hack for beginers that I learned in my color theory class at college :
Don't use mars black, prioritize a colored black. A colored black is a mix of a secondary color (made from two primary colors) and a primary color.
For exemple : A green (made with primary yellow and cyan) + magenta = a dark and deep slighty greenish grey.
That "black" is deeper than a regular black and reflect more light. It create a better contrast. If you add a drop of white, it become a colored grey.
There is a ton of colored black:
Orange+cyan
Green+magenta
Brown+ cyan
It really helped me!
Omg i'm amused of how easy your explanation was, and this helped me so much. Thank you!God bless your bro
Holy shit, a succinct drawing tutorial. Never thought I'd see the day.
Wow, the latter looks so much livelier!
Searching for copper and I found gold
Yo! This is actually so helpful!
I love these short tutorials but I can't get over the fact that he sounded like he was in tears by the end
"Think of it as another light source."
You have no idea how big of a difference this made.
_You're a legend._
You are incredibly underrated first of all, and second of all this helped a lot tysm! :DD
This is super helpful thanks. One of the best simple tutorials on how to shade a face.
It’s nice to see what Aang looks like as a teen😄
isnt aang like 100
@@sythepie yeah but we didnt get to see him get older in the show
@@bruh438 yeah true
Bro.... I love you, bro. Thank you.
Ahh thank you fellow swagapino 🔥🔥
Thank you sir, it is really helpful ✨
the way the drawing instantly improved when he added the warm light is just so satisfying to me
Incredibly helpful. Thank you!
Thanks!
You're welcome, I'm glad you find it helpful!
Yooo...tysm this helped me a lot
OMGG YESS TYSMM!! IVE WATCHED SEVERAL LONG VIDS ABT THIS BUT THIS SHORT TAUGHT ME THE MOST
Holy shit wow this bussin thanks for the tip
This is so helpful...
Why... why is your voice SO ATTRACTIVE
Underrated way to shade
Thank you for the video this was really helpful and also the way u explained it in such a limited time 👍🏽 looking forward for more
Bro just blew my mind 🤯🤯
I never thought of shading that way...
Thank you....
I wanna give this man a hug , THANK YOU FOR MAKING IT SHORT AND GETTING STRAIGHT TO THE POINT
OK THIS IS SO TRUE!!!!!!!!!!!!!! i will be using this technique
The thing is, your previous shading just had shading (no highlights or differences in the color of the brightened skin). But the second had multiple different lights and colors that you didn’t cover, but still claimed it looked better. Kinda misleading tbh
Note: I think that the information he provides is helpful for beginners, but it still felt misleading as stated above. So don’t assume I think what he’s teaching is bad advice, that’s not the point of my comment. Just felt i should point that out :)
What they wanna focus on is the color choice for the shading in general, and I didn't see them said the latter looks better. How is that misleading?
@@MonsterPlusArt I’m just saying that they use only flat colors for the first shading, and then the second is very defined with different shading styles and he doesn’t just add a different color to the shading, had also added highlights and other things. It’s implied that the first version is worse than the other, and it’s worse because he did more on the second than the first (but he says all he did to make it look better was to make it blue instead of a darker skin tone)
@@BixlsYT he said he did more on the second than the first. He talks about hues, saturation, bounce light, and techniques. I don't see where the issue is
Edit: It _is_ worse because he did less and treating the shadow as a base is also beneficial
@@chrono-glitchwaterlily8776 It just feels misleading because he doesn't really cover it, but kind of claims that all he did was change the shading color, when the second drawing's colors are completely different (minus the base skin color)
Edit: Replying to your edit: The point is that the first drawing is MUCH worse than the second due to the fact that the second uses multiple different shading techniques that he doesn't cover at all. The point of the video is to change the shadow color, but he does extra to make it seem like the shadow made more of a difference. Realistically, it would've looked marginally better; changing the shadow color doesn't automatically add different eye techniques and facial shading techniques.
@@BixlsYT well his video is "Quick shading tutorial for beginners" and even as someone who doesn't draw digitally, he still got his point across. I understand the concept of bounce light even without elaboration. I understand the significance of contrast, hues, and saturation without explanation.
He has implied that the changes in hues make a difference in the drawing, and they did. Sure, another example without the others added would've been nice, but even without it, you can see there's a difference in where the actual light lands. I mentally and physically translated both of them with the same hued shadow and I liked the second one more
The viewers understand the difference between the two. The viewers understand that it's not an accurate comparison, but it's less than a minute and who cares about accuracy. Point is that he got his point across. Even in his first video where he flipped the image, it was heavily edited. That's even more misleading than this one since he didn't even mention editing it until his second video. That's all made to bring his point across. Nobody gave him grief about it really.
He didn't even looked like he was drawing on it authentically. When adding the light source, you can see some parts where the brush didn't work on. When adding the shadow base, the eyes, which were a different color, was added the same way. Plus the bounce light effect he was talking about too
Plus he's never really that serious in his videos anyway and it has helped a lot of people.
Edit: replying to your edit, his video is named "Shading tutorial" for a reason. It isn't "Shadow tutorial" he was teaching the concept of light for beginner artists. It's been condensed into a fifty second video. He said changing the hues brings a difference, it did. He said adding bounce light was a good effect to add in, it did. He didn't do things without mentioning them like you implied. He just didn't do them on camera because he used his "render brush" which has been a running joke on this channel for a while now
SAITAMAAAAAAAAAA
also I love the shading tutorial!! ❤️🔥❤️🔥❤️🔥❤️🔥
why nobody is talking about how the hell on the earth he is working perfectly fine with that size of brush ?/
Because he's not drawing, but erasing layers to show already drawn ones
@@CLEARR-E- I am such an idiot 😶
Perfect tutorial. 40 seconds worth of information in a 40 second video, not wasting anyone's time. Thank you.
Shading for beginners: draws something that would take me at least a year to learn
??? I learned how to draw that in 4 months
Extremely helpful! Thank you for sharing.
Oh my god, I've been trying to learn skin shading for MONTHS, for YEARS! Only your video made me truly understand how to do it and man i think im going to do well :0c thank you so much for this tutorial!
amazing job on this, i cannot state that enough. your videos fill me with hope and knowledge of a free and just society that we must strive towards if we are to continue living on this planet.
This is why some people think digital art is made in less than 10 mins
edit: i am not begging for likes or anything but i didnt expect to get this much likes in so little time
Yeah, it took me 5 hours to draw a digital art and someone said "bro this is so ez i can make it in 10 mins" which pisses me off, they are probably people who never done any art
@@skittles12 thats sad! :(
It's not that easy but way easier than the traditional way... Just saying ...
@@LordADNsVlog no shit, they're mainly talking about the people who say it's no skill lol
@@skittles12 Hope you've kept drawing since that comment and not let other people discourage you! You know how hard (or not) you worked!
"I can do this in less than 10 min" then show me and teach me lmao, I worked hard on it and if I drew in a way that's not efficient, then show me how to improve
Keep up the work, everyone starts somewhere anyways there's nothing to be ashamed of if you take your time to do things!
I notice the difference now thank u very much
Okay, so just to clarify: you don’t have to be a beginner to have your own shading style. Sure some have better advice and quicker results, but there’s no need to say “oh you’re a beginner because you did this or that.” It is pretty degrading to artists when they’ve been drawing for probably longer than you.
I agree but this was just a meme
lol you're so mad
I mean yes but this isn't a serious video and in no way is an actual tutorial
thank you so much for this I actually used to shade faces like the first one that you mentioned ;-;
but now I understand :]
But this is not it. There are still things we need to learn in shading like changes in hue and saturation, not only the cool shadow. Actually, it depends on the environment if the shadow should look cool and the midtone to look warm. But this helps tho-
somebody not stupid for once wtf
Exactly. But newbies want instructions without nuance so they get immediate results.
I understand that, but practice takes patience.
@@ARandomEliatrope wdym?
I am guessing this is simplified so that people new at art don’t get confused and also, these shorts don’t last that long so they just wanted to get straight to the point.
Pretty sure this is mostly half joking since the “render brush” comes from another video called “how people think digital art is made”
I agree with adding light rather than shadows... nice
I saw this and genuinely thought it was going to be a meme from how short it was but it ended up being super helpful. Thanks!!
Literally solved my problem so quickly. THANK YOU.
Thank you for the wonderful tutorials
new subscribers by the way
UwU
Instant Tutorials are my favorites
other people: watch my 10 course video on how to draw an eyeball
ronillust: heres a minute long video that gives pretty good advice
this is awesome!
...so, all i got to do is, pick my own brush and slide it, and there i got it...i don't f**king understa-
hehe
You got a selection tool, you know? And clipping masks. So that is the easy part.
The hard part is selecting those God forsaken colors!
Just by watching this, I understand the procedure. Thank you!
"think of it as a different light source" this blew my mind :0
Holy shit! This is an amazing tip! Thank you!
this is what i do more often than not. it’s just easier imaging the shading first than how it affects the base color
THAT WAS SO HELPFUL OMG TYSM
This is probably the first time ever I've seen an instagram post as a video on youtube
This is amazing. Great tutorial
"I hope this is helpful.."
Me: YES IT IS!!
This was very useful info. Thanks!
The advice was good but damn that was literally not how its done😂
So Simple and yet so affective
Nice and thx
Why?
Because:
NO long intros
NO 30 minutes+ vids
NO long and complicated explanations
Short and understandable
The “I hope this was helpful” was so wholesome 🥺
Me: *just adds another layer and turns the opacity down to like 40 and uses black*
(Ibis paint x)
Thank you for the tips, trying to start drawing after half a decade of stopping on digital drawing
This is honestly pretty bad for people that want to learn. You are not painting, you are revealing something that you have painted previously by masking it back in. You should show that to your peers if your intention really is to help. The entire "painting" process is fake. and i don't get why you would do that in a "tutorial". seems very misleading
Thank you for the constructive criticism. I used that technique to keep the video short and provide the main concept quickly.. I figured that showing the entire process would slow things down. I see your point though and I'll be sure to keep this in in mind in the future.
You should do more!!!
This video helped more than that 10inute video I watched a week ago 😃😃