2009 FORD FLEX BLEND DOOR ACTUATOR REPLACEMENT passenger side - the really hard one to get to!

Vložit
- čas přidán 24. 07. 2024
- This is a tutorial on how to replace the hard to reach passenger side HVAC blend door actuator on a dual zone climate control equipped Ford Flex. This model is a 2009 SEL, FWD, non-turbo.


I just completed this task and must add that I used 8mm socket attached to a ratchet wrench . Made it so much easier when I removed the plastic surrounding the wire harness . No need to close eyes and try to do it blindly lol. Took about 20 min total and used to power from the other actuator to sync the gear to the same position as the one I removed.
Did you put the plastic surround back on or leave it off? How risky would you say it was to cut it off without damaging the wires? Great job otherwise!
Thanks to your video I was able to change it successfully. I only cried twice.😂 I found that zip ties worked really well for getting that black box out of the way. I sinched it up to get the screws out, and down to access the wiring harness.
Great job! (I think I cried more than you did, though!) That was good thinking on the zip ties too! Thank you for sharing your experience. :)
Just completed the task on my 2014 Flex. Part AA5Z-19E616-C. Your tips about the thumb ratchet and using the other motor harness to get the calibration right were a HUGE help to making the process go smoother. Besides a few choice words and some bloody knuckles... it took me about 45 min. I would not have thought it was possible without a lot more disassembly had I not watched this video. (Note that the motor that came out was labeled AA53-19E616-CB.)
Congrats on a job well-done! 45 minutes is great! I know your pain but am so glad the video was helpful. Thank you for posting the part number as well. I refrained from putting up any numbers in case there are differences in the model years or even models. Cheers!
What a job! My 2014 Flex as well. The Ford dealer told me the part was a YH1779 which I found on Amazon for $40 CDN from Motorcraft. Skinned forearm and sore fingers. NUTS!
@@drewwilson1477 That is the part number I used and also purchased on Amazon. I'll take skinned forearms and sore fingers over taking the dash completely apart! lol.
Thanks so much for this video. It took me forever, but I was able to replace this BDA on my 2010 Flex AWD Limited. There were parts where I practically watched your video frame by frame to figure out how to manipulate the stupid thing in and out. I simply could not have done it without this video. You saved me a bunch of money. Thank you!
Awesome! Glad it helped. I don't know that there is a particular way that worked for me. I think the biggest help was pulling that wire duct toward the passenger side to make enough of a gap to get the motor out. I saw somewhere where someone actually cut out that duct work completely. Obvious risk of doing that is damaging the wires. At any rate, it will be much easier the next time you have to replace it. :)
Hey Brian, did this fix your AC? My passenger side seems to only blow warm air while the rest of the car is cool air. Gonna give this a go! Gotta get that finger ratchet first.
Thanks for the video. This was the only video I've seen actually showing the replacement, and I appreciate you sharing your tips(finger ratchet/close eyes).
You are very welcome! So glad it worked out for you and thank you for commenting!
Thanks for the video. It was a big help.
I ended up removing a few more pieces of trim so I could get a hand in from below and remove the glove box all the way. I also cut away part of the wiring duct plastic to see what I was doing on the rear actuator screw. My fingers were too big to use the thumbwheel ratchet, so I used a flex head ratchet instead. I used doorman actuators. The one directly behind the glove box was a 604 252 and the two on either side of the center stack were 604 253. (Autozone had no clue, I cross referenced the parts off the Ford parts website to Doorman actuators).
To recalibrate the actuators before starting back up, pull the fuse for the climate control (fuse 15 for my model) for 60 seconds, then replace the fuse, turn the ignition to on for 30 seconds to relearn the actuator end points (sometimes this works to reset your existing actuators if they have skipped a tooth or two until you have time to replace them).
This was for an early 2009 Flex Limited, purchased in 2008 (not sure if it made a difference, the Ford site asked) with dual zone, auto temperature control.
Thank you.
I'm about to do mine and I was wondering if (how) factory setting on the part coincides with controls in my vehicle .
This answers my question , thanks again.
Thanks for making this video. It sure helped me out. I did this repair on a 2008 Taurus X, it was a pita. The rear screw didn't get reinstalled because it fell into oblivion, I found it in the blower motor after I started the car to try it out. There was a vibration in the fan and that's where the screw ended up. I had to plug in the actuator and adjust the temperature setting and it turned the splines in the actuator to the point where it would slide on to the splines on the shaft of the blend door. It seems to be working ok now, the temperature was changing with the button settings.
Awesome! Glad you "found" the screw. 😁Great job getting it fixed!
Wow this has been an amazing video of such detail of all the work in changing actuators
Thank you
Thank you! Hope you were able to get yours fixed. :)
Awesome video. Great advice. Couldn't have done it without your knowledge. It was shear torture but I got it.
Thank you for your kind words and glad you got through it. :)
AI auto and appliance.
I like that "close your eyes" idea. I use it frequently at work (electrician) and it keeps mind and fingertips working together in harmony.
I'm tackling this pita project today .
I bought all 3 for the front just because........
......only to find out that there's TWO in the rear.
FML ...
I didn't hear any clicking back there though .
I saw that forum you posted in a previous comment . Up on further investigation , just about EVERYONE consider this actuator a POS and PITA.
Thank You for the video.
A lot of good tips.
I already have one of those thumb ratchets . They're a lifesaver in a lot of instances.
Thanks again .
Thank you for commenting and good luck with the swap. If you are doing all (or most) of them, and can get past this PITA, the rest will seem easy (except for having to become a contortionist under the dash)!
That's was very helpful Also that connector cab I remove that so it's easier to get behind there to replace that actuator
Perfect video! Just finished changing mine out. Was not easy. Very little space and can’t hardly see a thing, but with time and patience was able to get it done. Small finger ratchet thingy is a an absolute must have. Thanks for the video !
Glad to hear you got 'er done!
This video helped a lot. Thank you!
You are very welcome!
Great video. Thanks so much for sharing. Although you make it look easy, I did it in an hour and the car works great.
Thank you for the compliment! The video makes it seem easy due to the magic of editing, lol. I admit I fumbled with the connector for quite a while and there may have even been some expletives shouted in the process! :)
😂thank you for sharing, it was difficult but got it Done !!!
You are welcome! Glad it worked out for ya!
I just did mine today. On a scale of 1 to 10 this is a hard 10 on the difficulty level to replace. Honestly it's just because of 1 bolt that faces closest to the firewall that makes it harder than it needs to be.
It took me 4 hours of searching for a tool that would work and did this in the autozone parking lot without any videos. I'm only just now seeing this.
Yikes! I hope it wasn't too hot where you are at. How did you wind up getting to that bolt?
@@AlsAutoandAppliance guess my reply won't post because I posted a link to what I used. I ended up using something like what was in your video after trying almost every tool, extension and flex extension on the shelf at autozone.
The time it took to actually get it replaced was less than the time I spent trying every tool at the store. It was also 95° outside all day when I ended up replacing the part on top of the fact I had been driving so those water pipes that sit under that part were good and hot. Nothing about replacing that part was enjoyable.
This video is spot on accurate and very helpful for my 2010 Ford Flex with Dual Zone controls.
I carefully cut away the black plastic wire harness shield.
The removal and replacement with the shield out of the way was straight forward and not difficult.
The replacement of the Actuator fixed the symptom of cold air on the drivers side vents and warmer air on the passenger side vents.
My wife is most often the passenger and is very happy that the correct air temperature air is available now for her passenger zone area.
Thank you for your comment and confirming cutting away the conduit is a feasible method of making the job easier. Happy wife, happy life! :)
Okey getting it off sucks so bad lol that back screw and I got big hands lol but I wouldn’t have gotten it done without this video . Thank you so much brother 🎉🎉🎉 and winter is heading in. And just in time it was freezing my wife’s face off lol 😂.
Frozen Wife = unhappy life! So glad you got things taken care of before the chill set in! Awesome work!
what is the function of that plastic shield you are trying to put the actuator behind? Does not look important, can you cut it?
The shield is a conduit that contains wires. Some viewers have said they cut the plastic out, but I don't recommend it, as you could damage the wiring in the process.
Thank you so much for this video. I replaced the easy one and it didn't fix my issue. I am trying to replace this one but it is being a pain. The hole where the gears should go in looks extremely worn. Did yours look that way? Or anyone else's?
It might look worn but the "worn" spot is actually where a tooth is missing to create a "key" so it can only go in one way. Even if you make the actuator shaft position match between old and new, the blend door its self can sometimes move on its own after removing the old actuator and would no longer be properly aligned. You would need to either turn the blend door manually to match the alignment of the actuator shaft, or adjust the actuator shaft to match the door's current position. Hope that makes sense.
In my 13 flex the ac doesn’t come out as cold in the front, and it also won’t change to defrost or feet vent it’s stuck on dash vent. I also only get cold or hot but to get heat I have to put the temperature to HI, and to get out of heat I have to go to lo or push the max AC button. There’s no in between temperature regulation in my flex. Any advice to what motors I need to replace or so?
For the defrost/dash/floor control, I believe that is the actuator that is on the driver side under the dash (opposite of the one in this video). As a quick test, there is an actuator just behind the glove box you can try swapping with the driver side actuator. As for the full blast hot or cold, is that on one side or both sides and do you have dual zone temp control?
very informative, but increased my anxiety watching you take the bad BDA out 😳
will reference your video 👍🏽
Hope everything went well!
Just got finished with both of mine, take your time it's not that difficult.
Do you have a video on replacing the vent selector?
The servo that changes the air to the vent for blowing from defrost to dash to the floor.
That's the one I'm looking for, because it's not blowing to the defroster anymore
@@frosty327 I never found a video, ended up taking it into the shop and it cost me $342 to have fixed.
@@JohnScheppler yeah, everywhere I look it says the mode or Defroster one is located behind dash. And it's the hardest to fix. I going to unhook battery and see if it resets
@@frosty327 I never tried that trick let me know if it works for the next time one of these pain on the access known problems comes up again. Best of luck
@@JohnScheppler Well, when temp lowered to freezing all of sudden it automatically went to the defroster vents when I started up car. I'm keeping them there until spring comes instead of spending money lol
So the finger ratchet is a must. Question - is the back screw really needed? Mine fell to be lost forever somewhere inside there. I guess I can go to a hardware store to find a replacement.
You can probably leave one out, since the shaft fits pretty well into the blend door. If you're in a pinch to get it done, get one screw from the actuator that is behind the glove box and replace that one later.
Hi! Do you know if its the same actuator for the backside? Its sounds the same in the back of the truck, clicking every time
I'm not sure, but check out this post on the ford flex forum: www.fordflex.net/forums/viewtopic.php?t=16903
Is there a recalibration process after installing the new one?
I haven't had to do anything. It seems like it does its own homing sequence once powered on. So sorry for the late response.
Can you tell me about the mini arcade mods I was wondering if you possibly do a tutorial to add more games to the arcade classic mini mortal kombat and add a micro usb slot so it no longer requires batteries if you can do this you would be a legend
Do you know why my heat and ac don't work. Only blows a tiny bit half the buttons won't work. Blows cold air on the vents in the back. 2010 ford flex sel
When you say half the buttons don't work, do you mean they light up but nothing happens or they don't light up at all? Also, I believe in 2010 they started using cabin filters. If those get clogged, that will cause all sorts of airflow problems.
what is inside the wire harness cover? can it be cut out?
The wire harness cover CAN be cut off, but I would not recommend it. Some viewers have mentioned that it did make the job easier.
I have a 2011 and changed it out but mine still blows hot air on drivers side. Do I have to reset the HVAC or climate control module? If so, do you know how?
If memory serves, the one this video addresses is the passenger side. The one you need to get at is on the opposite side and a lot easier to reach. The one you pulled from the passenger side might still be good, so it might be worth a shot putting it into the driver side.
I'm getting ready to do this.. Any tips you learned i should know? 😅😅
Another viewer just recently mentioned using tie wraps (aka zip ties) to hold the black plastic wire chase out of the way instead of a wedge. Some viewers cut away the chase, but that is pretty risky. Other than that, I wish there were a better way, lol. Good luck, take your time, and you'll do great!
Hello ! I just changed the one behind the cabinet, but it still blows cold air. My question is, should I change the one that appears in the video that is difficult?
Are you getting cold air always on driver and passenger side or only on one side? If so, which side?
I have the issue but on driver side . Only cold air on driver side
@@method220279 This would most likely be the one on the left side of the console. It's fairly easy to remove and replace. You can test it by swapping it out with the one behind the glove box (which is also easy to get to).
How many acuators are there? I just replaced the easy one. I gotta replace that hard one too.
I believe there are 4 up front and one in the rear somewhere. I've replaced two (the hard one and one on the driver's side).
what specifically did this fix ? does this actuator solely control the temperature or just switching?
This particular one controls the door that controls the passenger side temperature output only for dual zone climate control systems. When you try to adjust the temperature with the passenger control knob, and the air temp doesn't change, then this actuator is most likely the culprit. Hope this helps. :)
I don’t know if you can answer me this but when I turn on the heater it blows hot air on the passenger side but not the driver. The driver side just blows cold air. The heated seats also don’t work on driver but thats ok. Any way you can help out??
That would most likely be the opposite side of the one this video covers. Much easier to replace. If you want to test things out, you should be able to swap that side with the one behind the glovebox. The only caveat is sometimes the factory actuators are sometimes keyed to where you can't swap one with the other easily. There are quite a few videos on swapping the drivers side one out. It's not SUPER easy, but way easier than the passenger side. Hope this helps, and let us know how it goes if you tackle this. I don't have diagrams with me right now, but the heated seats could be bad connections, broken heater, broken button, or broken controller. If the lights light up when you hit the button, then that most likely rules out the buttons.
@@AlsAutoandAppliance thank you for answering so quickly! The one I replaced on the passenger side had to be replaced because it wasn’t blowing air at all. But works great now after replacing other than the driver side blowing cold air when the heater is on. Should I just buy the same part for the driver side now??
@@JMack007 The part I bought for this video is the same part I also used for behind the glovebox. The one behind the glovebox was originally on the driver's side. The new parts didn't have the key tabs the original ones had, so they fit in the pass side and glovebox positions no problem. I would guess it should fit the driver side too, but I have not confirmed this. What I do know is the the ones used up front are different than the rear passenger hvac actuators. I speak for the motorcraft part. The non-ford parts would be at your own risk but should be ok. I've heard they don't last long, though.
@@AlsAutoandAppliance they’re relatively cheap so it’s a chance I might take haha. I might just have to look at the part itself on the driver side just to see . Thank you sir for all the help, this has been a mystery that has been plaguing me for awhile. I will definitely let you know if it works! Also this video was a huge help as well. It was a pain in the ass to take this part out lol.
@@JMack007 Good luck! Just know that you've already tackled the worst actuator to get to. The rest is mostly a breeze! :)
I am curious, how long about does it take? Ford quoted 5.5 hours
I would say that it took 1.5 hrs TOPS. The 5.5 they quoted was due to them having to remove the dash.
I've done this before on our 2009 Flex 2 years ago, cut the tape that holds the plastic cover to the wiring harness - carefully - and get that stupid plastic cover away from the actuator. The aftermarket actuators are all POS, so you might be doing this again.....as I will be doing after Christmas.
Many thanks for the tip. I thought about cutting stuff out but I like to try to keep the chopping to a minimum. I didn’t really want to cut that clip either but it was getting cold, I was hungry, and the kids needed to eat, lol. I bought motor craft replacements, so hopefully they will last. I took the broken one apart and it failed due to the motor brushes being non-existent and there was no way to repair it. I’m super glad I don’t have huge hands. Have a very Merry Christmas!
@@AlsAutoandAppliance Yes on your distractions, been there on all points!
Merry Christmas to you and yours!
I have done this repair twice. I don't dispute that the aftermarket actuators are POS, but FORD should be slapped about for this horrible part design as the OEM part has a high failure rate too. I have large hands and that is a clear disadvantage for this horrible repair. I estimate it took me 2 hours each time and plenty of swearing and scraped hands. This POS should be recalled universally. I think they use this garbage on a good deal of the line up. Plastic garbage!
@@bladeklick1277 I completely agree. Never had these problems with old-school vacuum servos...ever!
Are these two motors the exact same part? I need to replace both.
The passenger blend door actuator and recirculation door actuator are the same. I can't say for sure if the driver side actuators are the same. The one on the driver side is somewhat easy to access and could be compared to the passenger side recirculation actuator to see if they are the same. I know there are already videos on here covering the driver side and I think there are a couple threads on fordflex.net on this too.
Maintenance guys close their eyes at their desks too.
Not disagreeing at all with this comment. 😎
Took me hours and 2 trips to the store to find the right combination of tools….. to a 3/4 drive thumb ratchet 1/4 drive adapter and 8 mil socket……
Hope you were able to get that sucker replaced, though!
@@AlsAutoandAppliance good to go
is there any other way to access it ?
There was a commenter that said they cut away the plastic shroud over the wires. I have no doubt that would make it easier, but definitely watch where you are cutting if you go that route. Otherwise, I believe the ford manual has you remove a lot of the dash board...does not sound like a fun job at all. Don't give up! :)
@@AlsAutoandAppliance How about remove the glove box to have better access ?
@@ranran1913 yes, removing the glove box will give more range of motion room for arms, but doesn’t make access any easier for that actuator, unfortunately.
Third time replacing mine on 2013 ford flex
Sorry to hear that. Out of curiosity, did you replace with motorcraft part or aftermarket? I used motorcraft and haven’t had any failures yet since replacing them.
czcams.com/video/sQ2afrTj1xY/video.html
THREE TIMES !!
DAMN.
Check this video out .
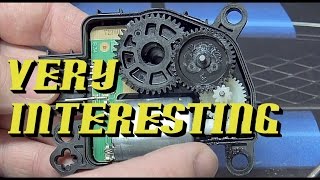
This guy shows the old actuator and it's faults (weak gears and robust contacts) and the new ones we're dealing with (robust gears and weak contacts) .
The new one is more compact and has a rigid housing.
You might be able to break down one of your old ones and jimmy those contacts into correct positioning.
I'm fixin to try that after replacing this p.o.s. !!!
I'll let ya know what happens .
Well everything is simple once you do it, but how in the hell do you get a screw in the back.
For me, that screw is accessed using the "finger ratchet" tool and lots of patience. I feel sorry for anyone who has large hands or fingers. Hope you are successful in getting yours replaced.
Do you need to keep the black cover. I say cut it out
It's not "needed" per-se, but there is the risk of damaging your wires while trying to cut it out.
It is really pain in the ass
Leave it to an engineer to design something like this.
I'm an industrial equipment maintenance tech with a background in engineering and have seen firsthand how inputs during design phase from folks who will be maintaining the equipment pretty much always get tossed because it will cost too much time and money to implement the design change. The mentality is that "we will deal with those concerns after the project is completed and put into service". Then the maintainer has to suffer with the result. Yay us.
the othere video just cut the plastic cover off
I don't like to cut things off but I know there have been a few viewers that did that and everything went well. :)