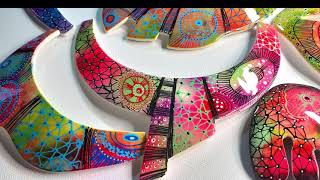
BO PAN PASTELS - Polymer clay tutorial : PanPastel earrings, ceramic effect.

Vložit
- čas přidán 25. 08. 2024
- Tutoriel sans prétention et grandes nouveautés mais avec quelques astuces qui pourront toujours servir. Consultez les conseils ci-dessous. Unpretentious tutorial and great news but with some tips that can always be used. Check out the tips below.
Boutique : helenejeanclau...
Blog : lesethiopiques....
Source d’inspiration pour formes fortuites chez Debbie Crothers : www.debbiecrot...
Technique facile mais qui nécessite un travail de traitement de surface (pour protéger le pastel sec) un peu fastidieux.
Conseils pour le traitement de surface et finitions :
Après cuisson, plusieurs étapes à respecter :
- 1) appliquer une couche de vernis (mat ou brillant) et gratter immédiatement un peu de poudre de pastels secs sur la pièce (si vous faites cette opération AVANT cuisson, la poudre de pastel ne tiendra pas au moment de l’application du vernis ou d’un autre traitement de surface ). Laisser sécher.
Concernant les vernis : chacun à sa préférence (marques, brillant, mat...), mais dans tous les cas, pas de vernis vinylique sur pâte polymère (qui finit par dégrader la polymère). Toujours utiliser un vernis nettoyable à l’eau. Pas de vernis aérosol non plus.
- 2) appliquer un vernis au dos de la pièce. Laisser sécher. Ici j’ai utilisé un vernis mat. Ce n’est qu’une proposition.
- 3) percer votre pièce dès cette étape si vous avez décidé d’y mettre de la résine.
- 4) sur les contours : si les contours sont imparfaits, les poncer. Puis, y appliquer une cire à dorer du type Inka Gold (attention, mettre une cire qui se nettoie à l’eau sinon risque de réaction avec la pâte polymère ; Inka Gold est parfaite pour cet usage).
- 5) appliquer une résine (UV ou bi composants) ou bien 1 ou 2 couches supplémentaires de vernis.
Remarque : Les pastels secs en bâtonnets feront le même travail que les PanPastels.
Easy technique but which requires surface treatment work (to protect the dry pastel) which is a bit tedious.
Tips for surface treatment and finishes:
After cooking, several steps to follow:
- 1) apply a coat of varnish (matte or glossy) and immediately scrape a little dry pastel powder on the piece (if you do this operation BEFORE firing, the pastel powder will not hold when applying the varnish or other surface treatment). Let dry.
Concerning varnishes: everyone has their own preference (marks, gloss, matte...), but in any case, no vinyl varnish on polymer clay (which ends up degrading the polymer). Always use a water-cleanable varnish. No aerosol varnish either.
- 2) apply a varnish to the back of the piece. Let dry. Here I used a matte varnish. It's just a proposal.
- 3) drill your piece at this stage if you have decided to put resin in it.
- 4) on the contours: if the contours are imperfect, sand them. Then, apply an Inka Gold-type gilding wax (be careful, use a wax that can be cleaned with water, otherwise there is a risk of reaction with the polymer clay; Inka Gold is perfect for this use).
- 5) apply a resin (UV or bi-component) or 1 or 2 additional coats of varnish.
Note: Stick pastels will do the same job as PanPastels.
FREE Music for Stream - No Copyright - Musique Libre de Droits - Jazz Blues - Chill • FREE Music for Stream ...


I'm so glad I ran across your tutorial today. I've always wondered how polymer clay artist made that effect! Thank you! Beautiful work!
How beautiful!! I must try🫶🏻Thank you so much for sharing👌🏻
Welcome back! I've so missed your inspiring videos!
Beautiful ❤❤❤Thank You
Merci bcp Hélène j adore 😊
Merci Hélèné pour ta générosité. Tes tutos sont toujours géniaux et tellement bien réalisés tant pour le médium que pour le tournage.
Merci Christine pour ce sympathique retour ! Bon dimanche !
So cool
Thank you for the tutorial for the technique you said didn't need a tutorial. ;-) It is always fun to watch how you work. Layering the bits of dark pastel on top of the clear finish is a very nice effect.
You mentioned that you shouldn't use aerosol finishes, but in the US, there are two good candidates for polymer clay. Helmar Crystal Cote Matte gives a nice matte finish, and UPol Clear #1, which is an automotive spray finish, is a beautiful high-gloss clear coat. Both have been tested and behave well with polymer. (I still can't bring myself to use resin! :-D )
I am not a big fan of varnishes and other resins, but some techniques impose their use. Thank you Heidi for the advice.
Whow, all the others have said it, FANTASTIC
Really great tutorial! Real ceramic jewelry is heavy to wear so this clever way to make ceramic looking jewelry is clever. I will share this tutorial on my blog (beadinggem) in the future so others can come learn from you!
Thanks.
Merci beaucoup
What a treat to see another video of your wonderful creations. Thank you so much!! ❤ cannot wait for the next one !!!
Merci pour ce nouveau tuto...j'aime bcp
Hélène, you are amazing! Thank you so much for sharing your talents with us! 💜
Thank you for showing how you do the “spotsl
Gracias Helene! 🌈😘
Ooohh! Très jolies boucles d’oreilles!! J’adore 😻 Merci d’avoir partagé!
what beautiful designs, going try! fingers crossed thank you so much for your chanel
Once again you have given me encouragement to try something new! Thank you so very much for sharing your talent and ideas!🤩
👌💕
Wow, très beau 😍 merci pour nous montrer! 🤗
Merveilleux!!! Mercie beaucoup
Absolutely fabulous Helene !!❤️
Thanks for sharing your technique, Hélène! I love Pan Pastels and I'm definitely going to try this. It's amazing how much more dramatic they look once you line the edges with the darker color! Merci!
And yes, Carol, the famous detail that makes the difference. Kisses from France!
Kisses to you, my dear Hélène!
Lovely!
Very pretty.
AWESOME!!! just love it THANK YOU Helene!
Wow!!! Very beautiful! I loved it! Kisses, from Brazil, Helene!
Super cute!! I love the pastels!
Very pretty, thank you
Splendid!!
💖💖💖 Merci beaucoup 🙏🏽
Wonderful! Thank you so much for your super tutorial! 💕
Très joli, merci Hélène pr le partage😀
Stunning earrings! Thanks so much for sharing your great techniques & talents with us!
Woooow excellent!!! Thank you!!
Encore des merveilles.❤️ Merci beaucoup pour ton partage❤️. Gros gros bisous 😚
Absolutely gorgeous ❤
Superbe merci Hélène 😘
Beautiful! Thank you 💕
superbe tuto 😍 merci Hélène 😘
Tres joli. Merci pour le partage.
Absolutely love this tutorial and your creation.
Would love to see the description translation in English. Thank you so much for your amazing tutorial, I'm in awe!!
merciii, très sympa et ces couleurs💕💕💕grosse bise
THIS is the style I’ve been looking for!!! Beautiful work and lovely music! What settings do you use on the stripes? TIA
Wow so beautiful.. can you please tell me which shade of pan pastels did you use to the sides.. it looks like a shade of green
Do you bake it after painting it or baking first?
Merci mille fois, chère Hélène! What work surface are you using that releases even soft, somewhat sticky Cernit so easily, please? Thanks so much!
I always work on a glass worktop.
@@helenejeanclaude1599 merci beaucoup!
La pâte noire est-elle à base d'huile ?
Absolutely, gorgeous. I love them. You did a beautiful job on them. Are Pan pastels paint?
Hi! They are actually highly pigmented chalk pastels that look incredible on clay. You can apply them with a brush or with your fingertips. They are a little pricey but honestly, a pot will last you for what seems like forever. You can't compare the color saturation of PanPastels to regular chalk. No contest!
Va rog , îmi spuneți ce colorant pudra aveați in cutiuțe ?
Cum se numește ?
Dear Helene, merci beaucoup pour partager, c'est magnifique! 💜quelle marque de pastel secs recommandez-vous ? (les PanPastels sont si chers..😕), j'ai essayé avec ceux que j'ai mais Les couleurs ont disparu apres la cuisson de la pâte. Faber Castell, est-il un bon choix? Merci✨
Vous pouvez utiliser des pastels secs en bâtonnets, le résultat sera le même. La seule condition : pas de sous-marques dans l'achat de ces médiums. Idem pour les pan pastels (ou peinture acrylique etc.). Je ne sais pas où vous habitez, mais par exemple, éviter les achats de médiums proposés par les enseignes discount type Action, Centrakor etc.
@@helenejeanclaude1599 Merci beaucoup Helene pour le conseille 🤗✨ J'habite en Allemagne. Nous n'avons pas d'Aktion mais je comprends la comparaison.
Bonjour Hélène, merci pour ce tuto très bien réalisé comme tous les autres d'ailleurs. Une question à laquelle je suis confrontée ces temps-ci : comment faire pour que les pièces résinées ne s'incurvent pas après le passage sous la lampe UV ? A l'heure d'aujourd'hui je n'ai toujours pas trouvé de remède à ce problème .... Merci pour votre aide !!! Bonne journée et merci encore de diffuser votre savoir-faire.
Pas de solution miracle, surtout sur une pièce polymère fine. Mettre une 1ere couche fine de résine, quitte à refaire une seconde couche si l'on veut plus de profondeur.
@@helenejeanclaude1599 Merci Hélène pour votre réponse. Je fais des tests en ce moments sur le papier ... c'est encore plus fin et plus galère donc que la polymère qui est plus épaisse .... à quand le produit miracle ?! Merci encore d'avoir pris le temps de me répondre. Bonne et belle journée.