Trailer Hydraulic Disc Brake Conversion - Part 1 - Intro and Pump Installation - Full Time RV Living

Vložit
- čas přidán 29. 06. 2024
- This is part 1 of a 3-part series showing how we performed our trailer hydraulic disc brake conversion.
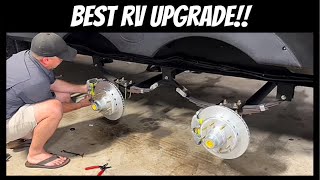
In Part 1 we give you an overview of the Kodiak RV hydraulic disc brake conversion kit we bought for our 2020 Grand Design Momentum 397TH toyhauler. We also install the hydraulic pump. You can find that video here:
• Trailer Hydraulic Disc...
In Part 2 we cover installation of the hydraulic brake lines. You can find that video here:
• Trailer Hydraulic Disc...
In Part Three we install the rotor/hub and caliper assemblies, bleed the brake lines and go for a test drive. You can find that video here:
• Trailer Hydraulic Disc...
Please give us a "thumbs up", hit the subscription button, and then the notification button so you will get a notification when we release new videos.
Hydraulic disc brakes provide better stopping power than the standard electric drum brakes that came with the trailer. We have found that we just can't trust the drum brakes - sometimes they seem to work great and others it's almost like they aren't even there. We also like the serviceability of disc brakes as the pads can be inspected and replaced without removing the hub from the axel.
Here are links to some of the main components we purchased from eTrailer.com. We are not affiliated with eTrailer and we paid full price for all of the parts we bought from them.
Kodiak Disc Brake Kit - 13" Hub/Rotor - 8 on 6-1/2 - Raw Finish - 7,000 lbs
Item # K2HR79
QTY 3
www.etrailer.com/s.aspx?qry=K...
Hydrastar Vented Marine Actuator - 1600 psi
Item # HS38167
QTY 1
www.etrailer.com/Brake-Actuat...
Kodiak Hydraulic Brake Line Kit - Triple Axle - 24'
Item # 24TR-BLKIT
QTY 1
www.etrailer.com/Accessories-...
You can visit our web site at www.nofixedaddress.life. While you're there, check out our gear pages. Please support our channel by making purchases through our gear pages. There is no additional cost to you in doing so.
Another way you can help out is, if you are going to be buying anything on amazon, start by clicking on one of the following links first, then go and buy whatever you're looking for. Again, there is no additional cost to you but it helps us out greatly.
amazon.com (USA) : amzn.to/3cd1mS6
amazon.ca (CANADA) : amzn.to/3c8YWUh
Thanks! - Jak na to + styl


Great job explaining the process looking fwd to viewing parts 2 & 3. Thks for posting
Glad you are finding some useful information in our videos. Appreciate the comment. D&J
Great tutorial on diy installation, thanks.
Thanks
Good brakes are so important, and often overlooked ,thanks for the info
We really hope the upgrade will be worth it. We will test them in part 3. Thanks for watching. D&J.
Dude..you are superman......I did not even know you could do this........you got skills
Wow! Thanks for the complements. Really appreciate your support. Dave
Wow, this is very interesting. This is a great idea. I have a feeling you're going to make this look a lot easier than it is. I'm impressed! :)
The pump installation is very straight forward and most people that know how to do basic repairs could install it. That said, we are talking about a critical system on the rig so anyone that is not comfortable in their abilities might be best to leave the installation to a pro. Thanks for watching and com(ple)menting 😊. D&J.
Good work, always like a good how to video. ~ Diana
Thanks!
D&J
Great information
Glad you found it useful. Thanks for watching. D&J
Good job
Thank you. We appreciate your feedback. And thanks for watching.
D&J
I wish manufacturers did the right thing and put the disk brakes on at the factory.
Absolutely agree! In my opinion electric brakes are not reliable enough.
D
Pretty amazing. Excited to see the follow up videos and I agree for the weight, it seems worth the peace of mind 👍
Thanks for watching. I have not completed the installation yet but if they work as advertised I’m (Dave) sure it will reduce the number of “white knuckle” moments. Thanks for watching. D&J
NoFixedAddress I’ve seen a few videos of folks that have done the same upgrade. Seems like a good upgrade especially with weight concerns. we’ve flirted with it but weight isn’t as big a concern for us. Though there have been many “white knuckle” trips 😬😬
Great video! Thank you for your time in putting this together. I am in the process of ordering the parts. Question; did you have any issue with the wheels fitting onto the 9/16 lugs since they were previously mounted on 1/2 inch lugs?
Thanks. No, there was no issue. The holes in our wheels were big enough. I’d recommend measuring yours to be on the safe side though. Just make sure you buy lug nuts with the same shoulder angle as your existing ones. You will love having brakes that work!
D
Ok, one more question. Any leaks in the oil bath system or need to change clear plastic cap with something not as susceptible to damage?
I have had a couple of leaks over the past couple years but just had to snug up the caps a bit. None of the plastic caps has broken or cracked.
Would it be possible to tie into existing electric brake wires from pin box ,which is already in place ???
Hi. You could use the signal that goes to your existing brakes to control the pump but you will still need to tap into the power supply and break-away wires. The break-away wires will likely only be up in your pin box.
D
Needs more Janice ;)
The video features her hand though. Not enough? I’ll see what we can do to fix that in Part 2. Thanks for watching. D