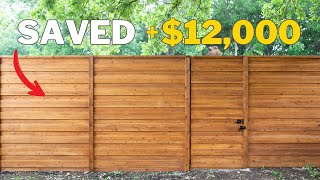
Building a Backyard Privacy Fence With My Son

Vložit
- čas přidán 10. 11. 2023
- Today I'm building a privacy fence with my son Matt! We're going with the simplest, most DIY-friendly approach, but we're also demonstrating a few additional methods that work for certain situations. Cheers! Watch the entire series 👉🏼 • Massive Maintenance Fr...
Do you need help with your renovation project? 👆🏼Hit the JOIN button to access the members only Discord
🔨Consult directly with Jeff about your project
🔨Crowdsource information on the best products and materials
🔨Post your incredible before and after’s
🔨Meet other DIYers
Once you've hit JOIN, go to the members tab to find the link to join the members only Discord 👇🏼
/ @homerenovisiondiy
🔨 PRODUCTS IN THIS VIDEO 🔨
SIKA Postfix 🇺🇸 - amzn.to/3u8HaP8
SIKA Postfix 🇨🇦 - amzn.to/40wyEFJ
DEWALT Pneumatic Coil Framing Nailer - amzn.to/46EJj2A
DEWALT Impact Driver - amzn.to/47nRyRT
DEWALT Beam Level - amzn.to/3SvxzMm
DEWALT Trigger Clamp - amzn.to/40GfltG
DEWALT Tape Measure - amzn.to/468iHXu
OLFA Knife - amzn.to/3SwTTVT
Similar 1 Gallon Sprayer - amzn.to/3SUg74v
Shop Jeff’s favorite tools and great products and help support our next project!
► Shop Wayfair 🇨🇦: www.jdoqocy.com/click-9148559-...
► Shop Wayfair 🇺🇸: www.jdoqocy.com/click-9148559-...
► Shop Amazon 🇨🇦: amzn.to/3g5Wdyq
► Shop Amazon 🇺🇸: www.amazon.com/shop/homerenov...
► Shop Home Depot: homedepot.sjv.io/nBVOX
► For up to date discounts visit our website:
homerenovisiondiy.com
Power your handyman or home service business with Jobber👇🏼
Free 14-Day Trial + 20% off for 6 Months: go.getjobber.com/homerenovisi...
Sign up for our newsletter 👉🏼 homerenovisiondiy.com
🔨 SHOP JEFF'S FAVOURITE TOOLS 🔨
Tape Measure - geni.us/TapeMeasure25FT
DeWALT Mitre Saw - geni.us/MiterSaw15Amp
Level - geni.us/BeamLevel72
DeWALT Circular Saw - geni.us/CircularSaw
DeWALT Sawzall - geni.us/ReciprocatingSawCorded
DeWALT Drill - geni.us/CordlessDrillComboKit
Makita Jig Saw - geni.us/TopHandleJigSaw
Oscillating Multi Tool - geni.us/ElectricMultiToo
WHAT TO WATCH NEXT:
► Easiest Deck You'll Ever Build | Anyone Can Do This • Easiest Deck You'll Ev...
► DIY How to Build a Shed A to Z • DIY How to Build a She...
► Kitchen Remodel Tips To Save Money | A to Z • DIY Kitchen Remodel Th...
#justdoityourself #lovingit #perfecteverytime
If you found this video useful and entertaining please subscribe to our channel 💪
SUBSCRIBE TO OUR SPANISH CHANNEL 👇🏼
/ homerenovisionenespanol
FOLLOW US ON SOCIAL MEDIA
INSTAGRAM👉🏼 / homerenovisiondiy
FACEBOOK👉🏼 / homerenovisiondiy
TIKTOK👉🏼 / homerenovisiondiy
Disclaimer:
Videos produced by Home RenoVision DIY are provided for informational and entertainment purposes only. All material provided within this website is for informational, educational, & entertainment purposes only. Some of these projects, materials, and techniques may not be appropriate for all ages or skill levels. The DIY instructions used here are used to simply breakdown projects to their simplest steps. Please use a clear mind and use all safety precautions while following the tutorials provided by this site. Home RenoVision DIY does not make any claims of the safety of the projects, techniques, or resources listed on this site and will not take responsibility of what you do with the information provided by this site. Viewers must be aware by doing projects on their homes they are doing it at their own risk and HRV cannot be held liable if they cause any damage to their homes. With different codes around the world and constantly changing standards, regulations and rules, it is the sole responsibility of the viewer to educate themselves on their local requirements before undertaking any sort of project. That being said Home RenoVision DIY cannot claim liability with all applicable laws, rules, codes and regulations for a project. Be safe, have fun renovating and ALWAYS stay informed with your local building code.
HomeRenoVision DIY may earn an affiliate commission if you purchase something through recommended links. #commissionsearned - Jak na to + styl


Do you need help with your renovation project? 👆🏼Hit the JOIN button to access the members only Discord
🔨Consult directly with Jeff about your project
🔨Crowdsource information on the best products and materials
🔨Post your incredible before and after’s
🔨Meet other DIYers
Once you've hit JOIN, go to the members tab to find the link to join the members only Discord 👇🏼
www.youtube.com/@HomeRenoVisionDIY/membership
Quick mix for the post holes
You the man! 👍
The Foam strong enough?
Always try to catch one of your videos when they appear in my feed. And appreciate your knowledge and professionalism and over over character. In fact, you may be my favorite Canadian.
Do you stain the backside of the fence as well?
Good job SR
Do you have a video on how to build a bike trail for kids?
What is a whippersnipper??
You can take the length of a side and convert it to inches. Then divide it by 96 to give you how many posts would fit that section evenly space. If it’s not a full number, say it’s 10.5 posts, divide the full side in inches by 11 posts and that will give you the exact measurement for perfectly evenly spaced posts. Rather then just measuring 8’ and then ending up with the last section in each side being bigger or smaller than all the other sections.
What about the other side of the fence ? ? ?
Matt sticks his hand in the stain at 53.15
Why no spacer between the boards? Usually here in Washington state we leave a small amount for swelling of the wood
What kind of screws did you use?
4sure!!
Jeff, you didn't put any would protection on the end of cut pieces after the first ones you cut.
you had me till foam........
question after you have dug your holes set your post in how do you get them all the same length ? Do you have to measure and cut some of the tops off ? T y
This “sh..stuff gets heavy”. Nice save
😊😊😊
Thank you so much I appreciate how you made the fence
New shed series starts next week. Looking forward to it. Cheers!
Looking forward to it! I really need to tear down my existing one and make a new one.
always super informative, appreciate it
i want to put a bigger window in my "she" shed office. A video on that would be nice. Putting in a new header. . .trimmers and king stud all from the inside. With minimal drywall cutting. Not alot of good videos on this. Thanks!
The foam doesn't work. Also when are you due?
Nice job Jeff. I especially love all your grunts and groans while working. I do the same exact thing and sometimes customers will ask me if I'm alright. I tell them it's part of the process of doing this work when your pushing 60.
hey there, just wanted to know if there was any particular reason why you use a roofing gun and not a framing. Would 16 gauge be strong enough too?
Your method is exceptionally straightforward and displays your skilled Craftsmanship!
Well done to both you and your son!
Yes me as a Girl thoroughly enjoyed every minute of this video, very educating💃🏻
How much is the price for a fence like this?
I love this guy you are just perfect
Is it bad if the vertical boards extend down into the dirt?
Whom ever build my fence extended them into what is mud because of how my yard drains, I think it’s causing the boards to absorb a lot of extra moisture over time
great video. found it just in time cuz im about to do the same thing.
Learning so much. Thankyou so very much. 😎
Don't like picking holes but when fitting rails like this you should buy 16ft lengths of rail so that all the joints don't fall on one post...this makes the fence twice as strong...also i wouldn't recommend 8fth centre posts for this tyoe of fence. too much load on the fence as the posts soften up in 15 years...perhaps you don't get the wind we do however
i wouldt hire this guy for a dog shed
Just great: Thanks
Can you burn the ends of the 4x4's that are in the ground for better protection against the elements?
Is this going to last 25 years or 40-50 years?
OMG!!!... Love's It!!!... The privacy is fabulous n sooo beyond important!!!... You just did such a great job and the fact that the table matches the deck!!!... wow...just beautiful!!!... 💜 👍🏾😊...
Level it yep same here in Ireland
damn thanks for this video im going to do 300ft fence myself and this gave me a lot more information and tips
Just love the way you work...
I find that money saving wise. Not wood.wise. I buy the better. Grade green treated, does not say ground contact .but I do have a tar dip treatment, I coat 32 inches of in hole ,of post. And never have I had a problem.. and I pre coat stain, whatever you call it . The rest of post With, a wood treatment sealer. Before I set mount in holes. 25 years later still in excellent condition. The top flat surface needs a dab of sealer or tar like product. Before the post lights go on. Saves about $10. A post. Back fill each hole. Before post goes in with a half shovel full of lite small rock/gravel. NORTH DAKOTA. Than I add a pit run grade gravel with the dirt to repack tamp around in posts.
isn't the ugly side meaning the horizontal boards supposed to be on the inside and the panels facing out? Opposite of the way you did? For example the nice view say from the street and the ugly side seen only by you in your backyard?
I Biuld one fence with the foam 4yrs ago the fences still up on that house the client was placed! Some other people won't trust the foam system for fences the still want concrete......I saw that foam system for the first time in the tv show ( This Old House ) on PBS Houston channel 8 ba k in 2016 or so ! I'm satisfied with that system is so quickly and saving lot of time and finicky effort.
This is great! Saving this video!
Its beautiful,great job.Thanks
Thank you! 😊
Love Sika foam "concrete"! I used it to re-do my whole backyard and put a new front yard fence! Its pricey, but definitely worth it.
Excellent. Thanks.
Cheers!
I was just wondering why you didn't use 14 footers for the rails alternating the joints at every other post and posts being placed every 7 ft. Using 8 ft rails means there's a joint at every post on the poster of 8 ft apart which is a pretty good span. By using 8 footers for the rails it seems you have created a weak link at every post. Just wondering.
Excellent video as always! Wish I could see what it looked like on the back of the fence, since we are required to face the "good side" in the neighbors direction.
u mean plumb at 9:05
I love the comment it rots slowly😅
Looks beautiful!
Excelent work
"don't press on it - let the auger do the work" - as they forcefully apply pressure... this is DIY special - fitting channel name.
wow amazingggg!!!
Wood needs oxygen and moisture to rot. That’s why all posts, power poles, etc. rot at the ground line.
Love it, love it, love it.
Thank you ❤
You're welcome 😊
Excellent !
Good video. Bones to top notch.
A wheelbarrow would be handy...
You forgot some stickers 😂😂 its ok the ground will eat it
Thank you for the informational video. I did my fence just like yours in the video. I want to ask if it is possible to cover the backside of the fence. And how?
Its a prety nice fence, but others than next to the street, why do you need one having such a big garden lot? You could just "waste"/spend 1,5m plant bushes and trees and regual cut tham. during spring or in October. garden time like summmers leaves cover / protect from views and in cold winter once there are no leaves , your seldom in the garden. But well might be a different concept. But again a nice fence with very fine explanation. Thank you
PERFECT timing!
Cheers Vince!
I have watched so many guys tell me "It's so easy!". But you are so through, like having my grandpa explain how to do stuff. Appreciate all your videos. Now I need to ask my neighbor how does he want to split costs.
Like a senile grandpa. Do not follow this "tutorial" as it will only lead to a bad fence. He doesn't know what he is doing and just makes up things as he goes. There are much better, accurate tutorials on youtube you could follow.
could tar the bottom of the post...
I went 5 foot spacings in 2020. I used 2x6 spanned across 3 posts.
"Level" up and down is called, PLUMB. Ha ha ha
Ottawa in the summertime looks beautiful
Thanks Jeff for another great video
Glad you enjoyed it
Enjoyed the video. Some great info. Fence looks a tidy job. Well done both.
Any comments on frost heave, since the frost portion of the foam around the posts will not be smooth? Sonatubes?
Thanks for the fence video dad
Gracias por los videos en español gracias muchas gracias y que pase un buen fin de año y felix navidad
I have a Toyta Venza in that exact color.
i dug mine with a one man auger on a slope, that sucked. Nice to have help! Wish this video had been out 15 years ago! lol
Got to love it when the boss say “let’s” !!! That means you😅
Always!
Matt should have waited a little longer after you sprayed the stain on the fence, I bet he had nine different shades of gray on his nose hairs. Love your videos.
wow you guys got all cinematic with this one
This is great! I would definitely do the final Skil Saw cut across the top of the fence but that's just because my OCD can't abide by seeing the top of the fence all jagged like that! LOL... Great video and great easy method for attaching everything and just good tips for working by one's self. Always love your videos, brother. Keep them coming! Shalom from Tennessee!
PUT ALL YOUR TOOLS A ND THINGS YOUR GOING TO USE IN A WHEELBARROW / MAKES IT E/Z TO MOVE AND GET TO ALL YOUR TOOLS BETTER THAN LEAVING EVERY THING ON THE GROUND ALL OVER THE PLACE / AND IT SAVES YOUR BACK A LITTLE FROM BENDING WAY DOWN AND TWISTING AND TURNING YOUR BACK IN A BAD WAY / GOOD LUCK
Glad to know u used the foam... I was kinda "on the fence" about that. 🤔😂
My boyfriend to the rescue again!!! hahaha
After seeing those fence posts move as much as they did? I will never use foam for a fence post. I love the thought process though.
Great video as always Jeff.
I'm curious about the nails you use because I'm looking for hot dipped galvanized ring shank nails for a siding nailer like yours for my next fence. It look to get the job done way faster than using screws and an impact driver.
Those nails are available in the home depot usa but not in Canada. I live in Quebec city area which is hopefully going to remain a part of Canada.
Thanks a lot.
I agree with the level language, but the triangle thing is called a speed square...😂
In my youth in thr Akron, OH area I spent a season building Cedar. We never built fences the way I see youtubers build. I guess none of them had a man in the company yard pre-building section of fence. We started with a string line to do one side, dig a hole set the first post, set second post then installed a section. Repeat until done. Any adjustment to post to keep run straight was done at the time of install. I know people will say I'm crazy but we never got a single call back on a install. No waiting for concrete to set and come back to finish. One and done.
To each their own.
Does the rear part of the fence have gaps between the panels as I can see through parts of it?
What is the monument with the cross on it?
20:30 i love this guy hahahahaha
Planning to replace our aged fence built by previous owner this March. Not sure how to remove old posts yet. Your video is perfect timing. I think I'll follow your method. Thanks!
Put a piece of 2x4 on the post and get a jack and jack the 2x4 with the post up... When it's too high, move the 2x4 lower and repeat until the post is out
Down south we call the post plumb and the floor level
How did you assure the posts were the same height by measuring the depth of hole?
+Home RenoVision DIY
I'm a new subber from California/Silicon Valley are USA. I appreciate your videos, especially the way you "teach". You are a great teacher/mentor. We will be buying property soon (In the country Area of California) I am handy and a fast learner now, but I never had to build a fence. Thank you both for your very useful videos and the time you take to make and edit them. I am also in the market for a truck. Can anyone out here on the internet recommend a work horse of a truck without breaking the bank? I'll be needing one for our new property.
Thank you Angel from The Bay
The finished look is really nice, well done overall. I wouldn't use the foam personally, but the biggest thing is the boards rotting from the ground up because you can't stain the bottom once it's installed and it takes ages to dry out every time it rains. Our fence is getting ready to be redone and I wanna do a concrete footing with galvanized post bases. A little more work and money up front, but the fence part will be a breeze and last much longer.
Hello my friend❤❤❤❤❤❤
Fair enough!
We did the ground contact 4x4 with the viynl post sleeve over it and sunk it in concrete. Luckily we have sandy soil so it drains well. We still added gravel in the bottom for drainage. Caps on the tops of the viynl post so no water gets into the post and there is no exposed bare wood so the viynl covers the post in the cement. Boy is it solid! 😅 We had a big windstorm and the neighbors big 60 ft. Pine tree fell on our new fence(almost gave us a heart attack! Since we had just finished installing it the year prior). Top half of the tree ended up in our yard and laying on our fence. Knocked out the power lines so crews had to bring in big equipment to fix the lines and cut the tree out of the way. Our fence barely had a scratch! 😊 The fence still looks great after 8 years. 👍 The fence is fixed panels so they are stronger too.
We just finished another section of fence with galvanized posts. We love it! When the wood rots(and it will) all we have to do is pop off the boards and attach new ones. So both are fence options that work well for long term use. No part of my fence is wood alone in the ground/cement Seen too many saggy fences in my time... It is worth the extra expense. 😅 We did it ourselves. It looks great! Saved a ton of money doing it ourselves. Even got a written agreement/contract with our neighbors to share the costs/permits, etc. The city suggested working with the neighbor and getting a written agreement to avoid conflict and have something grandfathered in. 😊
There is an ancient, I do believe it is Chinese possibly Japanese. Where you char the wood and then add oil to it. Whether it be canola or whatever you have available. Some ppl have used, used Motor oil. Most, if not all of these structures are still intact to this day! We are talking 300+ years.
I used this type of foam to build my fence in 2012, nothing has changed eleven years later. From Montreal.
Great video, and I fully intend on building this, this coming spring. My question, how would I go about insulating the floor? I want to use this as a "game room" for pinball machines and arcade games, and intend on insulating the walls and ceiling, and putting heat and a window AC in it. Thanks!
Nice bird shot @ 15:20 !