
- 3
- 218 130
builditstudio
Canada
Registrace 25. 02. 2021
Welcome! It's extremely satisfying to build something with your own hands. My goal is to make beautiful DIY wood projects possible for everybody
How to Build an Outdoor Chair - Start to Finish
I'm really happy with how these chairs turned out. They have a modern rustic look to them and they look fantastic on my front porch. There are a few angled cuts and it's easiest to assemble with an extra set of hands to help out, but it really is easy enough for any skill level to complete. If you want a truly rustic looks, use live edge pieces for the seat and chair back.
One chair uses four 2x4's and two 1x6's making it quite economical to build. I built two of these in October 2022 using cedar, and the total was $230 cdn (in Toronto).
Minimal tools needed:
Mitre saw
Power drill
Tape measure
Orbital sander (or sand manually with some gold old elbow grease)
C-clamp
Printable plans with step-by-step instructions:
www.etsy.com/ca/shop/builditstudio
Build Material:
Choose a wood that can withstand the elements in your area. Hardwood or pressure treated boards are a popular choice. Pressure treated lumber is easy to stain, durable and budget-friendly. You can also use cedar, redwood or another rot-resistant wood. They have a higher upfront cost but they’re extremely durable and look very nice.
Finishing
Pressure treated wood often accepts stain better after it weathers. Wait until the yellow-green wood turns gray, then apply your stain. If you don’t use pressure treated wood, stain your picnic table right away. Protect it with a weather-resistant polyurethane. Make sure you fully seal all surfaces, covering the sides, top and underneath. When staining pine, use a conditioner first to prevent blotching
#outdoorchair #patio #woodworkingplans
zhlédnutí: 18 848
Video


DIY 2 Bucket Planter | Easy to Build, Beginner Friendly | Backyard Garden
zhlédnutí 779Před 2 lety
This Bucket Planter design is perfect for a small space. Build it for your front porch, condo or apartment patio, or many other places. By planting in buckets, you can easily change out your soil for a new planting season. Search for how-to videos to make your buckets self watering! Minimal tools needed: Circular or Mitre Saw Power Drill Hammer Tape Measure If you don't have a saw, you can even...
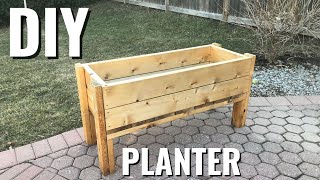
DIY Raised Planter Box - EASY Plans - Backyard Garden
zhlédnutí 199KPřed 3 lety
I built these planter boxes as a birthday gift for my mom so she can grow produce in her backyard. This is a simple design that looks beautiful and is easy to build Minimal tools needed: Circular or Mitre Saw Power Drill Tape Measure If you don't have a saw, you can even get your lumber cut at the store if you take them a cut list. At the time of building these in July 2020, it cost me $107 Can...
ooooooo lovely, going to make it😁
Happy to hear. Enjoy!
Excellent work but seems unlikely to do it without a mitre saw as I only have circular and jigsaw
You can do with circular
@@raywill5973 thank you, I will try to do it
@@jerrychetty2524ok but it will be difficult honestly lol
Thanks! And yes, I agree. Mitre saw is listed in the tools needed
Awesome work dude, what is the gap between the timber on the base of the planter for drainage?
Thanks! Yes, it is simply for drainage
@@BuilditStudio_Woodworking I think I meant the space of the gap
Oh, my mistake. It's been quite a while since I've built one of these, so I don't know off the top of my head. But I believe I explain that in the video
Exelente proyecto felicidades saludos desde Costa Rica pura vida bendiciones me gustaría saber las medidas x favor gracias
How thick are the boards?cant find it anywhere
The nominal dimensions (the sizes used to describe the approximate characteristics of the product rather than the exact dimensions) are: Frame - 2x4. Seat slats - 1x6 or 5/4x6. The actual sizes are smaller, but these are the thickness x width that you need to shop for. See 1:03 of the video for complete material list
For those whose miter wont do 60 degrees for the arm rests you can do a 45 but instead of 1 inch measure 1.5 inch up and you have to drill a pilot hole for the spade bit and take it easy. Chair is great looks amazing. It’s comfortable and it’s solid.
Thanks for providing this helpful tip. Glad you like the chair!
thanks for this ... nice
you're welcome. Enjoy the build!
great job I'm going to try it thanks for the video
You're welcome!
Thank you for sharing.
My pleasure!
Great job, for your first video!
Thank you so much!
Very nice. Simple, sturdy and cost effective!
Boa noite meu amigo Não entendo o seu idioma , mas vc voce esta de parabéns com o seu trabalho
Thank you for showing us something we can actually make with ordinary tool Nice clear instructions I've been looking for a vid like this for a long time great job
Thanks David, happy to hear to enjoyed it. Would love to see photos of your finished chairs
Got the plans but no mention of what degree for miter cuts?
Hey Steve. I don't have them in front of me right now but check the cut details. I made digital images of every cut with the angles. Let me know if you have any issues
Thanks But for some reason I cant see the angle cuts. I got everything else. I will figure it out. Thanks again
@@stevewhite7602 odd. I'll take a look when I can get to my laptop. Hadn't heard of this happening before. Sorry about that
I'm an idiot. I got it, just over looked it Sorry to bother you Cant wait to make a couple Thanks man@@BuilditStudio_Woodworking
@@stevewhite7602 take a look in section 4.0 Special Cuts. The mitre angles are shown in red font. If you don't see it, shoot me a message on Etsy so I can see your order and I'll send it to you again. Cheers
No squares were harmed in the making of this planter 🤣 No clamps, no angles checked just winged it and eyeballed it.
No need to complicate things for a planter box
Thanks! I`ve been looking for simple, good looking chairs to make for our house in Maine.
Great! Let me know how it goes ;)
Excellent! Thank you for sharing.. Will make one tomorrow
You're welcome! Please share some photos after you've planted
BRAVO MILLE FELICITATION JE VOUS DEMANDE SI POSSIBLE MENTIONNE LES MESURES DE COUPURE DU BOIS ETAPE PAR ETAPE POUR EN VA ESSAYEZ DE FAIRE UNE CHAISE COMME TOI MOI JE NE SUIS PAS MENUISERIE JE SUIS AGE DE 75 ANS JE SUIS SIMPLE RETRAITE COMME J AIMERAI BIEN ME BRICOLE JE NE PEUX PAS CROISER LES BRAS SINON JE TOMBE MALADE DONC LE TRAVAIL C EST DU SPORT POUR LE TEMPS AVEC LE BOIS MIEUX ALLER AU CAFETERIE OU FREQUENTE LES GENS MOI JE NE FREQUENTE PERSONNE SI POSSIBLE MENTIONNE LE MESURE DU BOIS LONGEUR? LARGEUR ET LA HAUTEUR ET LE EPAISER DU BOIS MERCI AMAR HADJI ALGERIEN ALGERIE BON TRAVAIL BRAVO CONTINUER VOU SERAIT LE PLUS GRAND PROFESSIONNELLE .
I made these planter boxes and I love them!! I made a couple modifications because I wanted them lower to the ground, but they came out great. Thanks so much for this video!! You literally saved me a ton of time and money!
Happy to hear that it worked out well for you!
Great work here! I think I'll try this design too. Looks simple.
Very nice work!
Thanks!
After a rabbit hole of planter box videos, I have to say....this one is the best! Making it tomorrow, thanks Brad!
Glad you find it helpful!
Thank you! You make it so easy to follow coz you talk through everything! It looks great too....Please do some more! I am hoping to build a ramp and platform for my little dog so that she can look out the window. At the mo she lies on top of the sofa (has done for 11yrs now!) but it's getting harder for her to jump up and, I want to move the sofa away from the window!
Great to hear!
Just found this after much research on how to make a raised planter and am soooooooo happy! Thank you for your detailed and easy to follow demo. Brilliant! Also just realised it's 2 years old so am very much looking forward to browsing your Channel. Thanks again ✌🏽💜
You're welcome. Happy you find it helpful
Thanks for watching! Plans are available here www.etsy.com/ca/shop/builditstudio?ref=profile_header
Thank you!!! This is going to make building my boxes so easy.
You're welcome, glad you enjoyed it
Great video keep em coming 👍
Thanks, Wayne!
Made two of them. Excellent tutorial! Thank you!
Glad it helped!
Your mom is one lucky lady:) Cool build btw...I'm going to make one this week:)
How did it go?
nice one man, keep it simple and nice!
Will you be my son!!! Mine is a computer geek and not handy. I might be able to make one myself! thanks for all the info.
LOL
GOOD JOB
Thanks, Dave!
Well done, Brad, for your first video! Simple enough for even an almost newbie to woodworking to have confidence in giving it a try!
Thanks! Happy to hear that you enjoyed it and my goal of making woodworking accessible to all is being reached
Very nice - another great vid, thank you. Can’t wait for many more.
Appreciate the support. Anything in particular you want a DIY video for? Cheers
great job, and why are you wearing sun glasses in the shop??
Thanks Ahmed. Those are my prescription safety glasses 🤣
are the 1 x 6 fence pickets
Hi Ted. I used rough cut 1x6 that I bought from a lumber mill. They have an actual 1 inch thickness. You can use fence pickets but they really aren't that much cheaper than what HD sells as 5/4 x 6 cedar. If you go with fence pickets, adjust the shorter 2x4's used for the legs. For the most economical build, find a local mill and to buy rough cut lumber from. Cheers
Great job man. Well done. Can’t wait for the next vid.
Thank you, Paddy Boy! I'm working on a rustic outdoor chair to post next. Built the prototype already and will film the corrected version of the build soon. Cheers
Best planter on the net. Well done sir.
Thank you, sir!
NICEEEEEEE WORK THANK YOU
Glad it was helpful!
Sturdy simple and practical ! Just making one similar design ! Thank you .
Well done sir.
What a great son to do this for your mom.
Great plan, but the total lumber cost is amost $400 for two of these planter boxes. It's NOT CHEAP at all. Or am I not finding the correct place to buy lumbers? (I'm searching on homedepot/lowes and similar stores)
Find a local lumber mill and price rough cut wood, it's your best bet. Unfortunately lumber prices have gone way up since I built these
@@BuilditStudio_Woodworking Thanks for the advice!
Very good and easy video to build a planter. Congratulations!
Thank you very much!
Cut list at 03:08:00
[̲̅p][̲̅r][̲̅o][̲̅m][̲̅o][̲̅s][̲̅m]
Yes thank you for your pattern. I will sure use it over and over.
You're welcome. Glad you like it!
Thanks for watching! Digital plans with a 2x4 frame are available here: www.etsy.com/ca/shop/builditstudio
Thanks Brad! Nice design. I'm going to add a top rail for looks.
Hey, Great work! This is from Family Handyman. We are really interested in your video and want to partner with you. Please share your contact information email address or any social media handle where we can share the information with you. Thank you