
- 6
- 200 021
Andrew's Garage
United States
Registrace 20. 03. 2020
FreeCAD 0.18: Dynamic model with a datum line & plane in Part Design
Before making this video I spent several hours trying a lot of other methods, reading forums, watching tutorials, etc. It might be obvious to seasoned users of FreeCAD, but it was not at all obvious to a newbie like me.
So, here is a little how-to, hopefully saving you a bit of time and maybe inspiring some new creations.
I love what can be done with FreeCAD, even if it can be frustrating at times and even if it crashes occasionally.
(The version of FreeCAD I am using is 0.18)
So, here is a little how-to, hopefully saving you a bit of time and maybe inspiring some new creations.
I love what can be done with FreeCAD, even if it can be frustrating at times and even if it crashes occasionally.
(The version of FreeCAD I am using is 0.18)
zhlédnutí: 1 099
Video


Turning a hexagon plate (mahogany, maple, resin)
zhlédnutí 463Před 4 lety
I had this idea of making a six sided dowel plate... I love the shape and how mahogany shines through the resin on the sides. What do you think?

Making a 7-sided plate
zhlédnutí 187Před 4 lety
It's a 4 in the morning half-dream idea turned into reality a seven sided plate.
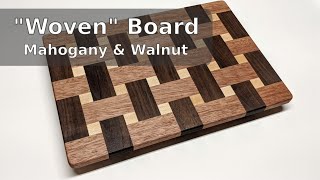
Making a "woven" cutting board
zhlédnutí 198KPřed 4 lety
This is a cutting board with a "woven" effect made from walnut, mahogany, and hard maple. It is the first of this kind for me and I over engineered it a little - I don't think biscuit cuts were really needed and they complicated things quite a bit. Would you have done it differently? Post in comments. The music is by Unicorn Heads: unicornheads.bandcamp.com/

Repeatable small pieces jig for table saw
zhlédnutí 175Před 4 lety
This is a very simple jig and is not my invention of course - I saw somebody else use a similar thing here on youtube.

How to slightly round cutting board sides
zhlédnutí 174Před 4 lety
Rounding sides of a simple walnut and maple cutting board with a quick template and a hand-held router. Mainly testing the waters with CZcams.
nice board but holy crap! keep your hands away from the table saw blade, one kickback with your hand an inch beside the blade and youll be missing fingers or more... and dont fidget and play around with stuff beside a blade thats still spinning down... yeohza, im shuddering when i see this stufff, i get this feeling down my spine like omg no jeez fuck dont... haha
Were the biscuit cuts to allow movement resulting from cross-grain glueing?
Nicely done!
If you're going to go through the trouble of using biscuit slots then why didn't he use splines or biscuits?. Totally unnecessary given todays glues and the thickness of the wood. If he had a past failure he must have done something wrong.
I've been on a cutting board video binge (Christmas is coming) and not one of them used biscuits, so I would not use them. I've done a lot of glue-ups and have stopped marveling at the adhesive strength one gets out of glue. Given that 0.090" thick acoustic guitar tops (which are under tremendous strain) are often glued together with just tape providing the clamping force, I'd say that a 1" or thicker clamped glue up for a cutting board has no chance of failure.
I dont think biscuits were necessary,a basic glue up and proper clamping would achieve the same result!
Beautiful piece. Thanks for sharing your work.
perfeito. so fiquei com uma duvida: por que os cortes nas laterais das peças?
qué función tenía la canal que hiciste con la rutiadora?, no tiene ningún sentido.
cool
You’re right. Definitely didn’t need the biscuits. Great result though. 👍
What size are the cubes? I read and got the large block dimensions.
They are 3/4". And the blocks are 3" x 1.5". Good luck!
Damnnnnnnnnnn
Abraços, muito bem feita... inspirador.. Brasil
Very beautiful and creative work, amazing craftsmanship. Thanks for sharing your work with us 🙏
Думал-думал, как плетение сделать без таких заморочек, но так и не догадался. До просмотра ролика посчитал, что автор с гениальной смекалкой, поставил лайк - а он разочаровал...
Hey man I’m trying to recreate this board I’m just wondering how you calculated how big each individual piece had to be?
The width + two small cubes must equal the length. Then you can play with whatever is available and looks good to you. In my board the rectangles are 3" x 1.5" and the little filler block is a 0.75" square.
Really nice work. 👍👍
Beautiful work. Can u tell me what is the use for two wooden sticks put on both side of the board before using DeWalt planer?
Thanks! The added sides before the planer were to avoid "sniping", where the board slightly jumps and cuts a groove as it comes off the planer puller wheels. Not super necessary to tell you the truth, I made boards without them afterwards.
You need to build a router table
I sure do :)
Excelente obra de arte 🇧🇷🇧🇷🇧🇷
If you want to do it yourself, just look for Woodprix. There is everything you need to do it :)
Looks good brother! :)
Nice work. Wondering if you have had any issues with wood Movement?
Was thinking the same thing. With the grain going both ways my first worry would be gaps and possibly cracking.
Nice work!
Excelente .
definitely the biscuits are not needed. They help with alignment, but don't add any strength. Beautiful job, tho.
Nice job Andrew!
Beautiful board. A couple questions, why did you rout a groove into the pieces? And how long did it take to put them together (I just worry that the glue would start to dry at one end before I'm able to get it done and clamped up).
I put the grooves in to then connect pieces with biscuits. It's barely visible in the video though, at around 4:27 mark. I was just afraid that it would be brittle otherwise, because I am gluing cross grain. For the glue -- that was my worry as well and I used Elmer's Glue All. It has much much longer working time than the typical wood glue. I like it. Good luck!
i've never seen woodworking made so difficult . put on some shoes. lol
Veri complimenti!!! Semplicemente fantastico. Saluti da Milano.
You made a extremely good CAD videos for a newbie. You should make many more. We discovered your FANTASTIC video. Very well done. You know your cad. We would love to subscribe to your videos but there is a small problem. Some of us have bad eye sight. Due to you knowing cad so well the pointer disappear at times due to moving so fast. Not your fault but the also cursor's problem. A lot of FreeCad sites already fixed this problem for us. As a example of one is - Andrew CAD, not advertising so only mentioning this one but if you want to see more I can name them from the lot. The real problem:- Normally the cursor is very small and black or white letting it disappear from our eye sight. If you could make it bigger and Bright Red with a light Yellow Hue around it. For WINDOWS Google catnip5 . Scroll down and you will find the cursor catnip5 page. UBUNTU have a fix by downloading Tweaks where you can do some tweaks and also then go to your Settings -> Accessibility. Beware Zoom "might" make your pointer jumping but if not it is fantastic, most of us use it. Thank You So Much, we would Appreciate it Really a Lot.
Great work! Are the dimensions of the pieces available? Thx!
great piece, but, youre correct the biscuit cuts were completely unnecssary
А для чего тогда фрезой делал прорези .если клеил просто так ?
Absolutely beautiful! Got a new subscriber.
I saw the biscuit cuts but thought maybe I missed they use. I agree that was a bit of overkill but at one point, it looked like you were going to actually weave a thin slat between the wood. However the overall effect is especially nice when polished. Thanks for sharing this video with us and remember Texas is watching.
It was really nice to watch. Congratulations👏
Muito bonito! Parabéns!
beautiful. Absolutely beautiful. Although, I got kinda nervous when it went through the planer. I've tried that before and it snapped the chess board i was working on into 7 pieces.
Just exploded a beautiful hardwood inset last weekend (a 3d-ish chevron pattern in cherry, walnut, and purpleheart - was going to be the center of an accent table) so I feel you real hard!
@@maggieharrison9280 sucks man, I hope it was somewhat salvageable. I've found it is just safe to use a drum sander rather than a thickness planer whenever there are contrasting grains or end grain facing up.
@@VaderViktor For sure. We've only got an orbital sander atm, and I figured that'd take forever so I went to a buddy's shop to borrow his planer, and, well ...😅I should be able to cut off the chewed up bits and glue it up into something pretty, if not quite what I'd intended. And hey, nothing like experience as a teacher!
@@maggieharrison9280 Get a shelix cutter head for your planer.
Beautiful Job mate
Good stuff! How did you remove the plywood edging after running it through the planer?
I just cut them off with a table saw.
@@AndrewMGarage Why put it on in the first place ?
@@davidheard3116 The idea was to avoid snipe by the thickness planer. They extend beyond the size of the board, so if there is any snipe it happens on these discarded side pieces and not on the board itself. On the board of this size it turned out to be unnecessary - it's heavy enough, but on smaller pieces I still use that trick.
Гарна робота!
Very nice!
Don’t understand what the slots were for. Also, I don’t think mahogany is a good cutting board species. Especially face or edge grain. Cherry would be better and look great in this pattern.
It's glued cross-grain, so I put in cookies/splines for stability. Yes, cherry would have worked well I think, I just did not have any.
How much could you charge for such a cutting board? $$$
Also, the amount of setup for those rounded corners is wild 😂 Why not just round them off with a sander or cut them with a jigsaw or something?
A belt or a disc sander would have worked too I think. I just don't have them :)
@@AndrewMGarage, just seems like sooo much setup but I guess it also guarantees perfect, matching rounded corners so 🤷♂️
I just want to say that I'm fascinated by the handles on the router. They look so smooth and comfortable. Are they custom made? But, it looks like they would be a little too easy to slip out of your hands and a router is the one tool I'd be most afraid of losing control over.
No, the handles are not custom. Standard handles that come with a Bosch router. I like them, they are comfortable and not slippery at all.
@@AndrewMGarage cool. Thanks for the info.
Beautiful job! Watch those fingers! Safety first.🌲🌳
Not worth the effort